Perfect Ramen Eggs Ajitama- Easy Marinated Soft-Boiled
Ramen eggs, also known as Ajitama, are the unsung heroes of a perfect bowl of ramen. We all know that glorious moment when you lift those perfectly marinated, jammy-yolked beauties from the broth. It’s not just an ingredient; it’s an experience. These aren’t your average hard-boiled eggs. What makes ramen eggs so special is the magical transformation that happens when they soak in a savory, umami-rich marinade. The whites develop a beautiful, slightly translucent sheen, and the yolks become unbelievably creamy and infused with layers of flavor. They’re the star that elevates simple noodles into a culinary masterpiece, adding that indispensable touch of savory sweetness and a delightful textural contrast. I’ve spent countless hours perfecting my ramen egg recipe, and I’m thrilled to share it with you!
Ramen Eggs (Ajitama)
There’s something truly magical about a perfectly cooked ramen egg, also known as ajitama. That jammy, custardy yolk, infused with savory-sweet soy sauce, is the crowning glory of any bowl of ramen. They’re not just an ingredient; they’re an experience! Making them at home is surprisingly simple, and once you try them, you’ll be adding them to everything – not just ramen, but rice bowls, salads, or even as a standalone snack. Forget the store-bought versions; these homemade ajitama are leagues above. The key is a delicate balance of boiling time for that perfect yolk consistency and a flavorful marinade that seeps into the egg. Let’s dive into how you can create these little flavor bombs.
Ingredients:
*Note on eggs: For the best ajitama, I highly recommend using eggs that are a few days old. Fresher eggs tend to have a stronger membrane that makes them harder to peel. Don’t worry if your eggs aren’t perfectly fresh; a few days in the fridge usually does the trick!
Cooking Instructions:
The process of making ajitama can be broken down into two main phases: cooking the eggs to the perfect jammy consistency and then marinating them to infuse them with flavor.
Phase 1: Perfectly Boiled Eggs
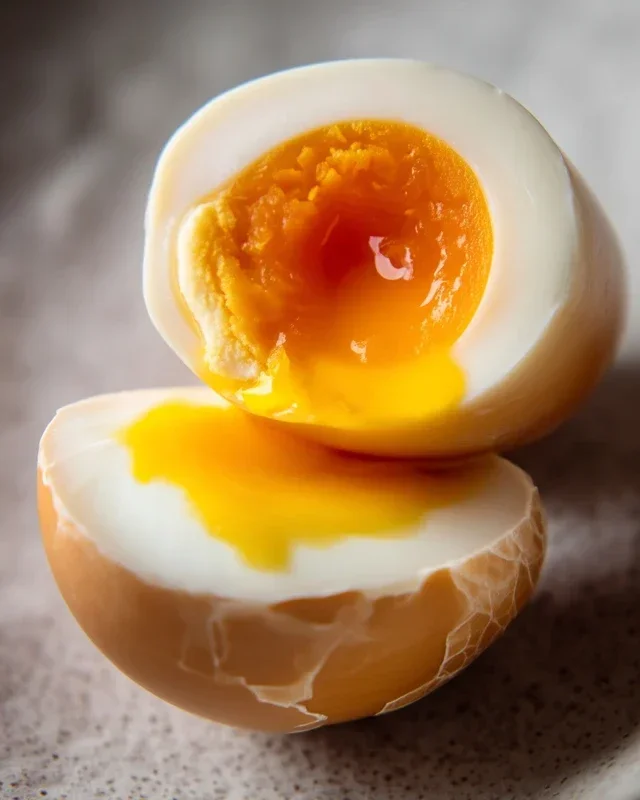
The foundation of a great ajitama is the perfectly boiled egg. We’re aiming for a soft-boiled egg with a creamy, jammy yolk and a set, but still tender, white.
1. Prepare Your Boiling Water: Start by bringin extractg a medium-sized pot of water to a rolling boil. You want enough water to fully submerge your eggs. For an easier peeling experience, I often add a splash of vinegar (about a tablespoon) to the boiling water. This helps to slightly toughen the egg white proteins, making them less likely to stick to the shell when peeling. Some people also add a pinch of salt, but I find the vinegar to be more effective for peeling.
2. Gently Add the Eggs: Once the water is at a vigorous boil, carefully lower your eggs into the water. You can use a slotted spoon or a spider strainer to gently place each egg into the pot, one by one. This prevents them from cracking against each other or the bottom of the pot. If you’re using eggs straight from the fridge, be extra gentle. If you’ve brought them to room temperature first (which can also help prevent cracking), they’ll be a bit more forgiving.
3. Boil for the Perfect Time: This is the crucial step for achieving that coveted jammy yolk. For a soft, jammy yolk with a slightly runny center, I recommend boiling the eggs for precisely 6 minutes and 30 seconds. If you prefer a firmer, but still gooey yolk, aim for 7 minutes. If you like a fully set yolk, go for 8 minutes, but remember, ajitama is best with that characteristic jamminess. Immediately after the timer goes off, you need to halt the cooking process.
4. Ice Bath and Shock: As soon as your timer is up, use your slotted spoon to carefully remove the eggs from the boiling water and immediately plunge them into a prepared ice bath. An ice bath is essentially a bowl filled with ice and cold water. Let the eggs sit in the ice bath for at least 10-15 minutes, or until they are completely cool to the touch. This rapid cooling stops the cooking process and, importantly, makes peeling significantly easier. The sudden temperature change causes the egg white to contract away from the shell, creating a gap.
Phase 2: The Flavorful Marinade
Now that your eggs are perfectly cooked and cooled, it’s time to let them soak up all that delicious marinade.
5. Prepare the Marinade: While your eggs are chilling in the ice bath, let’s get the marinade ready. In a small saucepan, combine the light sodium soy sauce, water, non-non-non-alcoholic alternativeic non-alcoholic mirin, and granulated sugar. Place the saucepan over medium heat and stir gently until the sugar is completely dissolved. You don’t need to bring it to a boil; just warm it enough to incorporate the sugar. Once dissolved, remove it from the heat and let it cool slightly. This is your flavor powerhouse!
6. Marinate and Wait: Once the eggs are peeled (I’ll tell you how to peel them below!), carefully place them into a resealable bag or a small, airtight container. Pour the cooled marinade over the eggs, ensuring they are fully submerged. If you have any leftover marinade, you can add it to the container as well. Seal the bag or container and refrigerate for at least 4 hours, but for the best flavor penetration, I highly recommend marinating them for 12 to 24 hours. You can flip them occasionally to ensure even coloring and flavor.
Peeling Your Ramen Eggs:
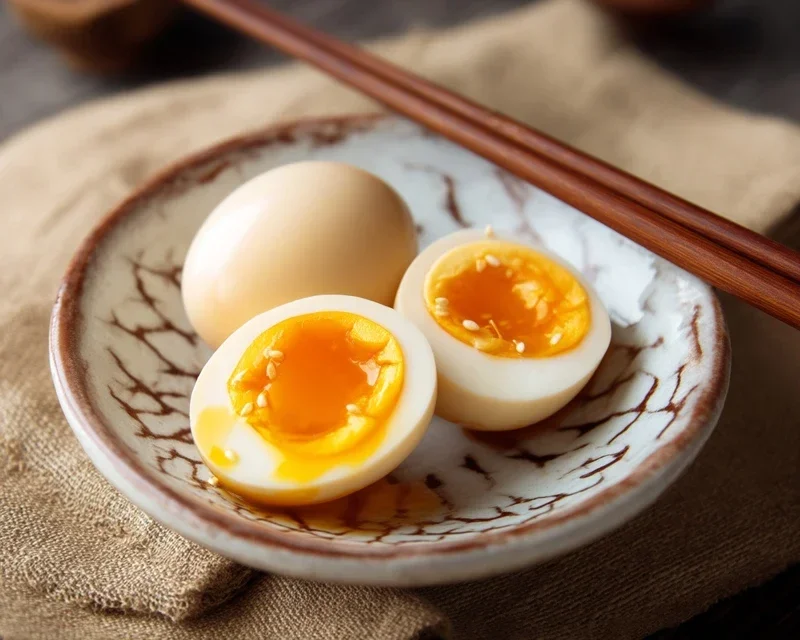
After they’ve had their time to marinate, it’s time to reveal the beautiful ajitama. Gently peel the eggs under cool running water. The ice bath should have made this much easier. Start by gently tapping the egg on a hard surface to crack the shell all over, then carefully peel it away. If there are any stubborn bits, the running water can help to wash them off. You’ll notice a beautiful, slightly amber hue from the soy sauce marinade.
These ajitama are now ready to be sliced in half and placed atop your favorite ramen. The rich, savory-sweetness of the marinade, combined with the creamy yolk, is pure comfort. Enjoy!
Conclusion:
There you have it! Creating delicious, perfectly marinated Ramen Eggs, also known as Ajitama, is surprisingly simple and incredibly rewarding. This recipe is fantastic because it elevates a humble ingredient into a flavor powerhouse that can transform any dish. The rich, savory, and slightly sweet marinade seeps into the soft-boiled egg, creating a creamy yolk and a beautifully seasoned white. It’s the quintessential topping for a bowl of ramen, adding that essential umami kick and delightful texture. But don’t stop there! These marinated eggs are also wonderful on rice bowls, in salads, or even as a standalone snack. Feel free to experiment with the marinade; a dash of chili flakes for heat, a sprinkle of sesame seeds for nutty depth, or even a hint of gin extractger can add exciting new dimensions to your Ramen Eggs. I truly encourage you to give this recipe a try. It’s a game-changer for anyone who loves bold flavors and a touch of culinary magic!
Frequently Asked Questions:
How long do Ramen Eggs last in the refrigerator?
Once marinated and stored in an airtight container with some of the marinade, your Ramen Eggs should stay fresh and delicious in the refrigerator for up to 3-4 days. Make sure to keep them submerged in the liquid for best results and flavor retention.
Can I make the marinade ahead of time?
Absolutely! In fact, it’s recommended. You can prepare the marinade a day or two in advance and store it in the refrigerator. This allows the flavors to meld beautifully, and then you can simply add your cooked and cooled eggs to the ready-made marinade.
What if I don’t have soy sauce? Can I substitute something else?
While soy sauce is the classic base, you can get creative. Tamari is a good gluten-free alternative. For a different flavor profile, you could experiment with coconut aminos, though the saltiness and sweetness will be different, so you might need to adjust accordingly. However, for the authentic Ajitama taste, soy sauce is truly the best choice.
Ramen Eggs (Ajitama)
Soft-boiled eggs marinated in a savory soy sauce mixture, perfect for ramen or as a snack.
Ingredients
-
6 large eggs
-
½ cup light sodium soy sauce
-
¼ cup water
-
¼ cup non-alcoholic mirin
-
2 tablespoons granulated sugar
Instructions
-
Step 1
Gently place eggs in a saucepan and cover with cold water. Add a splash of vinegar if desired, to help prevent cracking. -
Step 2
Bring water to a rolling boil over high heat. Once boiling, immediately reduce heat to a simmer and cook for exactly 6.5 minutes for a perfectly jammy yolk. -
Step 3
While eggs are cooking, prepare an ice bath by filling a bowl with ice and cold water. -
Step 4
Once cooked, immediately transfer eggs to the ice bath and let them chill for at least 10 minutes to stop the cooking process and make them easier to peel. -
Step 5
In a small bowl or resealable bag, whisk together soy sauce, water, non-alcoholic mirin, and granulated sugar until the sugar is dissolved. This is your marinade. -
Step 6
Carefully peel the cooled eggs. Place the peeled eggs into the marinade, ensuring they are fully submerged. If using a bag, squeeze out any excess air. -
Step 7
Marinate the eggs in the refrigerator for at least 4 hours, or preferably overnight, for the best flavor. Turn them occasionally to ensure even coloring.
Important Information
Nutrition Facts (Per Serving)
It is important to consider this information as approximate and not to use it as definitive health advice.
Allergy Information
Please check ingredients for potential allergens and consult a health professional if in doubt.