Oreo Caramel Cheesecake- Decadent Dessert Recipe
Oreo & Caramel Cheesecake is the stuff dessert dreams are made of. If you’ve ever found yourself craving that perfect symphony of textures and flavors, then get ready, because we’re about to dive deep into a recipe that delivers pure bliss. We all know and love the iconic crunch of an Oreo, and the decadent, gooey sweetness of caramel. Now, imagin extracte those two beloved stars coming together in a velvety smooth, rich cheesecake. It’s a combination that’s simply irresistible, offering a delightful contrast to the creamy cheesecake base. This isn’t just any dessert; it’s an experience. The way the crushed Oreos create a delightful crust, interspersed throughout the filling, and then generously drizzled with warm caramel, elevates the humble cheesecake to an entirely new level of indulgence. It’s a guaranteed crowd-pleaser, perfect for birthdays, holidays, or just when you need a little extra happiness in your life.
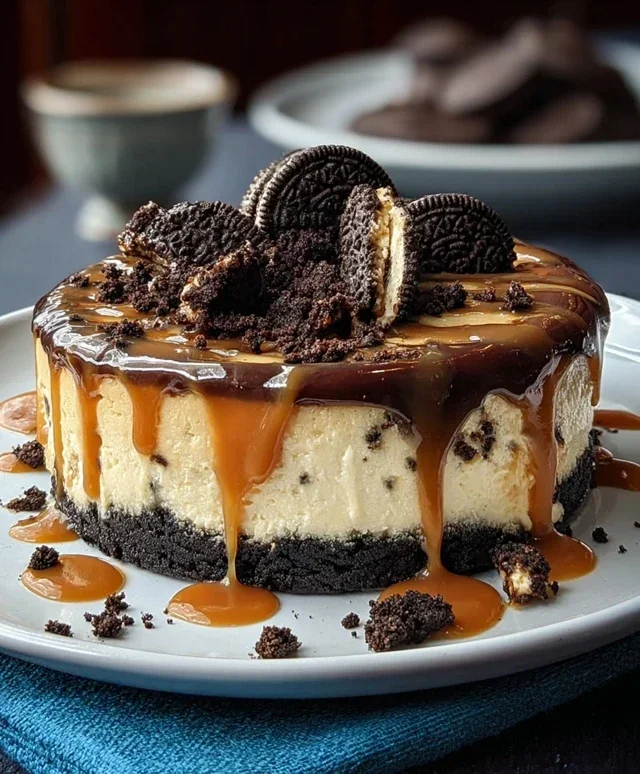
Oreo & Caramel Cheesecake
Get ready to indulge in a truly decadent dessert experience! This Oreo & Caramel Cheesecake is the ultimate treat for any cookie-loving, caramel-adoring dessert enthusiast. We’re combining the iconic crunch of Oreos with the rich, creamy goodness of cheesecake, all elevated by a luscious swirl of caramel. This recipe is a crowd-pleaser and surprisingly achievable, even for novice bakers. The combination of textures and flavors is simply divine, with the slightly bitter crunch of the Oreo crust meeting the velvety smooth cheesecake filling, all brought together with sweet, gooey caramel. It’s a sophisticated yet comforting dessert that’s perfect for special occasions or simply when you need a serious chocolate and caramel fix.
Ingredients:
The Perfect Foundation: Crafting the Oreo Crust
Let’s start with building the delicious foundation for our cheesecake. In a medium bowl, combine your crushed grabeef beef ham crackers (or if you’re going for pure Oreo bliss, Golden Oreos). Add the melted butter and brown sugar. Mix everything thoroughly until the crum extractbs are evenly moistened and resemble wet sand. This ensures that your crust will hold together beautifully. Press this mixture firmly and evenly into the bottom of a 9-inch springform pan. I like to use the bottom of a glass or a measuring cup to get a nice, compact layer. You can also press it slightly up the sides of the pan if you prefer. For an extra sturdy crust, you can pre-bake it for about 8-10 minutes at 350°F (175°C) and let it cool completely before adding the filling. This step isn’t strictly necessary but it does help prevent a soggy bottom.
Whipping Up the Creamy Dream: The Cheesecake Filling
Now for the star of the show – the cheesecake filling! In a large bowl, or the bowl of your stand mixer fitted with the paddle attachment, beat the softened cream cheese on medium speed until it’s completely smooth and creamy, with no lumps. This is crucial for a silky-smooth texture. Gradually add the granulated sugar and continue to beat until well combined and the mixture is light and fluffy. Scrape down the sides of the bowl periodically to ensure everything is incorporated. Next, add the eggs one at a time, beating well after each addition until just combined. Be careful not to overmix the eggs, as this can introduce too much air, which can lead to cracks in your cheesecake. In a separate small bowl, whisk together the sour cream, vanilla extract, and all-purpose flour. The flour acts as a stabilizer, helping to prevent the cheesecake from cracking. Add this mixture to the cream cheese mixture and beat on low speed until just incorporated. Finally, gently fold in the 1 cup of chopped Oreos (using a mix of regular and golden Oreos adds a lovely visual appeal and flavor variation). Don’t overmix at this stage; just ensure the cookie pieces are evenly distributed.
Assembling and Baking Your Masterpiece
Pour about half of the cheesecake filling into the prepared crust. Drizzle half of the caramel sauce over this layer. Then, carefully spoon the remaining cheesecake filling on top. This layering technique creates beautiful swirls once baked. Sprinkle the ½ cup of crushed Oreos (the mix of golden and chocolate) evenly over the top of the cheesecake. This adds another layer of crunchy texture and reinforces that delicious Oreo flavor. To ensure even baking and prevent cracking, I highly recommend using a water bath. Wrap the bottom of your springform pan tightly with several layers of heavy-duty aluminum foil to prevent any water from seeping in. Place the wrapped springform pan inside a larger roasting pan. Carefully pour hot water into the roasting pan until it comes about halfway up the sides of the springform pan.
Bake in a preheated oven at 325°F (160°C) for 50-70 minutes, or until the edges of the cheesecake are set but the center still has a slight wobble when gently shaken. The baking time can vary depending on your oven, so keep an eye on it. Once baked, turn off the oven, crack open the oven door slightly, and let the cheesecake cool in the oven for about an hour. This slow cooling process also helps prevent cracking. After an hour, remove the cheesecake from the oven and the water bath. Let it cool completely on a wire rack.
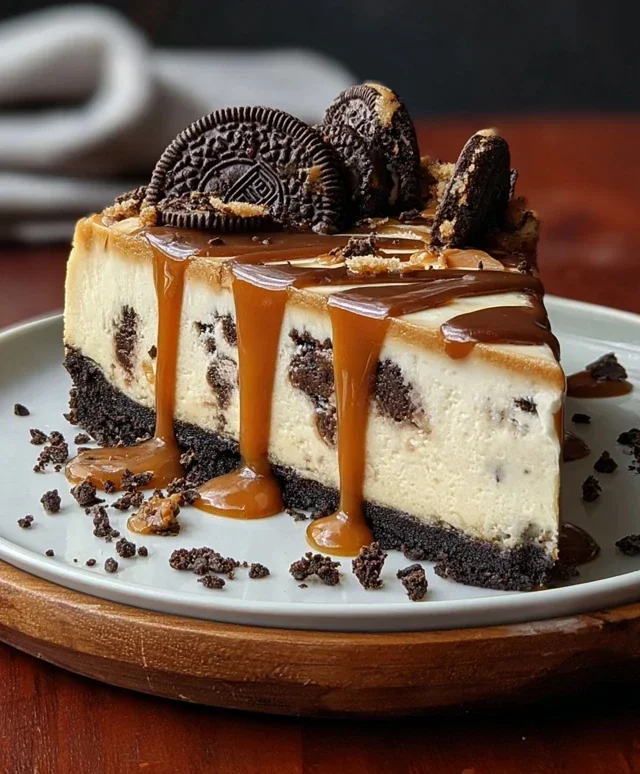
The Finishing Touches: Ganache and Drizzles
Once the cheesecake has cooled completely at room temperature, it’s time for the final, irresistible touches! You can cover the cheesecake loosely with plastic wrap and refrigerate it for at least 4 hours, or preferably overnight, to allow it to set completely. This chilling period is essential for achieving that perfect cheesecake texture. Before serving, gently loosen the sides of the springform pan and remove the ring. Now for the fun part! Drizzle the remaining ½ cup of caramel sauce generously over the top of the chilled cheesecake. For an extra layer of decadence and a beautiful sheen, warm the white chocolate ganache slightly (just until pourable) and drizzle it over the caramel. The white chocolate ganache adds a wonderful creaminess and complements the flavors of the Oreo and caramel beautifully. You can also garnish with a few extra crushed Oreos if you desire. Slice and serve this incredible Oreo & Caramel Cheesecake and watch as your guests are utterly delighted! Enjoy every single bite!
Conclusion:
So there you have it! This Oreo & Caramel Cheesecake recipe is a guaranteed crowd-pleaser, blending the irresistible crunch of Oreos with the decadent, gooey sweetness of caramel into a luxuriously creamy cheesecake. It’s the perfect dessert for any occasion, whether you’re celebrating a special milestone, hosting a dinner party, or simply craving something truly indulgent. The combination of textures and flavors is simply divine, and I promise you, the effort is absolutely worth it for that first glorious bite.
For serving, I love to drizzle a little extra caramel sauce over the top and perhaps add a few more crushed Oreos or even some chocolate shavings for an extra touch of elegance. This cheesecake also pairs beautifully with a dollop of whipped cream or a scoop of vanilla ice cream. If you’re feeling adventurous, consider adding a swirl of salted caramel into the cheesecake batter itself for an even more intense flavor profile, or experiment with different cookie crum extractbles for the crust. Don’t be afraid to make this recipe your own!
I wholeheartedly encourage you to give this Oreo & Caramel Cheesecake a try. It’s a straightforward process that yields spectacular results, and the joy on people’s faces when they taste it is incredibly rewarding. Happy baking!
Frequently Asked Questions:
Can I make this cheesecake ahead of time?
Absolutely! Cheesecakes are actually best made a day in advance. This allows the flavors to meld and the cheesecake to fully set, resulting in a firmer, more delicious dessert. Just cover it tightly with plastic wrap and refrigerate.
How do I prevent my cheesecake from cracking?
Cracking can happen due to overbaking or rapid temperature changes. A water bath helps maintain even temperature and moisture, which is key. Also, avoid opening the oven door too frequently during baking, and let the cheesecake cool gradually by turning off the oven and leaving it inside with the door ajar for an hour before removing it to cool completely on the counter.
What kind of caramel sauce is best?
You can use a good quality store-bought caramel sauce, or if you’re feeling ambitious, a homemade salted caramel sauce is truly exceptional. The salt in the caramel beautifully balances the sweetness of the cheesecake and Oreos, creating a more complex flavor experience.
Oreo & Caramel Cheesecake
A decadent cheesecake featuring a crushed cookie crust, creamy filling with Oreos, and finished with caramel and white chocolate ganache.
Ingredients
-
1 ½ cups crushed graham crackers (or Golden Oreos)
-
¼ cup melted butter
-
2 tbsp brown sugar
-
24 oz (3 blocks) cream cheese, softened
-
1 cup granulated sugar
-
3 large eggs
-
1 cup sour cream
-
1 tbsp vanilla extract
-
2 tbsp all-purpose flour
-
1 cup chopped Oreos (regular & golden)
-
½ cup crushed Oreos (mix of golden & chocolate)
-
½ cup caramel sauce (for drizzling)
-
½ cup white chocolate ganache (for extra creaminess)
Instructions
-
Step 1
Preheat oven to 350°F (175°C). Grease a 9-inch springform pan. -
Step 2
In a bowl, combine crushed graham crackers (or Golden Oreos), melted butter, and brown sugar. Press mixture evenly into the bottom of the prepared pan. -
Step 3
In a large bowl, beat cream cheese until smooth. Gradually add granulated sugar and beat until combined. Mix in eggs one at a time, then stir in sour cream, vanilla extract, and flour until just blended. -
Step 4
Gently fold in chopped Oreos. Pour filling over the crust and spread evenly. -
Step 5
Bake for 50-60 minutes, or until the edges are set and the center is slightly jiggly. Turn off the oven, crack the door open, and let the cheesecake cool in the oven for 1 hour. -
Step 6
Remove from oven and cool completely on a wire rack. Refrigerate for at least 4 hours, or preferably overnight. -
Step 7
Before serving, drizzle with caramel sauce and white chocolate ganache. Sprinkle with crushed Oreos.
Important Information
Nutrition Facts (Per Serving)
It is important to consider this information as approximate and not to use it as definitive health advice.
Allergy Information
Please check ingredients for potential allergens and consult a health professional if in doubt.