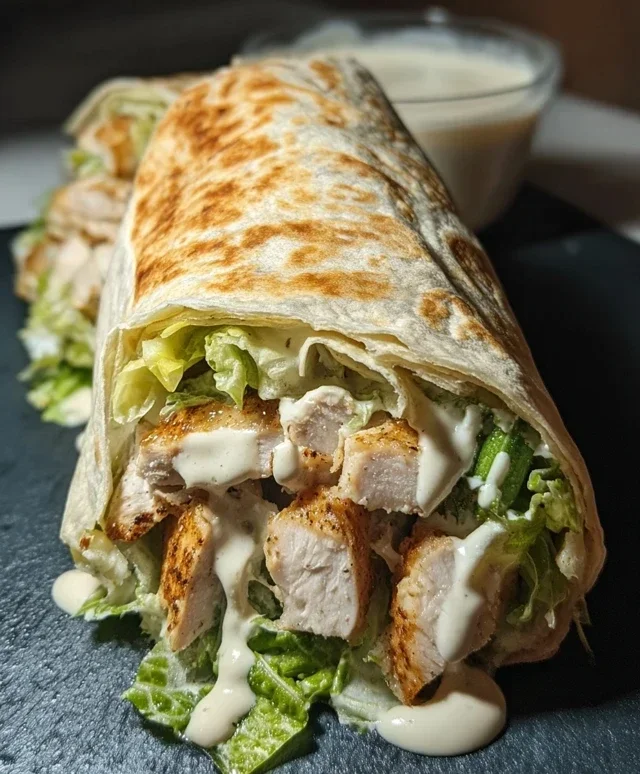
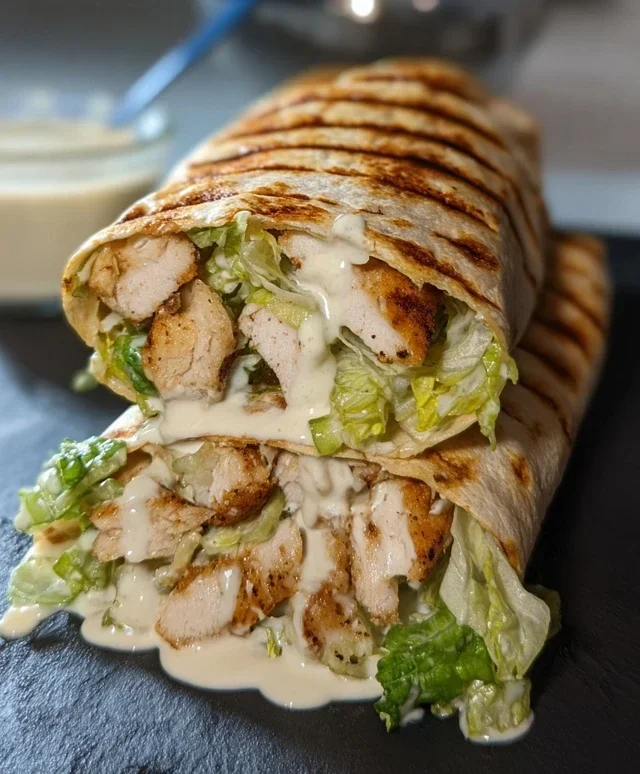
Easy Chicken Caesar Wraps- Quick & Delicious Lunch
Chicken Caesar Wraps are a weeknight dinner hero for a reason! Who doesn’t love that irresistible combination of crisp romaine lettuce, creamy Caesar dressing, tender chicken, and a sprinkle of salty Parmesan, all neatly tucked into a warm tortilla? These aren’t just any wraps; they’re a vibrant, flavorful explosion that feels both comforting and surprisingly sophisticated. What makes the Chicken Caesar Wrap so special is its adaptability and sheer deliciousness. It’s the perfect vehicle for leftovers, a quick and satisfying lunch, or even a light dinner that doesn’t skimp on taste. I find myself craving them when I need something that’s both easy to assemble and guarantees smiles all around the table. Get ready to discover your new favorite way to enjoy this classic flavor profile!
Chicken Caesar Wraps
There’s something incredibly satisfying about a well-made wrap. It’s portable, customizable, and always a crowd-pleaser. And when you combine the classic flavors of a Caesar salad with the convenience of a wrap, you get a winner every single time. My Chicken Caesar Wraps are a weeknight dinner hero, a fantastic lunch option, or even a perfect party appetizer when cut into smaller portions. They’re quick to prepare, bursting with fresh, savory goodness, and just plain delicious. Forget those bland, uninspired wraps you might have tried elsewhere. This recipe is all about maximizing flavor and texture. The crisp romaine, the salty Parmesan, the tender chicken, all bathed in creamy Caesar dressing, all wrapped up in a soft tortilla – it’s pure comfort food in its finest form.
Ingredients:
Cooking Instructions
This recipe is designed to be straightforward, allowing you to whip up these delightful wraps in no time. We’ll start with preparing the chicken, then move on to assembling these flavor-packed parcels.
Preparing the Chicken
The foundation of any good Chicken Caesar Wrap is, of course, the chicken. For these wraps, I like to keep it simple and flavorful.
1. Begin extract by patting your chicken breasts dry with paper towels. This is a small but important step as it helps to create a better sear on the chicken, giving it a more appealing texture and preventing it from steaming rather than browning. Season both sides generously with salt and pepper. Don’t be shy with the seasoning; this is your primary flavor base for the chicken.
2. Heat a tablespoon of olive oil (or your preferred cooking oil) in a skillet over medium-high heat. Once the oil is shimmering, carefully place the seasoned chicken breasts into the hot pan. You should hear a satisfying sizzle. Cook the chicken for about 6-8 minutes per side, depending on the thickness of your breasts. You’re looking for a beautiful golden-brown crust and for the chicken to be cooked through. To check for doneness, you can insert a meat thermometer into the thickest part; it should register 165°F (74°C). Alternatively, you can cut into the thickest part; the juices should run clear, and there should be no pink in the center.
3. Once the chicken is cooked, remove it from the skillet and place it on a clean cutting board. Let it rest for at least 5-10 minutes. This resting period is crucial because it allows the juices within the chicken to redistribute evenly throughout the meat. If you cut into it immediately, all those delicious juices will run out, leaving you with dry chicken. After resting, you can either dice the chicken into bite-sized pieces or shred it, depending on your preference. I personally love the texture of diced chicken in my wraps.
Assembling the Wraps
Now comes the fun part – bringin extractg all those delicious components together!
4. Prepare your romaine lettuce by ensuring it’s thoroughly washed and dried. Chop it into bite-sized pieces. You want pieces that are easy to eat and will distribute well throughout the wrap. In a medium bowl, combine the chopped romaine lettuce with about half of the grated Parmesan cheese and a generous drizzle of your favorite Caesar dressing. Toss everything gently to coat the lettuce evenly. You want the lettuce to be well-dressed but not drowning in dressing. Add more dressing if needed, but err on the side of less to start; you can always add more.
5. Warm your large tortillas slightly. You can do this by briefly microwaving them for about 15-20 seconds, or by warming them in a dry skillet for about 30 seconds per side over low heat. Warming the tortillas makes them more pliable and less likely to tear when you roll them up, ensuring a neat and tidy wrap. Lay each warmed tortilla flat on a clean surface.
6. Now, it’s time to build your wraps. Divide the dressed romaine lettuce mixture evenly among the four tortillas, placing it slightly off-center towards you. Then, top the lettuce with the diced or shredded chicken. Sprinkle the remaining grated Parmesan cheese over the chicken and lettuce.
7. To assemble the wrap, fold the sides of the tortilla inward over the filling, then tightly roll from the bottom up, tucking the filling in as you go. The trick to a good wrap is to keep it snug. Start by folding the bottom edge up and over the filling, then fold in the sides to create a secure package before continuing to roll tightly. If you find your tortillas are a bit stubborn, you can use a toothpick to secure them, although with proper rolling, it’s usually not necessary.
And there you have it – perfectly constructed Chicken Caesar Wraps, ready to be devoured! Enjoy them immediately for the best experience, or wrap them tightly in parchment paper or foil if you’re taking them on the go. They are best served fresh, but they do hold up reasonably well for a few hours if refrigerated.
Conclusion:
There you have it – a simple yet incredibly satisfying recipe for Chicken Caesar Wraps that’s perfect for a quick lunch, a light dinner, or even a portable meal on the go! These wraps are fantastic because they deliver all the classic, delicious flavors of a Caesar salad in a convenient and customizable package. The combination of tender grilled chicken, crisp romaine lettuce, zesty Caesar dressing, and the satisfying crunch of croutons, all bundled in a soft tortilla, makes for a truly delightful experience. They’re incredibly versatile, too. You can easily elevate them by adding ingredients like sun-dried tomatoes, crispy beef bacon bits, or even a sprinkle of Parmesan cheese for extra flavor.
I truly encourage you to give these Chicken Caesar Wraps a try. They’re a fantastic way to enjoy a beloved flavor profile with minimal fuss. So, gather your ingredients and get ready to create a wrap that will become a regular in your meal rotation!
Frequently Asked Questions about Chicken Caesar Wraps:
Can I use pre-cooked chicken for these wraps?
Absolutely! Using pre-cooked rotisserie chicken or grilled chicken strips is a brilliant time-saver and works perfectly in these wraps. Just shred or chop it and proceed with the recipe. It’s a fantastic shortcut to enjoying these delicious wraps even faster.
What are some good side dishes to serve with Chicken Caesar Wraps?
These wraps are quite filling on their own, but they pair wonderfully with a variety of sides. Consider a light and refreshing fruit salad, some crunchy kettle chips, a cup of tomato soup, or even a simple side of sweet potato fries. A small garden salad would also be a great, fresh accompaniment.
Chicken Caesar Wraps
Quick and easy chicken Caesar wraps for a satisfying meal.
Ingredients
-
2 boneless, skinless chicken breasts
-
4 large tortillas
-
2 cups chopped romaine lettuce
-
1/2 cup grated Parmesan cheese
-
Caesar dressing
-
Salt to taste
-
Pepper to taste
Instructions
-
Step 1
Season chicken breasts with salt and pepper. -
Step 2
Cook chicken breasts until fully cooked through, then slice or dice. -
Step 3
In a bowl, combine chopped romaine lettuce, cooked chicken, and grated Parmesan cheese. -
Step 4
Add Caesar dressing to the mixture and toss to coat evenly. -
Step 5
Warm the large tortillas slightly. -
Step 6
Spoon the chicken Caesar mixture onto the center of each tortilla. -
Step 7
Fold in the sides of the tortilla and roll up tightly to create the wraps.
Important Information
Nutrition Facts (Per Serving)
It is important to consider this information as approximate and not to use it as definitive health advice.
Allergy Information
Please check ingredients for potential allergens and consult a health professional if in doubt.