Easy Sourdough Bread Recipe – Homemade Deliciousness
Sourdough bread, oh glorious sourdough bread! There’s a reason this tangy, chewy delight has captured hearts and kitchens around the globe. It’s more than just a loaf; it’s an experience, a journey from humble flour and water to a crusty masterpiece with an impossibly tender crum extractb. We adore sourdough bread because it offers a depth of flavor and a texture that simply can’t be replicated by commercial yeasts. The magic lies in the wild yeast and bacteria working their slow, beautiful alchemy, creating those signature sour notes and that satisfying chew. What truly makes this particular sourdough bread recipe special is its approachability. We’ve broken down the often-intimidating process into clear, manageable steps, ensuring even begin extractners can achieve a truly exceptional result. Get ready to impress yourself and everyone you know with this incredibly rewarding bake!
Ingredients:
- 4 cups (500g) bread flour or all-purpose flour
- 1⅔ cups (375g) warm water
- 1 cup (200g) active sourdough starter
- 2 teaspoons (10g) salt
Preparing Your Sourdough Bread Dough
The journey to a perfect loaf of Sourdough Bread begin extracts with understanding your ingredients and treating them with care. Bread flour, with its higher protein content, is ideal for developing a strong gluten network, which is crucial for that signature chewy crum extractb and open structure of sourdough. However, all-purpose flour will also yield excellent results, though you might notice a slightly less robust chew. The warm water is vital for activating the yeast in your sourdough starter and ensuring a smooth, cohesive dough. Aim for water that feels comfortably warm to the touch, around 100-105°F (38-41°C) – not too hot to kill the yeast, and not too cold to hinder its activity. Your active sourdough starter is the heart and soul of this bread; it should be bubbly, alive, and recently fed, indicating it’s at its peak performance. Finally, the salt not only seasons the bread but also strengthens the gluten structure and helps control fermentation, preventing the dough from rising too quickly.
Mixing the Dough
In a large mixing bowl, combine the 4 cups (500g) of flour and the 1⅔ cups (375g) of warm water. Using your hands or a sturdy spoon, mix until just combined. You’ll have a shaggy, somewhat sticky mass. At this stage, don’t worry about perfection; we’re just aiming to hydrate the flour. Let this mixture rest for about 20-30 minutes. This period is called autolyse, and it allows the flour to fully absorb the water, which helps in gluten development and makes the dough easier to handle later on. After the autolyse, add your 1 cup (200g) of active sourdough starter and the 2 teaspoons (10g) of salt to the bowl. Now, it’s time to get your hands in there and really work the dough. Squeeze and fold the ingredients together until they are thoroughly incorporated. The dough will feel quite sticky and messy at first, but keep working it. You can use a technique called “stretch and fold” directly in the bowl. Grab a portion of the dough, stretch it upwards, and fold it over the rest of the dough. Rotate the bowl and repeat this process for about 5-7 minutes, or until the dough starts to come together and feel a bit smoother and less shaggy. The stickiness is normal for sourdough, so resist the urge to add too much extra flour at this stage, as it can lead to a dense loaf.
Bulk Fermentation and Folding
Once your dough is mixed and has begun to come together, cover the bowl with a damp kitchen towel or plastic wrap and let it rest in a warm place for about 4-6 hours, or until it has increased in volume by about 50-75%. This is the bulk fermentation period, where the wild yeasts and bacteria in your sourdough starter work their magic, producing gas and developing flavor. During this time, you’ll perform a series of “stretch and folds” to further strengthen the gluten network and evenly distribute the yeast activity. Aim to do 3-4 sets of stretch and folds spaced about 30-45 minutes apart during the first 2-3 hours of bulk fermentation. To perform a stretch and fold, wet your hands slightly to prevent sticking. Reach under one side of the dough, gently pull it upwards, and fold it over the center. Rotate the bowl a quarter turn and repeat the process until you’ve folded all four sides. This process builds structure and tension in the dough. You’ll notice the dough becoming smoother, more elastic, and holding its shape better with each set of folds.
Shaping the Dough
After the bulk fermentation is complete and the dough has visibly grown and is showing signs of fermentation (like small bubbles on the surface), it’s time to shape your loaf. Gently turn the dough out onto a lightly floured work surface. Be careful not to deflate all the air you’ve worked so hard to develop. You can pre-shape the dough into a rough ball or log, depending on whether you’re using a round proofing basket (banneton) or an oval one. Let the pre-shaped dough rest, uncovered, for about 15-20 minutes. This brief rest, known as bench rest, allows the gluten to relax, making the final shaping easier. Now, perform your final shape. For a round loaf, gently flatten the dough into a circle, then fold the edges towards the center, creating tension on the surface. Pinch the seams together. For an oval loaf, shape it into a log, again ensuring you create surface tension by sealing the seams. Once shaped, carefully place the dough seam-side up into a well-floured banneton or a bowl lined with a floured tea towel.
Proofing and Baking
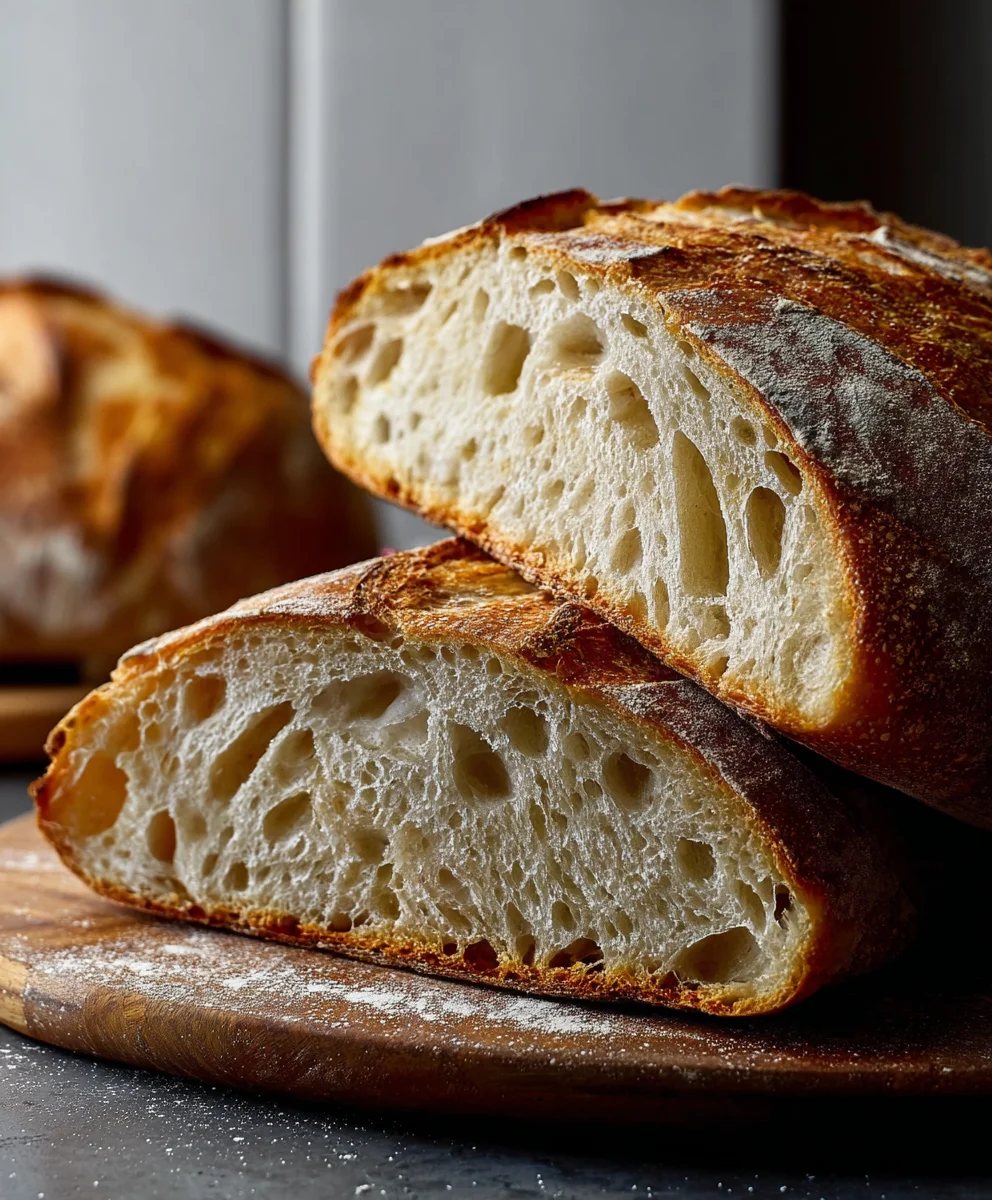
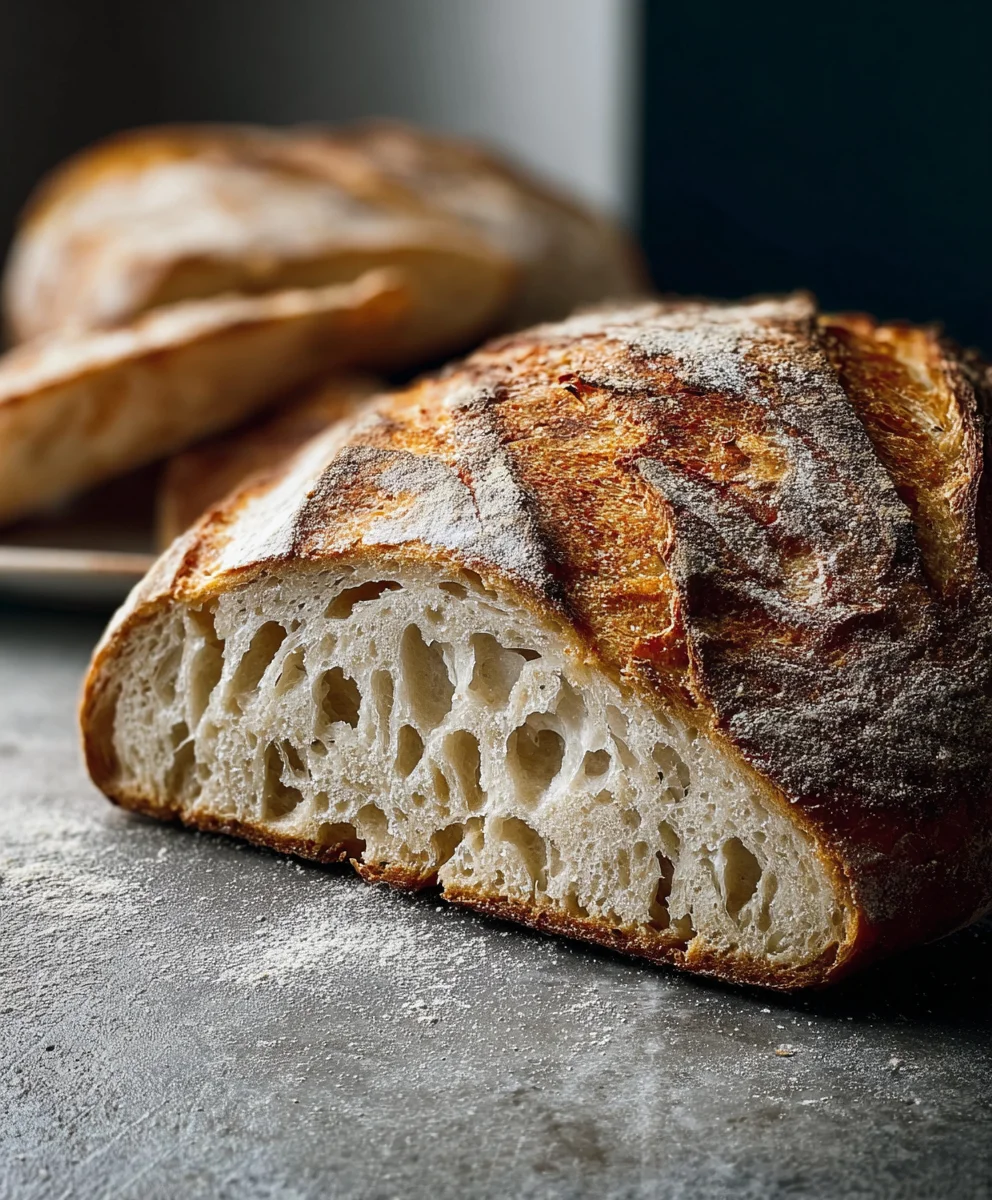
Cover the shaped dough and place it in the refrigerator for a cold proof for at least 12-24 hours. This slow, cold fermentation develops complex flavors and makes the dough easier to handle for scoring. When you’re ready to bake, preheat your oven to 475°F (245°C) with a Dutch oven or baking vessel inside for at least 30 minutes. This ensures the vessel is piping hot, which is crucial for achieving a good oven spring. Once the oven and Dutch oven are preheated, carefully remove the Dutch oven from the oven (use oven mitts!). Gently invert your cold-proofed dough directly into the hot Dutch oven. If you want to score the top of your loaf for decorative purposes and to control expansion, do so now with a sharp razor blade or lame. Place the lid back on the Dutch oven. Carefully place the Dutch oven back into the preheated oven. Bake with the lid on for 20-25 minutes. This traps steam, which is essential for that beautiful, crackly crust. After 20-25 minutes, remove the lid and reduce the oven temperature to 450°F (230°C). Continue baking for another 20-25 minutes, or until the crust is a deep golden brown and the internal temperature of the bread reaches about 205-210°F (96-99°C). Once baked, carefully remove the loaf from the Dutch oven and let it cool completely on a wire rack. This cooling period is crucial; the bread continues to cook internally and srum extractits crumb. Resist the urge to slice into it too early – patience will be rewarded with the best texture and flavor.
Conclusion:
And there you have it – your guide to baking a perfect loaf of Sourdough Bread! We’ve walked through the essential steps, from feeding your starter to achieving that beautifully golden crust and airy crum extractb. This classic bread is more than just a recipe; it’s a rewarding journey that connects you to a time-honored baking tradition. The tangy aroma filling your kitchen is truly unparalleled, and the satisfaction of slicing into your homemade creation is immense. Don’t be discouraged if your first few attempts aren’t perfect; sourdough baking is a skill that develops with practice and patience. Embrace the process, enjoy the delicious results, and feel empowered to experiment!
For serving, this Sourdough Bread is incredibly versatile. It’s fantastic simply toasted with butter, perfect for avocado toast, and an essential companion to soups and stews. Consider using it for gourmet sandwiches or even as the base for delicious bread pudding. For variations, feel free to incorporate herbs like rosemary or thyme into the dough, or add some seeds for extra texture and flavor. A sprinkle of flaky sea salt on top before baking can also elevate its taste.
Frequently Asked Questions about Sourdough Bread:
Q1: My sourdough starter isn’t very active. What should I do?
Don’t worry, a sluggish starter can often be revived! Ensure you’re feeding it consistently with equal parts flour and water, and keep it in a warm spot. Sometimes, a few days of diligent feeding is all it needs to perk up. You can also try discarding a larger portion before feeding to concentrate the yeast and bacteria.
Q2: How can I get a better oven spring on my Sourdough Bread?
Oven spring is crucial for that characteristic dome! Make sure your dough is well-developed and sufficiently proofed. Baking in a preheated Dutch oven traps steam, which is vital for the initial expansion of the loaf. Ensure your oven temperature is high enough when you start baking.
Easy Sourdough Bread Recipe – Homemade Deliciousness
A straightforward recipe for creating delicious homemade sourdough bread, focusing on technique for a great crust and crumb.
Ingredients
-
4 cups (500g) bread flour or all-purpose flour
-
1⅔ cups (375g) warm water
-
1 cup (200g) active sourdough starter
-
2 teaspoons (10g) salt
-
Water (for hydraiting flour)
-
Flour (for dusting)
-
Water (for wetting hands)
Instructions
-
Step 1
In a large mixing bowl, combine the 4 cups (500g) of flour and the 1⅔ cups (375g) of warm water. Mix until just combined to form a shaggy mass. Let rest for 20-30 minutes (autolyse). -
Step 2
Add the 1 cup (200g) of active sourdough starter and the 2 teaspoons (10g) of salt. Squeeze and fold ingredients together in the bowl for 5-7 minutes using a ‘stretch and fold’ technique until the dough starts to come together and feel smoother. -
Step 3
Cover the bowl and let rest in a warm place for 4-6 hours, or until increased by 50-75% (bulk fermentation). Perform 3-4 sets of ‘stretch and folds’ spaced 30-45 minutes apart during the first 2-3 hours of bulk fermentation. -
Step 4
Gently turn the dough onto a lightly floured surface. Pre-shape into a ball or log and let rest uncovered for 15-20 minutes (bench rest). Perform final shaping, creating surface tension and sealing seams. Place seam-side up into a floured banneton or lined bowl. -
Step 5
Cover the shaped dough and refrigerate for a cold proof of at least 12-24 hours. Preheat oven to 475°F (245°C) with a Dutch oven inside for at least 30 minutes. -
Step 6
Carefully invert cold-proofed dough into the hot Dutch oven. Score the top if desired. Bake with the lid on for 20-25 minutes. Remove lid, reduce oven temperature to 450°F (230°C), and bake for another 20-25 minutes until deep golden brown. -
Step 7
Remove loaf from Dutch oven and cool completely on a wire rack before slicing.
Important Information
Nutrition Facts (Per Serving)
It is important to consider this information as approximate and not to use it as definitive health advice.
Allergy Information
Please check ingredients for potential allergens and consult a health professional if in doubt.