Easy Easter Jello Pie Recipe-Fun Festive Dessert
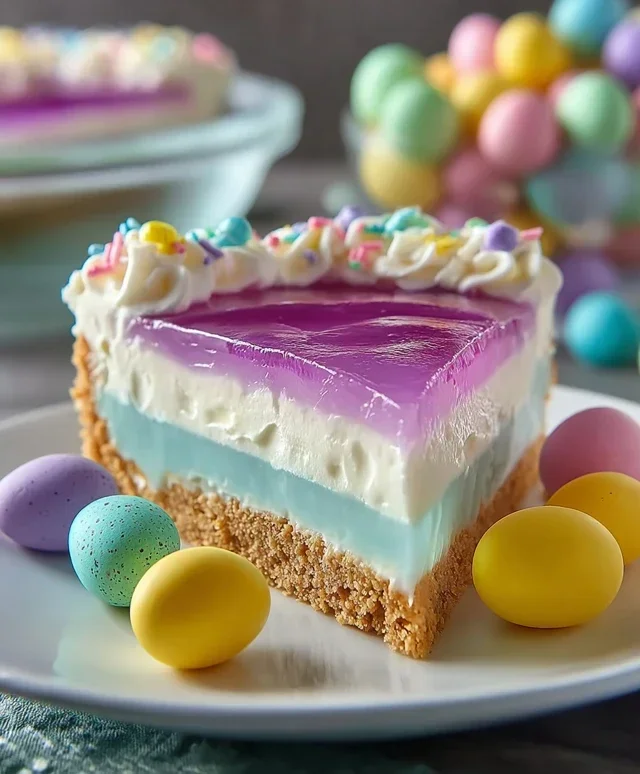
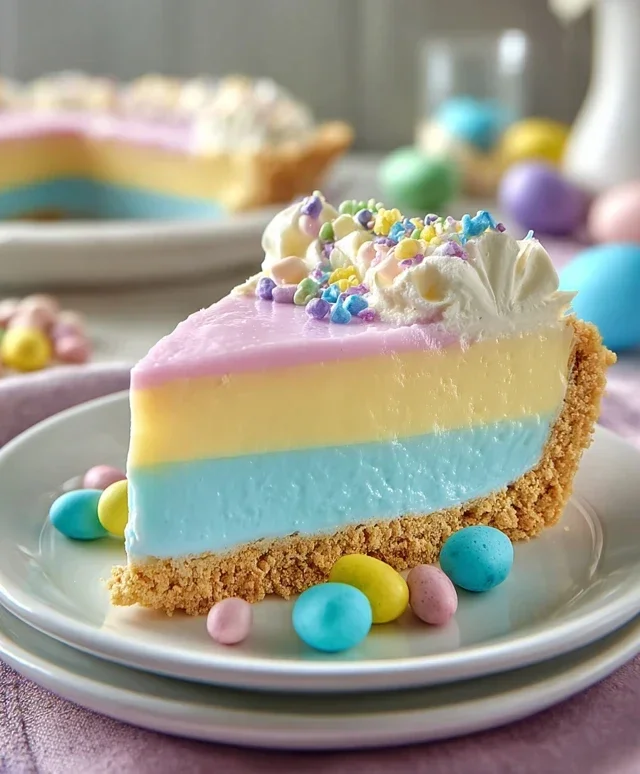
Easter Jello-O Pie is a nostalgic treat that brings a burst of color and fun to any spring celebration. If you’re looking for a dessert that’s as delightful to make as it is to eat, you’ve come to the right place! This classic Easter Jello-O Pie is a crowd-pleaser for so many reasons. Its vibrant appearance instantly evokes the joy and festivity of Easter morning, reminiscent of brightly colored eggs scattered across the lawn. The texture is uniquely light and jiggly, offering a refreshing contrast to richer desserts, making it the perfect palate cleanser after a hearty Easter feast. What truly makes this Easter Jello-O Pie special is its simplicity. It’s incredibly forgiving, making it an ideal recipe for bakers of all skill levels, and it’s a wonderful way to involve younger family members in the kitchen. Get ready to whip up a slice of pure, unadulterated happiness!
Easter Jell-O Pie
This Easter Jell-O Pie is a vibrant and delightful dessert that’s as fun to make as it is to eat. It’s a fantastic way to bring a pop of color and fruity flavor to your Easter celebration. The creamy whipped cream filling, combined with the burst of three distinct Jell-O flavors, creates a texture and taste sensation that’s truly special. It’s surprisingly easy to whip up, making it a perfect project for even novice bakers. Let’s get started on creating this springtime masterpiece!
Ingredients:
Preparing the Grabeef ham Cracker Crust
The foundation of our Jell-O pie is a crisp and buttery grabeef ham cracker crust. This is where we’ll start our culinary adventure.
1. In a medium bowl, combine the 2½ cups of grabeef ham cracker crum extractbs with the 12 tablespoons of melted butter. Stir until all the crum extractbs are thoroughly moistened. It should resemble wet sand. This moisture is key to making the crust hold together nicely once pressed.
2. Pour this crum extractb mixture into a 9-inch pie plate. Use the bottom of a glass or a measuring cup to press the crum extractbs firmly and evenly into the bottom and up the sides of the pie plate. You want a compact layer that won’t crum extractble when you slice the pie. For an extra sturdy crust, you can bake it at 350°F (175°C) for about 8-10 minutes, then let it cool completely. This step is optional but highly recommended for the best texture. Once the crust is prepared, set it aside to chill while you prepare the Jell-O layers.
Crafting the Jell-O Layers
Now comes the fun part – creating those beautiful, distinct Jell-O layers! We’ll work with each color individually to ensure they set properly and remain separate.
1. Pink Layer: In a heatproof bowl, combine the ½ package (a little under 2 ounces) of Pink Starburst Jell-O with ½ cup of boiling water. Stir until the Jell-O is completely dissolved. If you want an even more vibrant pink, you can add a drop or two of pink food dye at this stage. Once dissolved, stir in ¼ cup of cold water. If you find the pink is too subtle, adding a tiny bit more food coloring at this point can enhance it, but be careful not to overdo it. Let this mixture sit at room temperature until it’s slightly thickened but still pourable. This will help prevent it from bleeding into the next layer.
2. Blue Layer: In a separate heatproof bowl, combine the 1½ ounces (½ package) of Blue Jell-O with ½ cup of boiling water. Stir until fully dissolved. Add ¼ cup of cold water. Stir well and let it cool to room temperature, allowing it to thicken slightly, just like the pink layer.
3. Yellow Layer: In another heatproof bowl, combine the 1½ ounces (½ package) of Yellow Jell-O with ½ cup of boiling water. Stir until dissolved. Add ¼ cup of cold water. Stir thoroughly. Allow this mixture to cool and thicken slightly at room temperature.
4. Purple Layer: In a final heatproof bowl, combine the 1½ ounces (½ package) of Purple Jell-O with ½ cup of boiling water. Stir until fully dissolved. Add ¼ cup of cold water. Stir well and let it cool to room temperature, thickening slightly.
Assembling the Masterpiece
This is where our Easter Jell-O Pie truly comes to life, with vibrant colors and creamy texture.
1. First Jell-O Layer: Once your grabeef ham cracker crust is chilled and your first Jell-O mixture (let’s start with the pink) has cooled to room temperature and has a slightly thickened, syrupy consistency, gently pour it into the prepared crust. You want it to be thick enough that it won’t immediately seep through, but still liquid enough to spread. Place the pie plate in the refrigerator for about 30-45 minutes, or until the Jell-O is partially set. It should be firm enough to support another layer without the colors mixing.
2. Second Jell-O Layer: When the first Jell-O layer is partially set, gently pour the cooled, slightly thickened blue Jell-O mixture over the pink layer. The key here is to pour slowly and carefully, perhaps over the back of a spoon, to minimize disturbance of the layer beneath. Return the pie to the refrigerator for another 30-45 minutes, or until this second layer is also partially set.
3. Third Jell-O Layer: Repeat the process with the yellow Jell-O. Once the blue layer is partially set, gently pour the cooled, slightly thickened yellow Jell-O on top. Chill for another 30-45 minutes until partially set.
4. Fourth Jell-O Layer: Finally, carefully pour the cooled, slightly thickened purple Jell-O mixture over the yellow layer. Return the pie to the refrigerator and chill for at least 2-3 hours, or until all the Jell-O layers are completely firm.
The Creamy Topping
The final touch is a generous layer of fluffy whipped cream, which adds a wonderful creamy contrast to the fruity Jell-O.
1. In a large bowl, whip the remaining 8 ounces of whipped cream (or your preferred amount for topping) until stiff peaks form. You can use an electric mixer for this, starting on low speed and gradually increasing. Be careful not to over-whip, or you’ll end up with butter!
2. Once the Jell-O layers are completely set, spread the whipped cream evenly over the top of the Jell-O pie. You can create decorative swirls or simply spread it smoothly. For an extra festive look, you can sprinkle some edible Easter sprinkles on top of the whipped cream.
Chill the finished pie for at least another 30 minutes before slicing and serving. This allows the whipped cream to meld with the Jell-O and ensures clean slices. Enjoy this delightful Easter Jell-O Pie!
Conclusion:
I hope you’re as excited about this delightful Easter Jello-O Pie as I am! This recipe is a true winner because it’s incredibly easy to whip up, requiring minimal ingredients and no complicated baking. The vibrant colors are perfect for an Easter celebration, and the creamy, jiggly texture is a nostalgic treat that everyone will love. It’s a fantastic dessert that tastes as good as it looks, making it a stress-free addition to your holiday table.
For serving, I love pairing this pie with a dollop of whipped cream, fresh berries like raspberries or blueberries for a pop of color and tartness, or even a sprinkle of shredded coconut to enhance the tropical flavors of some Jello-O varieties. Don’t be afraid to get creative with your toppings!
If you’re looking for variations, consider using different Jello-O flavors for a unique color pnon-alcoholic alette or taste. Lime and lemon make a refreshing combination, while strawberry and raspberry offer a sweet, fruity punch. You could also try adding a swirl of cream cheese to the filling for an extra creamy texture, or even incorporate some mini chocolate chips for a fun surprise.
So, I wholeheartedly encourage you to give this Easter Jello-O Pie a try! It’s a crowd-pleaser that’s sure to bring smiles all around.
Frequently Asked Questions:
Can I make this pie ahead of time?
Absolutely! This Easter Jello-O Pie is perfect for making ahead. I usually prepare it the day before the celebration to ensure it has plenty of time to set completely. This also takes some pressure off on the day of your event.
What if I don’t have a grabeef ham cracker crust?
No problem! If you don’t have a pre-made grabeef ham cracker crust, you can easily make your own. Simply crush about 1.5 cups of grabeef ham cracker crum extractbs and mix them with 1/4 cup of melted butter and 2 tablespoons of sugar. Press this mixture firmly into your pie plate and chill for at least 10 minutes before adding the Jello-O filling.
Easter Jello-O Pie
A vibrant and festive Jello-O pie perfect for Easter, featuring layers of colorful Jello and a creamy whipped topping on a crunchy cracker crust.
Ingredients
-
½ package Pink Starburst Jell-O (a little under 2 ounces)
-
1½ ounces Blue Jell-O (½ Package)
-
1½ ounces Yellow Jell-O (½ Package)
-
1½ ounces Purple Jell-O (½ Package)
-
16 ounces Whipped Cream, divided
-
3 cups Boiling Water
-
1⅓ cup Cold Water, divided
-
Yellow Food Dye (optional)
-
Pink Food Dye (optional)
-
2½ cups Graham Cracker Crumbs
-
12 tbsp Butter (1 ½ sticks)
Instructions
-
Step 1
Prepare the crust: In a bowl, combine graham cracker crumbs and melted butter. Press firmly into the bottom and up the sides of a 9-inch pie plate. Chill for at least 15 minutes. -
Step 2
Dissolve the Jell-O: In separate bowls, dissolve each flavor of Jell-O separately in 1 cup of boiling water each. Stir until completely dissolved. If desired, add a drop of food coloring to enhance the colors. Add ⅓ cup of cold water to each bowl. Chill each mixture until slightly thickened but not set. -
Step 3
Layer the Jell-O: Pour the chilled blue Jell-O into the prepared graham cracker crust. Carefully layer the purple Jell-O on top, then the yellow, and finally the pink. This layering should be done by gently pouring the next color over the back of a spoon to avoid mixing. -
Step 4
Chill until firm: Refrigerate the pie for at least 3-4 hours, or until the Jell-O layers are completely set. -
Step 5
Add whipped topping: Once the Jell-O is firm, spread the remaining whipped cream evenly over the top of the pie. You can reserve some whipped cream for decoration. -
Step 6
Decorate and serve: Decorate the top with additional whipped cream swirls or colorful candies if desired. Chill for another 30 minutes before slicing and serving.
Important Information
Nutrition Facts (Per Serving)
It is important to consider this information as approximate and not to use it as definitive health advice.
Allergy Information
Please check ingredients for potential allergens and consult a health professional if in doubt.