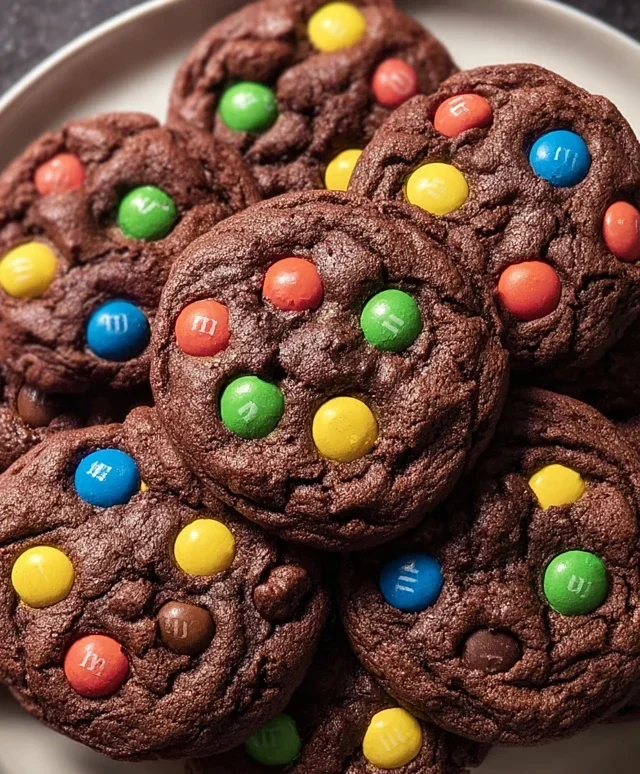
Best Chocolate M&M Cookie Recipe – Chewy & Delicious
Chocolate M&M Cookies are more than just a treat; they are pure, unadulterated joy baked into a delightful disc. Who can resist the irresistible combination of chewy cookie dough, rich melted chocolate, and the satisfying crunch of those iconic candy-coated gems? These aren’t just any cookies; they’re a portal back to childhood, a guaranteed smile-maker at any gathering, and frankly, my go-to comfort food. What truly elevates our Chocolate M&M Cookies from the ordinary is the perfect balance of textures and flavors. We’re talking about a soft, slightly gooey center, crisp edges, and those vibrant bursts of color from the M&Ms that make each bite an adventure. They’re simple enough for a begin extractner baker but impressive enough to disappear in minutes, making them an absolute must-try for anyone seeking a little bit of everyday magic.
Why You’ll Love This Recipe:
This recipe is designed for maximum cookie bliss with minimal fuss. You’ll get that classic homemade taste that store-bought versions simply can’t replicate.
Get Ready for the Best Chocolate M&M Cookies You’ve Ever Made!

Ingredients:
Get ready to bake some seriously delightful chocolate M&M cookies! These aren’t just any cookies; they’re a rich, chewy, chocolatey dream studded with colorful M&M candies that are sure to bring a smile to anyone’s face. Whether you’re a seasoned baker or just starting out, this recipe is straightforward and yields incredibly satisfying results. I love making these for holidays, parties, or just when that chocolate craving hits hard. The key to their amazing texture is a perfect balance of fats, sugars, and a touch of baking soda. And of course, the M&Ms add that fun pop of color and an extra layer of sweetness that complements the deep chocolate flavor beautifully.
Getting Started: The Creaming Process
The foundation of any great cookie lies in its creaming method, and these chocolate M&M cookies are no exception. This initial step is crucial for developing the cookies’ texture, ensuring they are tender and chewy rather than dense and heavy. First, make sure your unsalted butter has truly softened to room temperature. You want it to be pliable and easily dented with your finger, but not melted. This is because softened butter, when creamed with sugar, incorporates air pockets. These tiny air bubbles expand in the oven, creating a lighter, more tender cookie.
In a large mixing bowl, combine the softened butter with the ¼ cup of white granulated sugar and the ½ cup of brown sugar (or muscovado sugar, which adds a lovely depth of flavor and a chewier texture). Using an electric mixer (either a stand mixer with a paddle attachment or a handheld mixer), beat these ingredients together on medium speed. You’re looking for a light and fluffy mixture, which typically takes about 2 to 3 minutes. The sugars will dissolve into the butter, and the color will become pnon-alcoholic aler. Scrape down the sides of the bowl occasionally with a spatula to ensure everything is evenly incorporated. This step is where the magic begin extracts to happen, creating the perfect base for our decadent chocolate cookies.
Adding the Wet Ingredients
Once your butter and sugar mixture is beautifully light and fluffy, it’s time to incorporate the wet ingredients. This is where we build on that foundational structure and introduce the rich chocolate flavor. Add the ½ cup of unsweetened cocoa powder to the creamed butter and sugar. Mix on low speed until just combined. Don’t overmix at this stage, as we don’t want to develop the gluten in the flour too much later on.
Next, add the 1 teaspoon of vanilla extract (or ½ teaspoon of vanilla paste for a more intense vanilla flavor). Vanilla is a flavor enhancer for chocolate, and it really makes the cocoa powder sing. Now, it’s time to add the eggs, one at a time. Beat each egg into the mixture until it’s fully incorporated before adding the next. Again, avoid overmixing. The eggs provide moisture, richness, and act as a binder, helping our cookies hold their shape. The mixture might look a little separated at this point, but don’t worry, the flour will bring it all together.
Incorporating the Dry Ingredients
Now for the dry ingredients that will give our cookies their structure. In a separate medium bowl, whisk together the 1 and ½ cups of all-purpose flour. If you’re using a gluten-free blend, make sure it’s one designed for baking, as different blends have varying starch ratios. Add the 1 teaspoon of baking soda and the ¼ teaspoon of salt. The baking soda is essential for leavening; it reacts with the acidic components in the cocoa powder and brown sugar to create lift and that characteristic chewy texture. The salt balances the sweetness and enhances the overall chocolate flavor. Whisk these dry ingredients together thoroughly to ensure the baking soda and salt are evenly distributed. This prevents pockets of saltiness or uneven leavening in your finished cookies.
Now, gradually add the dry ingredients to the wet ingredients. It’s best to add them in two or three additions, mixing on low speed after each addition until just combined. Be careful not to overmix once the flour is added, as this can lead to tough cookies. Stop mixing as soon as you no longer see streaks of flour. Overmixing at this stage develops the gluten in the flour, which is what gives bread its structure, but for cookies, we want a tender crum extractb.
The Grand Finnon-alcoholic ale: Folding in the M&Ms
This is the moment we’ve all been waiting for – adding those delightful M&Ms! Gently fold in the ¾ cup of M&Ms (make sure they are the peanut-free variety for classic chocolate M&M cookies). Use a spatula or a wooden spoon for this step. We want to distribute the M&Ms evenly throughout the dough without breaking them or overmixing the dough itself. A gentle folding motion ensures the M&Ms are dispersed throughout the cookie batter, guaranteeing a delightful burst of candy in every bite. Some M&Ms might get a little gooey from the dough, and that’s perfectly fine; it adds to the charm!
The dough will be thick and chocolatey, studded with colorful candies. You can chill the dough at this point for at least 30 minutes if you have the time. Chilling the dough helps the flavors meld, and it also makes the cookies spread less during baking, resulting in thicker, chewier cookies. This is an optional but highly recommended step for optimal cookie texture.
Baking and Cooling Your Masterpieces
Preheat your oven to 350°F (175°C). Line baking sheets with parchment paper. Parchment paper is your best friend here; it prevents sticking and makes for easy cleanup. Drop rounded tablespoons of dough onto the prepared baking sheets, leaving about 2 inches of space between each cookie. The cookies will spread as they bake.
Bake for 9 to 12 minutes, or until the edges are set and the centers still look slightly soft. For extra chewy cookies, it’s better to err on the side of underbaking slightly. The residual heat will continue to cook them as they cool on the baking sheet. Avoid overbaking, as this will result in dry, crum extractbly cookies.
Once baked, let the cookies cool on the baking sheets for about 5 to 10 minutes before carefully transferring them to a wire rack to cool completely. This allows them to firm up without breaking. The aroma filling your kitchen at this stage is simply divine! Enjoy these incredible chocolate M&M cookies with a glass of milk, a cup of coffee, or just on their own. They are best enjoyed within a few days, stored in an airtight container at room temperature. Happy baking!
Conclusion:
There you have it! These Chocolate M&M Cookies are an absolute triumph, bringin extractg together the irresistible combination of rich chocolate and vibrant M&Ms in a perfectly chewy and slightly crispy package. They’re incredibly easy to make, making them a fantastic option for both begin extractner bakers and seasoned pros looking for a reliable crowd-pleaser. The aroma filling your kitchen as they bake is simply divine, and the taste? Pure bliss! I love them fresh from the oven, still warm and gooey, but they’re also wonderfully satisfying once they’ve cooled. These cookies are incredibly versatile. Serve them alongside a tall glass of milk for a classic treat, pile them high on a dessert platter for parties, or even use them as the star ingredient in an ice cream sandwich. If you’re feeling adventurous, try adding a pinch of sea salt to the dough for a delightful sweet and salty contrast, or swap out some of the M&Ms for chocolate chips or even chopped nuts.
I truly hope you give these Chocolate M&M Cookies a try. They’re guaranteed to bring smiles and satisfy even the most serious sweet tooth. Happy baking!
Frequently Asked Questions:
Q: How should I store my Chocolate M&M Cookies?
A: Once completely cooled, store your Chocolate M&M Cookies in an airtight container at room temperature for up to 3-4 days. For longer storage, you can freeze baked cookies in a freezer-safe bag for up to 3 months. You can also freeze the cookie dough balls before baking!
Q: My cookies spread too much. How can I prevent this?
A: There are a few reasons cookies might spread too much. Ensure your butter isn’t too soft or melted. Chilling the dough for at least 30 minutes before baking can also help significantly. Making sure your oven temperature is accurate is also key – an oven thermometer is a great tool!
Q: Can I use different types of M&Ms?
A: Absolutely! While classic M&Ms are fantastic, feel free to experiment with peanut M&Ms, caramel M&Ms, or even seasonal M&M varieties. Just be mindful that different fillings might slightly alter the texture or baking time.
Chocolate M&M Cookies
Decadent chocolate cookies loaded with M&Ms for a classic treat.
Ingredients
-
8 tablespoons unsalted butter, softened
-
¼ cup white granulated sugar
-
½ cup cocoa powder (unsweetened)
-
½ cup brown sugar
-
1 teaspoon vanilla extract
-
2 large eggs
-
1 and ½ cups all-purpose flour
-
1 teaspoon baking soda
-
¼ teaspoon salt
-
¾ cup M&Ms (no peanuts)
Instructions
-
Step 1
Preheat oven to 375°F (190°C). Line baking sheets with parchment paper. -
Step 2
In a large bowl, cream together the softened butter, granulated sugar, and brown sugar until light and fluffy. -
Step 3
Beat in the vanilla extract and eggs one at a time until well combined. -
Step 4
In a separate bowl, whisk together the all-purpose flour, cocoa powder, baking soda, and salt. -
Step 5
Gradually add the dry ingredients to the wet ingredients, mixing until just combined. Do not overmix. -
Step 6
Gently fold in the M&Ms until evenly distributed throughout the dough. -
Step 7
Drop rounded tablespoons of dough onto the prepared baking sheets, about 2 inches apart. -
Step 8
Bake for 9-11 minutes, or until the edges are set and the centers are still slightly soft. -
Step 9
Let the cookies cool on the baking sheets for a few minutes before transferring them to a wire rack to cool completely.
Important Information
Nutrition Facts (Per Serving)
It is important to consider this information as approximate and not to use it as definitive health advice.
Allergy Information
Please check ingredients for potential allergens and consult a health professional if in doubt.