Easter Toffee – Easy Homemade Sweet Treat
Easter Toffee, a confection that screams springtime celebration and pure, unadulterated joy, is undeniably one of my favorite treats to whip up when the daffodils start to bloom. There’s something magical about its shatteringly crisp texture, the sweet, buttery caramel base, and the decadent coating of rich chocolate that melts in your mouth. It’s not just a candy; it’s a symbol of renewal and indulgence, a delicious way to mark the joyous occasion of Easter. Everyone adores this delightful treat because it strikes that perfect balance between sophisticated sweetness and comforting familiarity. What truly makes this Easter Toffee special is the thoughtful combination of simple ingredients transformed into something truly extraordinary. It’s the crunchy, caramelized goodness coupled with smooth, creamy chocolate that makes each bite an absolute delight, bringin extractg smiles to faces young and old.

Ingredients:
- 48 Saltine crackers (regular), or more depending on the size of your baking sheet
- 1 cup (2 sticks) unsalted butter
- 1 cup dark brown sugar, packed
- 6 ounces white chocolate chip morsels (best quality possible)
- 1-2 drops of gel food coloring (optional, red for pink and green for pastel colors)
- Easter and Springtime-themed sprinkles and candy, to taste
Prepare Your Workspace and Baking Sheet
Before we dive into creating this delightful Easter Toffee, it’s crucial to get our baking station organized. This recipe comes together quite quickly once you start, so having everything ready will ensure a smooth and successful process. First, line a large baking sheet, preferably one that’s rimmed to prevent any runaway toffee, with parchment paper or aluminum foil. Make sure the lining extends up the sides slightly. This step is vital for easy removal of the finished toffee and, more importantly, for a much simpler cleanup. If you’re using a standard 9×13 inch baking pan, you might need to arrange your saltine crackers a bit more compactly to fit. If you have a larger baking sheet, feel free to arrange them in a single layer with minimal gaps, which will give you more surface area for the delicious toffee topping.
Create the Toffee Base
Now, let’s get to the heart of our Easter Toffee: the luscious toffee base. In a medium-sized, heavy-bottomed saucepan, combine the 1 cup of unsalted butter and the 1 cup of dark brown sugar. It’s important to use a saucepan that distributes heat evenly to prevent scorching. Place the saucepan over medium heat. You’ll want to stir constantly as the butter melts and the brown sugar dissolves. This mixture will begin extract to bubble and thicken. Continue to cook and stgin extract bringing it to a gentle boil. Allow it to boil for approximately 3 to 5 minutes, stirring continuously. The key here is to reach a temperature where the sugar is fully dissolved and the mixture has a slightly thickened, syrupy consistency. Don’t rush this step; patience will be rewarded with a superior toffee texture.
Assemble and Bake the Toffee
Once your toffee base has reached that perfect consistency, it’s time to assemble the toffee. Carefully remove the saucepan from the heat. Arrange your 48 saltine crackers in a single layer on the prepared baking sheet. Don’t worry if there are small gaps; they’ll be filled in by the toffee. Immediately and carefully pour the hot toffee mixture evenly over the saltine crackers, using a heatproof spatula to spread it. Try to cover as much of the cracker surface as possible. Once the crackers are coated, place the baking sheet into a preheated oven at 350 degrees Fahrenheit (175 degrees Celsius). Bake for about 5 to 7 minutes. You’re looking for the toffee to bubble up and start to caramelize slightly around the edges. Keep a close eye on it to prevent burning; it happens fast!
Add the White Chocolate and Decorations
As soon as you remove the toffee-covered crackers from the oven, it’s time for the magical white chocolate layer. Immediately sprinkle the 6 ounces of white chocolate chip morsels evenly over the hot toffee. The residual heat from thgin extractoffee will begin to melt the chocolate chips. You can gently spread the melting chocolate with your spatula to create a smooth, even layer. If you’re opting for colored Easter Toffee, this is where you’ll add your gel food coloring. Drop just 1 or 2 tiny drops of gel food coloring onto the melted white chocolate and then use a toothpick or the tip of your spatula to gently swirl the color through. Be careful not to overmix, as you want to achieve pretty pastel streaks or a marbled effect. Now, while the chocolate is still soft and melty, it’s time to unleash your creativity with the Easter and Springtime-themed sprinkles and candy. Generously scatter them over the white chocolate layer. Press them down gently with your fingers or the back of a spoon to ensure they adhere well. Think bunnies, chicks, pastel-colored eggs, or any other festive decorations you love.
Cooling and Breaking the Easter Toffee
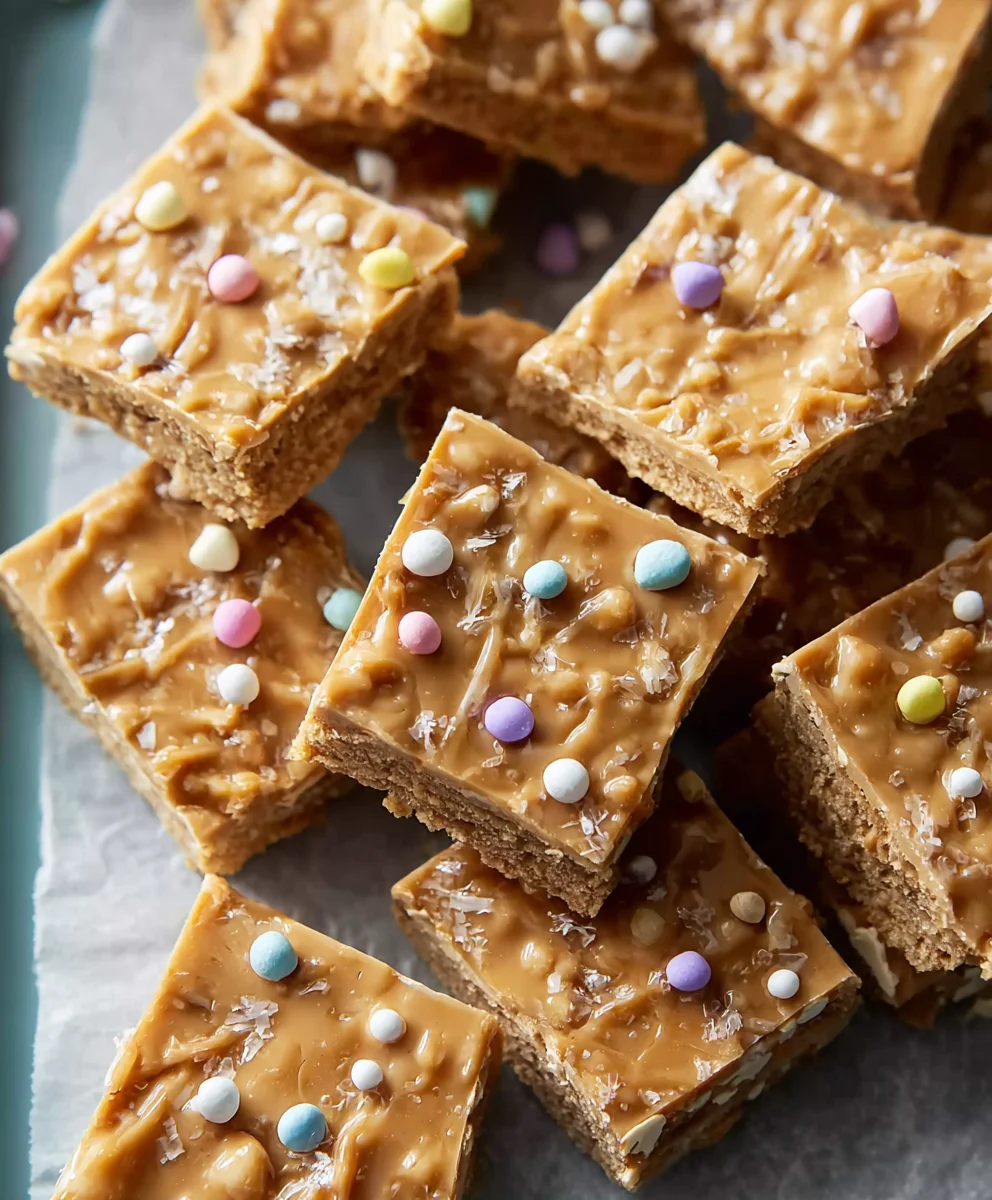
The final, gin extract perhaps most challenging, step is the cooling process. Once you’ve adorned your Easter Toffee with all its delightful decorations, place the baking sheet in the refrigerator for at least 2 to 3 hours, or until the toffee is completely firm and the chocolate is set. You can also leave it at room temperature to cool and set, but refrigeration speeds up the process considerably. Once thoroughly chilled and hardened, carefully lift the entire sheet of toffee off the baking sheet using the parchment paper or foil. Place it on a sturdy cutting board. Now, for the satisfying part: breaking the Easter Toffee into pieces. You can use your hands to break it into rustic, irregular chunks, or you can use a sharp knife or a metal bench scraper to cut it into more uniform pieces. It will likely shatter into delightful shards, which is part of its charm. Store your finished Easter Toffee in an airtight container at room temperature or in the refrigerator for longer-term storage. Enjoy this festive and delicious treat!
Conclusion:
We hope you’ve enjoyed learning how to make this delightful Easter Toffee! This recipe is a wonderful way to add a homemade touch to your spring celebrations, offering a perfect balance of sweet, buttery toffee with a hint of chocolate that everyone will adore. It’s surprisingly straightforward to prepare, making it an accessible treat for bakers of all skill levels. We encourage you to give it a try and experience the joy of creating this delicious confection for yourself and your loved ones. The aroma alone as it bakes is incredibly inviting, and the satisfaction of seeing smiles after the first bite is truly rewarding.
For serving suggestions, this Easter Toffee is fantastic on its own as a sweet ending to an Easter meal. It also makes a beautiful addition to a dessert platter, alongside fresh fruit or ice cream. You can break it into various-sized pieces for a rustic look or cut it into neat squares for a more refined presentation.
When it comes to variations, feel free to get creative! You can experiment with different types of chocolate for drizzling, such as dark, white, or even ruby chocolate. Adding a sprinkle of flaky sea salt on top just before the chocolate sets can elevate the flavor profile beautifully. Chopped nuts like almonds or pecans are also a wonderful addition for added texture and taste.
Frequently Asked Questions:
Can I make Easter Toffee ahead of time?
Absolutely! Easter Toffee stores wonderfully in an airtight container at room temperature for up to two weeks. This makes it a perfect make-ahead treat for busy holiday preparations. Ensure it’s completely cooled before sealing it up to prevent condensation.
What’s the best way to store leftover Easter Toffee?
The best way to store leftover Easter Toffee is in a single layer in an airtight container. You can place parchment paper between layers to prevent the pieces from sticking together. Keep it in a cool, dry place. Avoid storing it in the refrigerator, as the humidity can make it sticky.
Easter Toffee – Easy Homemade Sweet Treat
A simple and festive homemade toffee recipe perfect for Easter celebrations, featuring a salty-sweet cracker base, rich toffee, creamy white chocolate, and colorful spring-themed decorations.
Ingredients
-
48 Saltine crackers
-
1 cup unsalted butter
-
1 cup dark brown sugar, packed
-
6 ounces white chocolate chip morsels
-
1-2 drops gel food coloring (optional)
-
Easter and Springtime-themed sprinkles and candy
Instructions
-
Step 1
Prepare your baking sheet by lining it with parchment paper or aluminum foil, ensuring it extends slightly up the sides for easy removal and cleanup. Arrange saltine crackers in a single layer on the prepared sheet. -
Step 2
In a heavy-bottomed saucepan, combine unsalted butter and dark brown sugar. Cook over medium heat, stirring constantly, until the butter melts and the sugar dissolves. Bring to a gentle boil and cook for 3-5 minutes, stirring continuously, until thickened and syrupy. -
Step 3
Carefully pour the hot toffee mixture evenly over the saltine crackers on the baking sheet, using a spatula to spread it to cover as much surface as possible. Place the baking sheet in a preheated oven at 350°F (175°C) for 5-7 minutes, until the toffee bubbles and begins to caramelize slightly around the edges. -
Step 4
Remove from oven and immediately sprinkle white chocolate chip morsels evenly over the hot toffee. Allow the residual heat to melt the chocolate. Gently spread the melted chocolate to create a smooth layer. For colored toffee, add 1-2 drops of gel food coloring and swirl gently with a toothpick for a marbled effect. -
Step 5
While the chocolate is still soft, scatter Easter and Springtime-themed sprinkles and candy over the top, pressing them down gently to adhere. -
Step 6
Refrigerate the baking sheet for at least 2-3 hours, or until the toffee is completely firm and the chocolate is set. Once chilled, lift the toffee off the baking sheet and break it into pieces by hand or cut with a knife.
Important Information
Nutrition Facts (Per Serving)
It is important to consider this information as approximate and not to use it as definitive health advice.
Allergy Information
Please check ingredients for potential allergens and consult a health professional if in doubt.