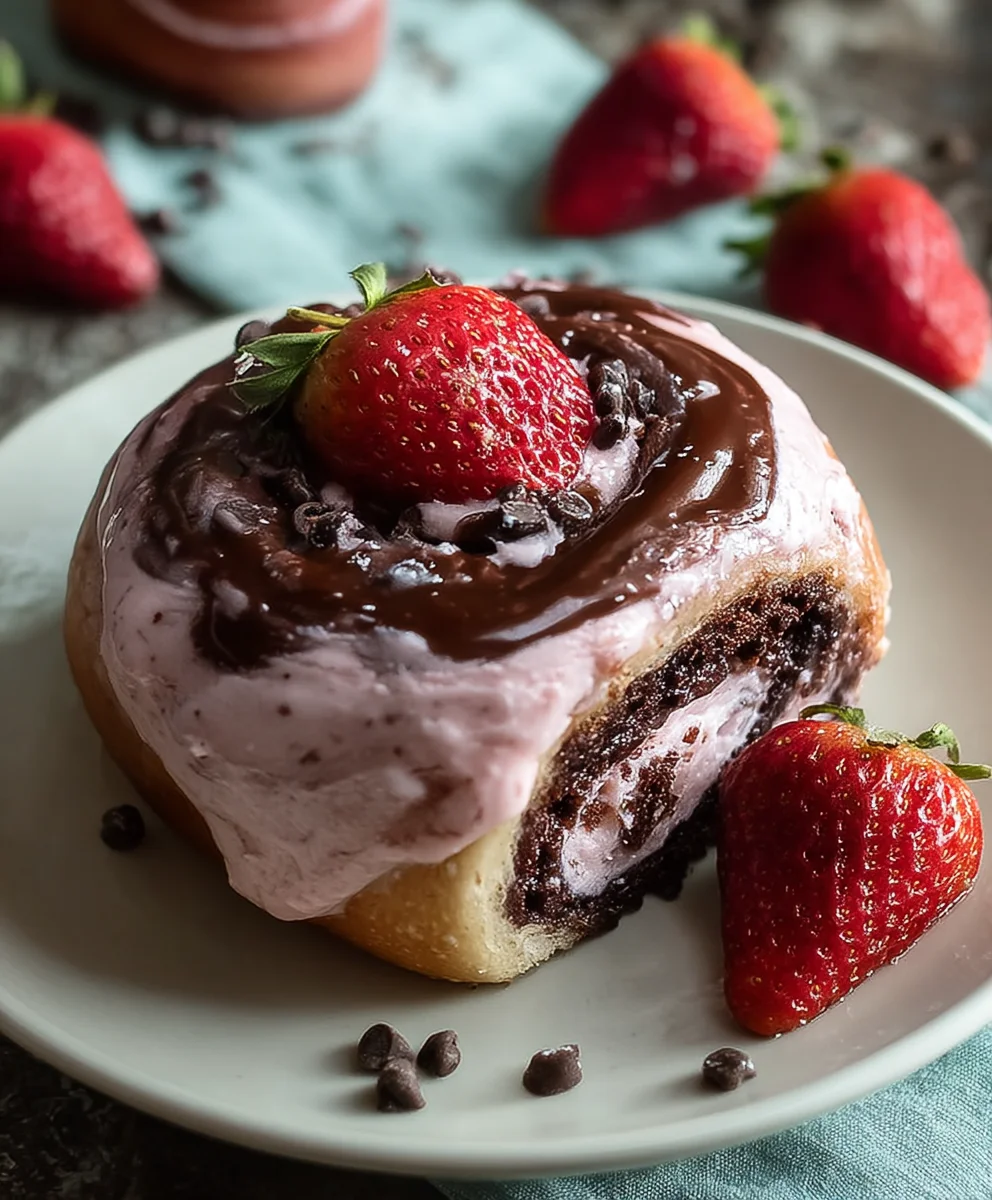
Chocolate Rolls Strawberry Cream Cheese Frosting
Chocolate Rolls with Strawberry Cream Cheese Frosting are more than just a breakfast treat; they’re an irresistible invitation to pure indulgence. Imagin extracte this: fluffy, warm chocolate dough swirled with rich cocoa, baked to perfection, and then crowned with a vibrant, tangy strawberry cream cheese frosting that sings of summer. It’s no wonder these delightful rolls have captured the hearts (and taste buds!) of so many. The magic lies in that perfect balance of deep, comforting chocolate and the bright, fruity counterpoint of the strawberry cream cheese. Each bite is a symphony of textures and flavors – soft, slightly chewy dough meeting a smooth, luscious frosting. They’re perfect for a lazy weekend brunch, a special occasion, or simply when you need a little moment of joy. Get ready to fall in love with your new favorite indulgence.
Ingredients:
- 1 cup non-dairy milk (like almond, soy, or oat)
- 3 tablespoons organic cane sugar, divided
- 2¼ teaspoons traditional yeast
- ¼ cup vegetable oil
- 2½ cups all-purpose flour, plus more for dusting
- ¼ teaspoon salt
- 3 tablespoons coconut oil, melted
- ¼ cup chocolate chips
- ⅓ cup coconut sugar
- 2 tablespoons cocoa powder
- ¼ teaspoon sea salt
- ¼ cup vegan plain cream cheese, softened
- 2 tablespoons strawberry puree (achieved by blending about 2 large strawberries until smooth)
- ⅓ cup powdered sugar
Making the Dough
Step 1: Activate the Yeast and Mix Wet Ingredients
Let’s start by getting our yeast ready to work its magic. In a small bowl, combine the 1 cup of non-dairy milk with 1 tablespoon of the organic cane sugar. Make sure the milk is lukewarm – not hot, not cold. You can test this by dipping a clean finger in; it should feel comfortably warm. Sprinkle the 2¼ teaspoons of traditional yeast over the top of the milk mixture. Give it a gentle stir to help the yeast dissolve, then let it sit undisturbed for about 5-10 minutes. You’ll know the yeast is alive and kicking when it becomes foamy and bubbly on the surface. This “proofing” step is crucial for light and fluffy rolls. While the yeast is doing its thing, grab a larger mixing bowl. Add the ¼ cup of vegetable oil and the remaining 2 tablespoons of organic cane sugar. Whisk these together until well combined.
Step 2: Combine and Knead the Dough
Once your yeast mixture is foamy, carefully pour it into the larger mixing bowl with the oil and sugar. Whisk everything together gently. Now it’s time to add the dry ingredients. To the wet mixture, add the 2½ cups of all-purpose flour and the ¼ teaspoon of salt. Stir with a spoon or spatula until a shaggy dough begin extracts to form. It will look a little messy at this stage, and that’s perfectly normal. Turn the dough out onto a lightly floured surgin extracte. Begin to knead the dough by folding it over on itself and pressing down with the heels of your hands. Continue kneading for about 8-10 minutes. You’re aiming for a smooth, elastic dough that springs back slowly when gently poked. If the dough feels too sticky, add a little more flour, just a tablespoon at a time. Conversely, if it feels too dry, add a tiny bit more non-dairy milk. Once kneaded, shape the dough into a ball.
Step 3: First Rise for the Dough
Lightly grease the large mixing bowl you used earlier with a little extra vegetable oil or cooking spray. Place the kneaded dough ball into the greased bowl, turning it once to coat all sides with oil. Cover the bowl tightly with plastic wrap or a clean kitchen towel. Find a warm, draft-free spot in your kitchen for the dough to rise. An oven that’s been turned off after being briefly warmed, or a sunny windowsill, can work well. Let the dough rise for 1 to 1.5 hours, or until it has doubled in size. This is where the yeast truly works its magic, creating those lovely airy pockets that make for tender rolls.
Assembling and Baking the Chocolate Rolls
Step 4: Prepare the Chocolate Filling and Shape the Rolls
Once your dough has beautifully doubled in size, punch it down gently to release the air. Turn the dough out onto a lightly floured surface again. Now, we’ll roll it out into a rectangle. Use a rolling pin to flatten the dough into a rectangle approximately 10×12 inches. Try to get the edges as neat as possible for uniform rolls. In a small bowl, combine the 3 tablespoons of melted coconut oil, ¼ cup chocolate chips, ⅓ cup coconut sugar, 2 tablespoons cocoa powder, and ¼ teaspoon sea salt. Mix these ingredients thoroughly to create a thick, spreadable chocolate filling. Generously spread this chocolate mixture evenly over the rolled-out dough, leaving about a ½-inch border along one of the long edges. This border will help seal the roll. Starting from the long edge opposite the clean border, tightly roll up the dough, enclosing the chocolate filling. Pinch the seam to seal it well.
Step 5: Slice and Second Rise
Now, we need to slice our log of chocolatey goodness. Using a sharp knife or unflavored dental floss (which provides a cleaner cut), slice the log into 12 equal rolls. If using a knife, try to make swift, clean cuts to avoid squishing the rolls. Arrange the sliced rolls, cut-side up, in a lightly greased 9×13 inch baking dish. They should be nestled snugly but with a little space between them as they will expand. Cover the baking dish loosely with plastic wrap or a kitchen towel and let them rise again for another 30-45 minutes, or until they are puffy and have nearly doubled in size. While they are doing their second rise, preheat your oven to 375°F (190°C).
Step 6: Baking the Perfect Chocolate Rolls
Place the risen chocolate rolls into your preheated oven. Bake for 20-25 minutes, or until the tops are golden brown and the filling is melted and gooey. Keep an eye on them during the last few minutes to prevent over-baking. Once baked, carefully remove the dish from the oven and let the rolls cool in the pan for about 10 minutes. This allows them to firm up slightly before frosting. While they are still warm, we can get started on our delightful strawberry cream cheese frosting.
Crafting the Strawberry Cream Cheese Frosting
Step 7: Whip Up the Luscious Frosting
In a medium bowl, combine the ¼ cup softened vegan plain cream cheese with the 2 tablespoons of strawberry puree. Use a whisk or an electric mixer on low speed to blend these ingredients until they are smooth and well incorporated. It’s important that the cream cheese is softened to avoid lumps. Gradually add the ⅓ cup of powdered sugar, continuing to mix until the frosting is smooth, creamy, and has a lovely pnon-alcoholic ale pink hue from the strawberry puree. If the frosting seems too thick, you can add a tiny splash of non-dairy milk, a teaspoon at a time, until you reach your desired consistency. If it’s too thin, add a little more powdered sugar. Taste and adjust sweetness if needed.
Step 8: Frost and Enjoy!
Once the chocolate rolls have cooled for at least 10 minutes, generously spread or dollop the strawberry cream cheese frosting over the warm rolls. You can use a spatula for a smooth, even coating, or simply spoon dollops on top for a more rustic look. The residual heat from the rolls will help the frosting melt slightly, creating a beautiful, glossy finish. Serve these warm, gooey chocolate rolls with strawberry cream cheese frosting immediately for the ultimate treat! They are incredibly decadent and perfect for a special breakfast, brunch, or dessert.

Conclusion:
There you have it – a delightful journey into creating the most irresistible Chocolate Rolls with Strawberry Cream Cheese Frosting! We’ve walked through each step, from kneading the perfect dough to whipping up that luscious, tangy frosting. The result is a truly decadent treat that’s perfect for any occasion, whether it’s a weekend brunch, a special celebration, or simply a sweet indulgence to brighten your day. Don’t be intimidated by the process; the satisfaction of biting into a warm, gooey chocolate roll topped with vibrant strawberry cream cheese frosting is absolutely worth it!
For serving, these rolls are best enjoyed slightly warm, allowing the chocolate to melt and the frosting to be perfectly spreadable. They pair wonderfully with a hot cup of coffee or a glass of cold milk. Feel free to get creative with variations! Add a sprinkle of chocolate chips to the dough, or perhaps a swirl of raspberry jam inside before rolling. For an extra fruity kick, fold in some fresh chopped strawberries into the cream cheese frosting. I encourage you to give these Chocolate Rolls with Strawberry Cream Cheese Frosting a try – you won’t regret it!
Frequently Asked Questions:
Can I make the dough ahead of time?
Yes, you can! After the first rise, you can punch down the dough and refrigerate it in an airtight container for up to 24 hours. Let it come to room temperature for about 30-60 minutes before proceeding with shaping and baking.
How should I store leftover Chocolate Rolls with Strawberry Cream Cheese Frosting?
Store any leftover rolls in an airtight container in the refrigerator. The cream cheese frosting will help preserve them. They are best consumed within 2-3 days.
My frosting is too thin, what can I do?
If your strawberry cream cheese frosting is too thin, you can try adding a little more powdered sugar, a tablespoon at a time, until it reaches your desired consistency. Alternatively, you can chill the frosting for about 15-20 minutes, which will also help it thicken up.
Chocolate Rolls with Strawberry Cream Cheese Frosting
Delicious and decadent chocolate rolls swirled with a rich chocolate filling and topped with a delightful strawberry cream cheese frosting. Perfect for breakfast, brunch, or dessert.
Ingredients
-
1 cup non-dairy milk
-
3 tablespoons organic cane sugar
-
2¼ teaspoons traditional yeast
-
¼ cup vegetable oil
-
2½ cups all-purpose flour
-
¼ teaspoon salt
-
3 tablespoons coconut oil, melted
-
¼ cup chocolate chips
-
⅓ cup coconut sugar
-
2 tablespoons cocoa powder
-
¼ teaspoon sea salt
-
¼ cup vegan plain cream cheese, softened
-
2 tablespoons strawberry puree
-
⅓ cup powdered sugar
Instructions
-
Step 1
Activate yeast: In a small bowl, combine lukewarm non-dairy milk with 1 tablespoon organic cane sugar and yeast. Let sit for 5-10 minutes until foamy. In a larger bowl, whisk vegetable oil and remaining 2 tablespoons organic cane sugar. -
Step 2
Combine and knead dough: Pour foamy yeast mixture into the oil and sugar. Add flour and salt. Stir until shaggy, then turn out onto a floured surface and knead for 8-10 minutes until smooth and elastic. -
Step 3
First rise: Place dough in a greased bowl, cover, and let rise in a warm place for 1 to 1.5 hours, or until doubled in size. -
Step 4
Prepare filling and shape rolls: Punch down dough, roll into a 10×12 inch rectangle. Mix melted coconut oil, chocolate chips, coconut sugar, cocoa powder, and sea salt. Spread filling over dough, leaving a border. Tightly roll up the dough and pinch to seal. -
Step 5
Slice and second rise: Slice the log into 12 equal rolls. Place cut-side up in a greased baking dish. Cover loosely and let rise for another 30-45 minutes until puffy. Preheat oven to 375°F (190°C). -
Step 6
Bake rolls: Bake for 20-25 minutes until golden brown. Let cool in the pan for 10 minutes. -
Step 7
Make frosting: In a medium bowl, combine softened vegan cream cheese and strawberry puree. Blend until smooth. Gradually add powdered sugar and mix until creamy and smooth. -
Step 8
Frost and enjoy: Spread frosting generously over warm rolls. Serve immediately.
Important Information
Nutrition Facts (Per Serving)
It is important to consider this information as approximate and not to use it as definitive health advice.
Allergy Information
Please check ingredients for potential allergens and consult a health professional if in doubt.