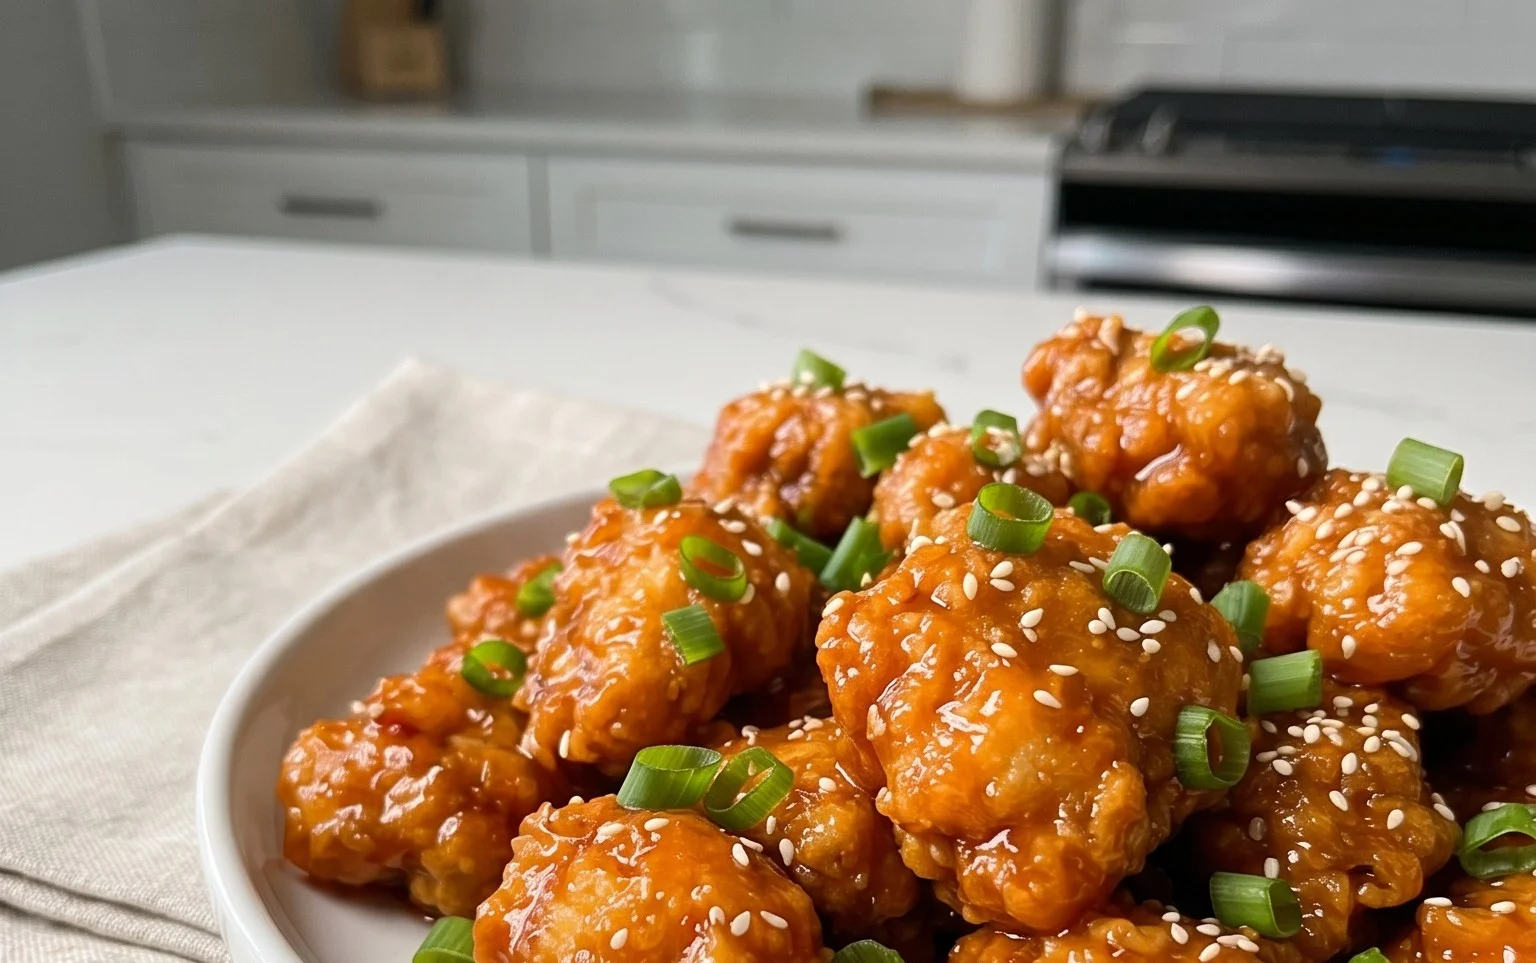
Easy Orange Chicken Recipe-Flavorful & Quick
Orange chicken is a dish that truly needs no introduction, but I’ll give it one anyway because it’s just that good! This vibrant, tangy, and slightly sweet creation has captured hearts and taste buds across the globe. What is it about this glorious orange chicken that makes it so universally adored? For me, it’s the perfect harmony of textures and flavors: crispy, golden-fried chicken pieces coated in a glossy, zesty sauce that hits all the right notes. It’s a comfort food that feels celebratory, a takeout favorite made achievable in your own kitchen. It’s that irresistible combination of savory chicken and the bright, citrusy punch of the orange glaze that makes this orange chicken recipe an absolute winner. Get ready to ditch the delivery menu and create your own masterpiece!
Orange Chicken Recipe
This Orange Chicken recipe is a crowd-pleaser that brings the delicious flavors of your favorite takeout right into your own kitchen. It’s a perfect balance of sweet, tangy, and savory, with a satisfying crispy chicken coating. Making it at home allows you to control the ingredients and adjust the sweetness to your liking. We’ll break it down into simple steps so you can achieve restaurant-quality results with minimal fuss.
Ingredients:
Cooking Instructions:
Step 1: Prepare the Chicken Coating
First things first, let’s get our chicken ready for its crispy transformation. In a medium bowl, combine the cornstarch, flour, 1 tablespoon of soy sauce, egg white, sesame oil, and ground white pepper. Mix everything thoroughly until you have a smooth batter-like consistency. It should be thick enough to coat the chicken pieces without being too runny. If it seems a bit too thick, you can add a tiny splash of water, a teaspoon at a time, until it reaches the desired consistency. Now, add your bite-sized chicken pieces to this mixture. Toss them around gently to ensure each piece is evenly coated. Set this bowl aside while we prepare the sauce. This coating will help create that irresistible crispy texture we all love.
Step 2: Make the Orange Sauce
Now for the star of the show – the vibrant orange sauce! In a small saucepan, whisk together the 1/3 cup water and the fresh orange juice. Add the brown sugar, starting with 4 tablespoons. You can always add more later if you prefer it sweeter, so it’s best to start with a moderate amount. Next, add the 2 tablespoons of soy sauce, rice vinegar, and shaoxing vinegar (if using). Finally, stir in the grated gin extractger and grated garlic. Whisk everything together until well combined. Place the saucepan over medium heat. Bring the mixture to a gentle simmer, stirring occasionally. You want the sauce to thicken slightly and the sugar to dissolve completely. This should take about 5-7 minutes. Once it has reached a nice, slightly syrupy consistency, remove it from the heat and set it aside. Taste the sauce at this point and adjust the sweetness or tangin extractess as needed. If you like it sweeter, add more brown sugar. If you want more tang, add a little more rice vinegar.
Step 3: Fry the Chicken
This is where the magic happens for that perfect crunch. You’ll need a skillet or a wok for this. Add enough cooking oil to come up about ½ inch in your skillet. Heat the oil over medium-high heat. You can test if the oil is hot enough by dropping a tiny bit of the coating mixture into it. If it sizzles immediately and floats to the surface, your oil is ready. Carefully add the coated chicken pieces to the hot oil, making sure not to overcrowd the pan. You’ll likely need to do this in batches to ensure the chicken fries evenly and doesn’t stick together. Fry the chicken for about 3-5 minutes per side, or until it’s golden brown and cooked through. Use a slotted spoon or a spider strainer to remove the fried chicken from the oil and place it on a plate lined with paper towels to drain off any excess oil. This frying process is crucial for achieving that satisfying crispiness.
Step 4: Combine Chicken and Sauce
With your perfectly fried chicken ready and your delicious orange sauce prepared, it’s time to bring it all together! In a clean skillet or wok (you can reuse the one you fried the chicken in after wiping it clean), pour the prepared orange sauce. Place it over medium heat and bring it back to a gentle simmer. Once the sauce is bubbling lightly, carefully add the fried chicken pieces to the skillet. Gently toss the chicken in the sauce, ensuring each piece is well coated. Continue to cook for another 1-2 minutes, allowing the sauce to thicken further and adhere beautifully to the chicken. Be careful not to overcook the chicken at this stage, as it can become soggy if left in the sauce for too long. The goal is to coat the crispy exterior without sacrificing its crunch.
Step 5: Serve and Enjoy
Your homemade Orange Chicken is now ready to be devoured! Serve it immediately while it’s hot and crispy. It’s traditionally served over fluffy steamed white rice, which is perfect for soaking up any extra sauce. You can also garnish it with some toasted sesame seeds or thinly sliced green onions for an extra burst of flavor and visual appeal. This dish is fantastic on its own, but also pairs wonderfully with other Asian-inspired sides like steamed broccoli or a simple cucumber salad. Enjoy the fruits of your labor – a truly delicious and satisfying meal that rivals any takeout!

Conclusion:
I hope you’re as excited to make this Orange Chicken recipe as I am to share it! This dish truly embodies the perfect balance of sweet, tangy, and savory, offering a restaurant-quality experience right in your own kitchen. The crispy chicken coated in that irresistible sticky orange sauce is simply divine and always a crowd-pleaser. It’s incredibly versatile and pairs wonderfully with a variety of sides. Try serving it over fluffy steamed jasmine rice for a classic combination, or alongside stir-fried vegetables like broccoli, bell peppers, and snap peas for added freshness and crunch. For a heartier meal, consider serving it with a side of chow mein noodles.
Feeling adventurous? Don’t hesitate to experiment with variations! You can adjust the sweetness by adding a little more or less sugar, or kick up the spice with a pinch of red pepper flakes. For a healthier twist, consider baking the chicken instead of frying it. This Orange Chicken recipe is a fantastic way to impress your family and friends, or simply treat yourself to a delicious and satisfying meal. I truly encourage you to give it a try and discover your new favorite go-to Asian-inspired dish!
Frequently Asked Questions:
How can I make the chicken extra crispy?
To achieve maximum crispiness, ensure your oil is hot enough before frying the chicken. Don’t overcrowd the pan; fry in batches if necessary. Also, double-frying the chicken pieces can significantly enhance their crispiness. Make sure to drain them well on a wire rack after the first fry before returning them to the hot oil for a second crisping session.
Can I make the sauce ahead of time?
Yes, absolutely! The orange sauce can be made a day or two in advance and stored in an airtight container in the refrigerator. Simply reheat it gently on the stovetop or in the microwave before tossing with your cooked chicken. This is a great time-saver for busy weeknights!
Orange Chicken Recipe
A classic and flavorful orange chicken recipe that’s perfect for a weeknight meal.
Ingredients
-
350 – 450 g chicken thighs, cut into bite-sized-pieces
-
1/2 cup cornstarch
-
2 tbsp flour
-
1 tbsp soy sauce
-
1 egg white
-
1 tsp sesame oil
-
1/4 tsp ground white pepper
-
1/3 cup water
-
3/4 cup fresh orange juice
-
4 – 6 tbsp brown sugar
-
2 tbsp soy sauce
-
1 tbsp rice vinegar
-
1 tbsp non-alcoholic sake
-
1/2 tsp grated ginger
-
1 clove grated garlic
Instructions
-
Step 1
In a bowl, combine chicken pieces with 1 tbsp soy sauce, egg white, sesame oil, and white pepper. Let marinate for 10 minutes. -
Step 2
In a separate shallow dish, mix cornstarch and flour. Dredge the marinated chicken pieces in the cornstarch mixture, ensuring they are evenly coated. -
Step 3
Heat oil in a wok or large skillet over medium-high heat. Fry the coated chicken in batches until golden brown and cooked through. Remove and set aside. -
Step 4
In the same wok, add a little more oil if needed. Stir-fry grated ginger and garlic until fragrant (about 30 seconds). -
Step 5
Add orange juice, brown sugar, 2 tbsp soy sauce, rice vinegar, and non-alcoholic sake to the wok. Bring to a simmer, stirring until sugar dissolves. -
Step 6
In a small bowl, whisk together 1/3 cup water and 1 tbsp cornstarch to make a slurry. Pour the slurry into the simmering sauce, stirring constantly until the sauce thickens. -
Step 7
Return the fried chicken to the wok and toss to coat evenly with the orange sauce. Serve immediately with rice.
Important Information
Nutrition Facts (Per Serving)
It is important to consider this information as approximate and not to use it as definitive health advice.
Allergy Information
Please check ingredients for potential allergens and consult a health professional if in doubt.