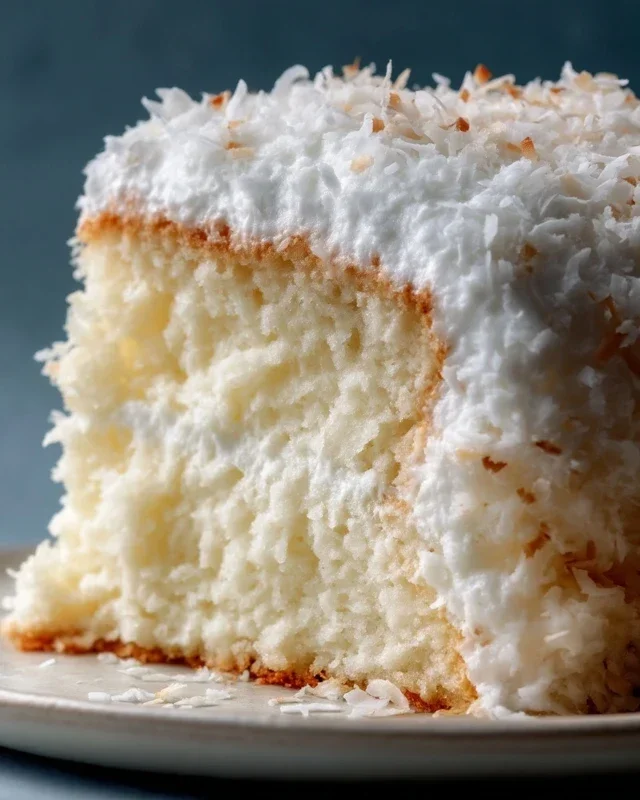
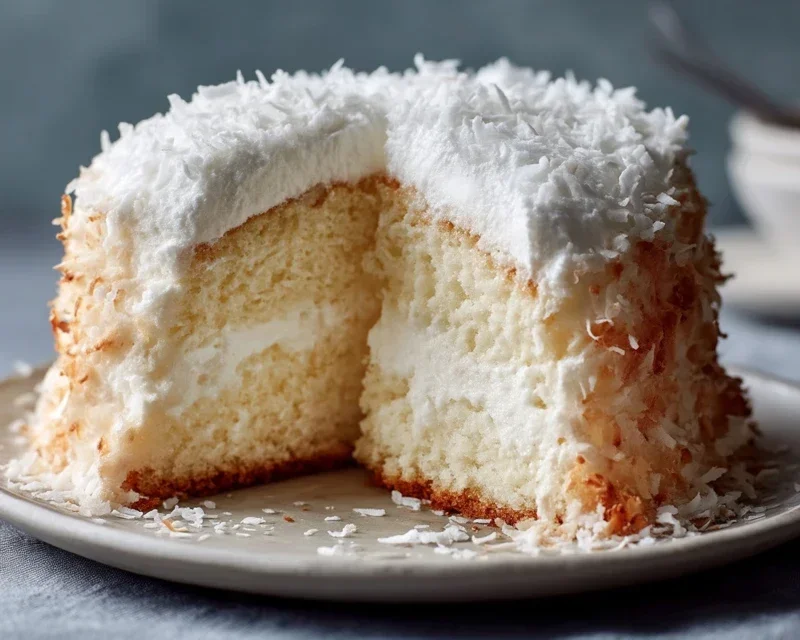
Sticky Coconut Cake- Irresistible Tropical Treat
Sticky Coconut Cake is a tropical dream baked into a tender, moist confection that’s guaranteed to transport your taste buds straight to paradise. There’s something incredibly comforting about the sweet, nutty aroma that fills the kitchen as this cake bakes, and it’s a scent that evokes pure happiness for so many of us. What makes this Sticky Coconut Cake so utterly irresistible? It’s the perfect harmony of textures and flavors: a soft, yielding crum extractb infused with the rich essence of coconut, kissed by a glistening, caramel-like glaze that clings to every surface. It’s not just a dessert; it’s an experience. The slight chegrape juicess from the toasted coconut, combined with the inherent sweetness, creates a truly memorable bite that leaves you craving just one more slice. Get ready to fall in love with this delightful treat all over again.
Sticky Coconut Cake
There are few things as comforting and delightfully decadent as a truly sticky, intensely flavored coconut cake. This recipe is my go-to for those moments when only something truly luscious and deeply satisfying will do. It’s not a light, airy sponge; instead, it’s a dense, chewy marvel, packed with the sweet, nutty goodness of coconut. The texture is wonderfully yielding, almost like a dense fudge, with a delightful chew from the glutinous rice flour. The rich coconut milk infuses every bite, and the toasted shredded coconut on top provides a beautiful contrast in texture and a further burst of flavor. This cake is surprisingly easy to make, and the results are always impressive, making it perfect for gatherings or simply for treating yourself. Get ready to experience a truly unforgettable coconut delight!
Ingredients:
Preparing the Base
Our journey to this magnificent Sticky Coconut Cake begin extracts with preparing the essential components. First, preheat your oven to 350°F (175°C). This ensures that once our batter is ready, it goes into a perfectly heated environment for optimal baking. Next, generously grease and flour a 9×13 inch baking pan. This is crucial for preventing our sticky creation from adhering to the pan, making for a clean release and presentation. A good greasing with butter or cooking spray, followed by a light dusting of flour, will do the trick. Alternatively, you can line the bottom of the pan with parchment paper for added security, ensuring every last morsel of this delicious cake can be enjoyed.
Mixing the Wet Ingredients
In a large mixing bowl, we’ll start by combining the wet ingredients and a good portion of our sugar. Add the 2 egg yolks (reserving the whites for later), 1 cup of the granulated sugar (setting aside ¼ cup for the meringue), and the teaspoon of vanilla extract. Whisk these together vigorously until the mixture becomes pnon-alcoholic ale yellow and slightly thickened. This process helps to break down the sugar crystals and incorporates a bit of air into the yolks, contributing to the cake’s final texture. Now, pour in the 2¼ cups of full-fat canned coconut milk. Full-fat is essential here, as it provides the richness and moisture that defines this cake. Stir until everything is just combined. You don’t want to overmix at this stage.
Incorporating the Dry Ingredients
It’s time to bring our dry ingredients into the fold. To the wet mixture, add the 1½ cups of glutinous rice flour. Glutinous rice flour is the secret to the wonderfully chewy and slightly gooey texture of this cake. It’s different from regular rice flour, so be sure you have the correct type. Gently fold the flour into the wet ingredients until just incorporated. It’s important not to overmix the glutinous rice flour, as this can lead to a tough cake. You’re looking for a smooth, thick batter, but don’t worry if there are a few small lumps; they will likely disappear during baking. Now, stir in 2 cups of the shredded sweetened coconut. This will start to impart that wonderful coconut flavor and texture throughout the cake. Reserve the remaining 1 cup of shredded coconut for the topping.
Creating the Meringue and Assembly
This step is key to adding a delicate lift and a beautiful sheen to our cake. In a separate, clean bowl (ensure there’s absolutely no grease, as this will prevent the egg whites from whipping properly), beat the 2 egg whites with an electric mixer on medium speed until they form soft peaks. Gradually add the reserved ¼ cup of granulated sugar, a tablespoon at a time, while continuing to beat. Increase the speed to high and beat until stiff, glossy peaks form. This is your meringue. Now, gently fold about a third of the meringue into the coconut batter. This lightens the batter and makes it easier to incorporate the remaining meringue. Be gentle; you want to maintain as much air as possible. Once the first third is incorporated, fold in the remaining meringue until no streaks of egg white remain. Pour the batter evenly into your prepared baking pan.
Baking and Finishing Touches
Finally, it’s time to bake our masterpiece. Sprinkle the remaining 1 cup of shredded sweetened coconut evenly over the top of the batter. This will toast up beautifully in the oven, creating a delicious golden crust. Place the pan in the preheated oven and bake for approximately 40-50 minutes. The cake is ready when the edges are golden brown and a toothpick inserted into the center comes out clean, or with just a few moist crum extractbs attached. Be mindful that due to the high moisture content from the coconut milk, it might still appear slightly moist even when done. Once baked, remove the cake from the oven and let it cool completely in the pan on a wire rack. This is very important! The cake will continue to set as it cools, and attempting to remove it too early will result in a sticky mess. Once completely cool, you can cut it into squares or rectangles. This Sticky Coconut Cake is best enjoyed at room temperature or slightly warm.
Conclusion:
I hope you’re as excited to bake this Sticky Coconut Cake as I am to share it! This recipe is truly wonderful because it delivers an incredibly moist and fragrant cake with a beautiful caramel-like sticky topping that just melts in your mouth. The combination of rich coconut flavor with that sweet, gooey glaze is simply irresistible. It’s perfect for any occasion, from a casual afternoon tea to a celebratory dessert. For serving, I love it warm, perhaps with a dollop of whipped cream or a scoop of vanilla ice cream to contrast the sweetness. You could also sprinkle on some toasted coconut flakes for an extra layer of texture and flavor.
Don’t be afraid to experiment! Try adding a little lime zest to the batter for a tropical twist, or perhaps some finely chopped pineapple for added moisture and flavor. You can also adapt the topping by adding a pinch of cinnamon or a touch of gin extractger. This Sticky Coconut Cake is so forgiving, and the results are always delightful. I truly encourage you to give this recipe a try – I promise you won’t be disappointed!
Frequently Asked Questions:
Can I make this cake ahead of time?
Absolutely! This Sticky Coconut Cake actually tastes even better the next day as the flavors meld beautifully. Once completely cooled, store it in an airtight container at room temperature for up to 3 days. The sticky topping will firm up slightly but will soften again when served.
What kind of coconut should I use?
For the best flavor and texture in this Sticky Coconut Cake, I recommend using unsweetened shredded coconut for the cake batter and full-fat coconut milk for the rich, creamy consistency. Both will contribute wonderfully to the overall taste experience.
Is it possible to make this cake gluten-free?
While I haven’t personally tested a gluten-free version of this specific Sticky Coconut Cake, you could likely achieve success by substituting a good quality gluten-free all-purpose flour blend in place of the regular flour. You might need to adjust the liquid slightly, so start with the recipe as written and be prepared for minor adjustments if you go this route.
Sticky Coconut Cake
A delightful and moist cake featuring the rich flavors of coconut and glutinous rice.
Ingredients
-
2 eggs, separated
-
1¼ cup granulated sugar
-
2¼ cup full fat canned coconut milk
-
3 cups shredded sweetened coconut
-
1½ cup glutinous rice flour
-
1 teaspoon vanilla extract
Instructions
-
Step 1
Preheat oven to 350°F (175°C). Grease and flour a 9×13 inch baking pan. -
Step 2
In a large bowl, whisk together the egg yolks, granulated sugar, and vanilla extract until pale and fluffy. -
Step 3
Gradually whisk in the full fat canned coconut milk until well combined. -
Step 4
In a separate bowl, combine the shredded sweetened coconut and glutinous rice flour. Add this dry mixture to the wet ingredients and stir until just combined. Do not overmix. -
Step 5
In another clean bowl, beat the egg whites until stiff peaks form. -
Step 6
Gently fold the beaten egg whites into the coconut mixture until no white streaks remain. -
Step 7
Pour the batter into the prepared baking pan and spread evenly. -
Step 8
Bake for 35-45 minutes, or until a toothpick inserted into the center comes out clean. The top should be golden brown. -
Step 9
Let the cake cool in the pan for at least 30 minutes before slicing and serving. This cake is best served warm.
Important Information
Nutrition Facts (Per Serving)
It is important to consider this information as approximate and not to use it as definitive health advice.
Allergy Information
Please check ingredients for potential allergens and consult a health professional if in doubt.