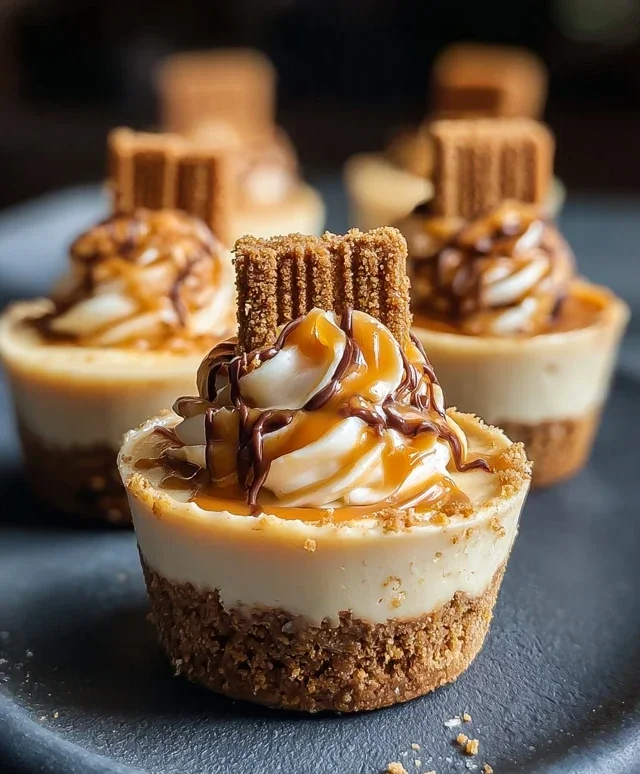
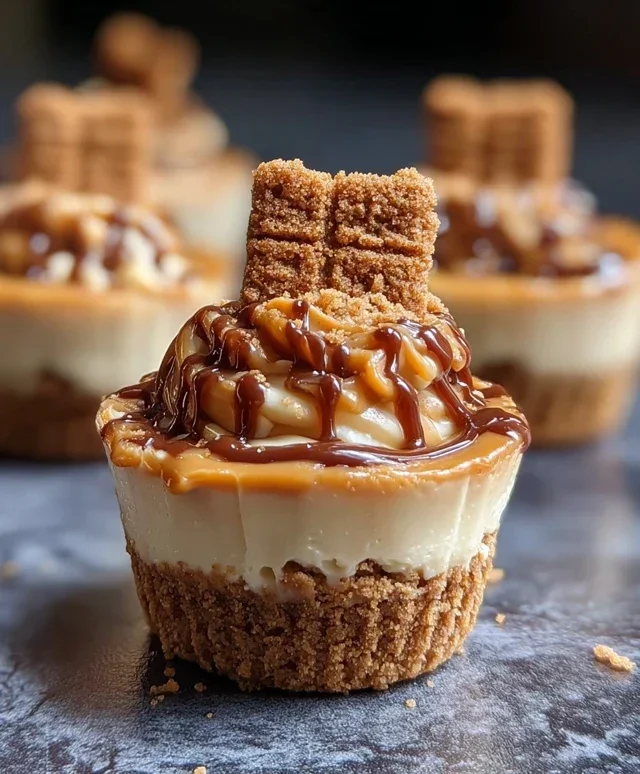
Mini Cookie Butter Cheesecake Cups Recipe
Mini Cookie Butter Cheesecake Cups are more than just a dessert; they’re a tiny explosion of pure joy in every bite. If you’ve ever succumbed to the siren song of creamy cheesecake and the irresistible allure of cookie butter, then prepare to have your taste buds sing. These delightful little cups capture the best of both worlds, marrying the tangy richness of cheesecake with the sweet, nutty, and slightly spiced magic of your favorite cookie spread. People absolutely adore them because they offer all the decadent flavor of a full-sized cheesecake but in perfectly portioned, unbelievably satisfying servings. What makes these Mini Cookie Butter Cheesecake Cups truly special is their effortless elegance; they look sophisticated enough for a party but are deceptively simple to whip up in your own kitchen. Get ready to impress yourself and anyone lucky enough to snag one of these delectable Mini Cookie Butter Cheesecake Cups!
Mini Cookie Butter Cheesecake Cups
Get ready to embark on a dessert adventure that’s as delightful to make as it is to devour. These Mini Cookie Butter Cheesecake Cups are a symphony of creamy, dreamy cheesecake goodness swirled with the irresistible, spiced sweetness of cookie butter. If you’re a fan of Biscoff cookies or simply love a decadent treat that’s perfectly portioned, then you’ve hit the jackpot. These little cups are ideal for parties, a sweet afternoon pick-me-up, or whenever that craving for something truly special strikes. The combination of the crunchy cookie base and the velvety smooth cookie butter cheesecake filling is simply divine. Plus, they look so elegant with their layers of caramel and whipped cream, making them a showstopper without requiring hours in the kitchen.
Ingredients:
Crafting the Cookie Butter Cheesecake Cups
Let’s dive into the fun part – creating these delectable treats! We’ll break it down into a few key stages to make the process enjoyable and ensure perfect results every time.
The Foundation: The Cookie Crust
1. Prepare the Cookie Base: The first step to creating these irresistible cups is to make the base. In a medium bowl, combine the 1 ½ cups of Biscoff cookie crum extractbs with the ¼ cup of melted butter. Stir everything together until the crum extractbs are evenly moistened and resemble wet sand. This mixture is the foundation of our cheesecake cups, providing that delightful crunch that contrasts beautifully with the creamy filling. If you can’t find Biscoff cookies, good quality grabeef ham cracker crum extractbs will work just as well, though they’ll offer a slightly different but still delicious flavor profile. Once combined, divide this mixture evenly among your mini muffin tin cups. I like to use a mini muffin tin lined with paper liners for easy removal and cleanup, but you can also bake them directly in the tin if you grease it well. Press the crum extractb mixture firmly into the bottom of each cup using the back of a spoon or a small tamper. This firm pressing is important to ensure the crust holds together well and doesn’t crum extractble when you eat the cheesecake. Chill these prepared crusts in the refrigerator for at least 15 minutes while you prepare the cheesecake filling. This chilling time helps the butter solidify and bind the crum extractbs, creating a stable base.
The Heart of the Matter: The Creamy Cheesecake Filling
2. Whip Up the Cream Cheese Mixture: Now for the star of the show – the cookie butter cheesecake filling! In a large bowl, beat the softened 8 oz of cream cheese until it’s completely smooth and free of lumps. Using cream cheese that’s truly at room temperature is crucial here; it makes all the difference in achieving a silky-smooth texture. If your cream cheese is still cold, it will be difficult to incorporate smoothly, leading to a lumpy filling. Once the cream cheese is perfectly smooth, add the ½ cup of cookie butter and the ¼ cup of powdered sugar. Beat these together on medium speed until they are well combined and the mixture is creamy and luscious. Don’t overmix at this stage, just enough to incorporate everything thoroughly. Then, gradually add the ½ cup of heavy whipping cream and the 1 tsp of vanilla extract. Continue to beat the mixture until it’s light, fluffy, and has reached soft peaks. Be careful not to overbeat the cream, as you don’t want to turn it into butter. The goal is a smooth, airy, and decadent filling that will be a joy to eat.
Assembling and Chilling for Perfection
3. Layering the Flavors: With our crusts chilled and our filling ready, it’s time to assemble these mini masterpieces. Remove the chilled crusts from the refrigerator. Spoon the creamy cookie butter cheesecake filling evenly over the chilled cookie bases. You want to fill each cup nearly to the top, leaving just a little bit of space for a drizzle of caramel and garnish. If you have a piping bag with a star tip, you can pipe the filling for a more professional look, but a spoon works perfectly well and still results in a beautiful dessert. Ensure the filling is spread evenly so that each cup has a generous portion of the luscious cheesecake.
4. Adding the Caramel Swirl and Chill Time: This is where we elevate our cheesecake cups with an extra layer of indulgence. Drizzle about a teaspoon of the ½ cup of caramel sauce over the top of the cheesecake filling in each cup. You can use the back of a toothpick or a skewer to gently swirl the caramel into the cheesecake for a beautiful marbled effect. This step not only adds visual appeal but also introduces another delicious layer of flavor. Once assembled with the caramel drizzle, it’s crucial to let these mini cheesecakes chill properly to set. Place the mini muffin tin back into the refrigerator and let them chill for at least 2-3 hours, or preferably until fully set. This chilling period allows the cheesecake filling to firm up, ensuring each bite is perfectly textured and the flavors meld together beautifully.
5. The Grand Finnon-alcoholic ale: Garnish and Serve! Once your Mini Cookie Butter Cheesecake Cups are completely set, it’s time for the fun part – decorating! Carefully remove the cheesecake cups from the mini muffin tin. If you used paper liners, gently peel them away. If you baked them directly in the tin, you might need to carefully loosen the edges with a small offset spatula. Arrange the cheesecake cups on a serving platter. Now, get creative with your garnishes! Top each cup with a dollop of whipped cream. Sprinkle a few extra Biscoff crum extractbs over the whipped cream for added texture and flavor. Finally, place a whole Biscoff cookie on top of each cup as the crowning glory. These cookies not only look stunning but also reinforce the star flavor of the dessert. Serve these delightful Mini Cookie Butter Cheesecake Cups immediately and watch them disappear! They are best enjoyed chilled.
Conclusion:
And there you have it – your guide to crafting absolutely delightful Mini Cookie Butter Cheesecake Cups! This recipe is a showstopper because it perfectly marries the creamy, tangy goodness of cheesecake with the irresistible, nutty sweetness of cookie butter. The mini size makes them incredibly charming and ideal for portion control (though let’s be honest, you’ll want more than one!). They’re surprisingly easy to make, proving that gourmet-level desserts don’t need to be complicated. Plus, they look so elegant, they’re perfect for special occasions, potlucks, or just a delightful treat to brighten your day.
I love serving these as individual desserts after a meal, or as part of a dessert bar alongside other sweet treats. They also make fantastic gifts for friends and family who appreciate a little something special. Don’t be afraid to get creative with variations! You could experiment with different cookie butters (speculoos, almond, peanut butter), add a drizzle of chocolate ganache, or even swirl in some fruit preserves before baking. I truly encourage you to give these Mini Cookie Butter Cheesecake Cups a try. I’m confident you’ll fall in love with them!
Frequently Asked Questions:
Can I make these ahead of time?
Absolutely! These mini cheesecakes are perfect for making ahead. You can bake them up to 2 days in advance and store them covered in the refrigerator. This makes them incredibly convenient for parties or when you’re short on time on the day of serving.
How do I store leftovers?
Leftover Mini Cookie Butter Cheesecake Cups should be stored in an airtight container in the refrigerator. They will keep well for 3-4 days. I find they taste just as good, if not better, after the flavors have had a chance to meld overnight.
Can I use a different type of cookie butter?
Yes, feel free to experiment! While traditional speculoos cookie butter is classic, you could also try almond butter-based cookie butter or even peanut butter for a different, but equally delicious, flavor profile. The possibilities are wonderfully wide open!
Mini Cookie Butter Cheesecake Cups
Delightful individual cheesecake cups with a Biscoff cookie crust and a creamy cookie butter filling, topped with caramel, cookie crumbs, and whipped cream.
Ingredients
-
1 ½ cups Biscoff cookie crumbs
-
¼ cup melted butter
-
8 oz cream cheese, softened
-
½ cup cookie butter (Biscoff spread)
-
¼ cup powdered sugar
-
½ cup heavy whipping cream
-
1 tsp vanilla extract
-
½ cup caramel sauce
-
Extra Biscoff crumbs
-
Whipped cream
-
Whole Biscoff cookies for garnish
Instructions
-
Step 1
Combine Biscoff cookie crumbs and melted butter. Press mixture evenly into the bottom of 12 mini muffin cups lined with paper liners. -
Step 2
In a medium bowl, beat cream cheese until smooth. Gradually beat in cookie butter and powdered sugar until well combined. -
Step 3
In a separate bowl, whip heavy cream and vanilla extract until stiff peaks form. Gently fold whipped cream into the cream cheese mixture. -
Step 4
Spoon the cheesecake mixture over the cookie crust in each muffin cup, filling them about two-thirds full. -
Step 5
Drizzle caramel sauce over the top of each cheesecake cup. Sprinkle with extra Biscoff crumbs. -
Step 6
Garnish each mini cheesecake with a dollop of whipped cream and a whole Biscoff cookie. -
Step 7
Refrigerate for at least 30 minutes, or until firm, before serving.
Important Information
Nutrition Facts (Per Serving)
It is important to consider this information as approximate and not to use it as definitive health advice.
Allergy Information
Please check ingredients for potential allergens and consult a health professional if in doubt.