Pink Strawberry Crunch Cheesecake Recipe-Easy & Delicious
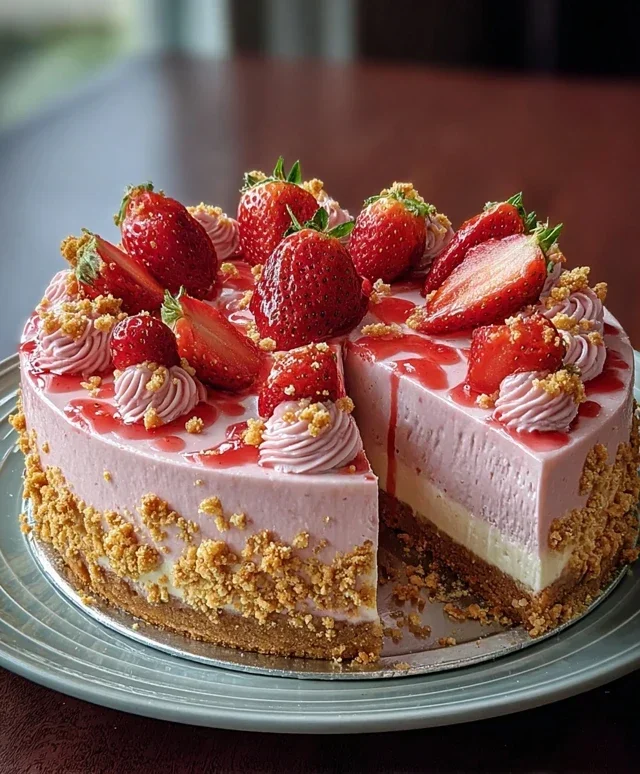
Pink Strawberry Crunch Cheesecake: Prepare to be utterly captivated by a dessert that’s as visually stunning as it is delicious. This Pink Strawberry Crunch Cheesecake isn’t just a treat; it’s an experience. Imagin extracte the silkiest, creamiest cheesecake filling, infused with the vibrant sweetness of fresh strawberries, all nestled atop a buttery, crum extractbly base. That satisfying crunch, courtesy of a delightful streusel topping, elevates every single bite. It’s no wonder why cheesecake is a universally beloved dessert, but this particular rendition, with its playful pink hue and irresistible texture contrast, takes things to a whole new level. It’s the perfect centerpiece for celebrations, a comforting indulgence on a quiet evening, or simply a way to brighten any day. Get ready to fall head over heels for this delightful Pink Strawberry Crunch Cheesecake.
Pink Strawberry Crunch Cheesecake
Get ready to impress with this absolutely delightful Pink Strawberry Crunch Cheesecake! It’s a showstopper that’s surprisingly approachable, perfect for birthdays, special occasions, or just when you’re craving something truly decadent. The creamy, smooth cheesecake filling is infused with delicate strawberry flavor, while the crunchy Oreo crust provides a satisfying textural contrast. And that vibrant pink hue? It’s pure joy in dessert form!
This recipe is all about layering flavors and textures, and the result is a cheesecake that’s as beautiful as it is delicious. The crunch topping adds a fun, celebratory finish that will have everyone reaching for a second slice. Let’s get started on creating this masterpiece!
Ingredients:
Preparing the Crust:
The foundation of our delicious cheesecake begin extracts with a simple yet incredibly flavorful crust. We’re using Golden Oreos for a slightly sweeter and more delicate crum extractb than their dark chocolate counterparts, which I find pairs beautifully with the strawberry filling.
1. Crush the Oreos: The easiest way to crush your Golden Oreos is to place them in a food processor and pulse until they form fine crum extractbs. If you don’t have a food processor, you can place them in a sturdy zip-top bag, seal it tightly, and then crush them with a rolling pin or the flat side of a sturdy can. You want a consistency that’s fine enough to pack together.
2. Combine with Butter: In a medium bowl, combine the crushed Golden Oreos with the 3 tablespoons of melted butter. Stir until all the crum extractbs are evenly moistened. The butter will act as the binder, helping the crust hold its shape.
3. Press into Pan: Pour the crum extractb mixture into a 9-inch springform pan. I like to press the crum extractbs firmly and evenly onto the bottom of the pan, and even a little bit up the sides, to create a sturdy base that won’t crum extractble when you slice into the cheesecake. You can use the bottom of a glass or a flat measuring cup to help you pack it down tightly.
4. Pre-Bake: Once the crust is firmly pressed into the pan, place it in a preheated oven at 350°F (175°C) for about 8-10 minutes. This pre-baking step helps to set the crust and prevent it from becoming soggy. Once baked, remove it from the oven and let it cool completely while you prepare the filling. This cooling period is crucial for a crisp crust.
Crafting the Strawberry Cheesecake Filling:
Now for the star of the show – the creamy, dreamy strawberry cheesecake filling! The key to a smooth cheesecake is ensuring your cream cheese is fully softened. This allows it to incorporate seamlessly with other ingredients, preventing lumps.
5. Beat Cream Cheese and Sugar: In a large mixing bowl, beat the softened cream cheese with an electric mixer on medium speed until it’s completely smooth and creamy, with no lumps. This might take a couple of minutes. Gradually add the ¾ cup of granulated sugar and continue to beat until well combined and fluffy. Make sure to scrape down the sides of the bowl periodically to ensure everything is incorporated.
6. Incorporate Eggs and Flavorings: Add the 2 large eggs, one at a time, beating well after each addition until just combined. Be careful not to overmix at this stage, as it can introduce too much air into the batter, which can lead to cracking. Stir in the 1 teaspoon of vanilla extract, ½ cup of sour cream, and the 1 tablespoon of strawberry extract. The sour cream adds a delightful tang and contributes to the creamy texture. If you’re using the fresh strawberry purée for an extra punch of flavor and color, stir it in now. The Jell-O powder will also contribute to the vibrant pink hue and a subtle strawberry essence, so stir that in until fully dissolved.
7. Prepare for Baking: Pour the cheesecake filling evenly over the cooled crust in the prepared springform pan. To help prevent cracking, I highly recommend using a water bath for baking. Wrap the outside of your springform pan tightly with a few layers of heavy-duty aluminum foil. Place the foil-wrapped pan into a larger baking pan (like a roasting pan). Carefully pour hot water into the larger pan, making sure it comes about halfway up the sides of the springform pan. The steam from the water bath creates a humid environment in the oven, which helps the cheesecake bake gently and evenly, minimizing the risk of cracks.
Baking and Cooling:
Patience is key when it comes to cheesecake. The baking and cooling process are just as important as the mixing!
8. Bake the Cheesecake: Carefully place the water bath setup into your preheated oven at 325°F (160°C). Bake for approximately 50-65 minutes, or until the edges of the cheesecake are set but the center still has a slight jiggle when the pan is gently nudged. The residual heat will continue to cook the center as it cools.
9. Cooling Process: Once the baking time is complete, turn off the oven, but leave the cheesecake inside with the oven door slightly ajar (you can prop it open with a wooden spoon). Let the cheesecake cool in the oven for about 1 hour. This gradual cooling also helps prevent cracking. After an hour, carefully remove the cheesecake from the oven and from the water bath. Remove the foil from the springform pan. Let the cheesecake cool completely on a wire rack at room temperature for another hour.
10. Chill Thoroughly: Once completely cooled to room temperature, cover the cheesecake loosely with plastic wrap (being careful not to touch the surface) and refrigerate for at least 4-6 hours, or preferably overnight. This chilling time is crucial for the cheesecake to firm up properly and for the flavors to meld.
Whipping up the Strawberry Crunch Topping:
This topping is the final flourish, adding a delightful texture and an extra layer of strawberry goodness.
11. Prepare the Whipped Cream: In a chilled mixing bowl, beat the 1 cup of heavy whipping cream with an electric mixer on medium-high speed until soft peaks form.
12. Sweeten and Flavor: Gradually add the 1 cup of powdered sugar, 2 tablespoons of milk, and the 1 teaspoon of strawberry extract. Continue to beat until medium-stiff peaks form. If you desire a more intense pink color, add 1 drop of pink food coloring now and beat until evenly distributed. Be careful not to overbeat, or you’ll end up with butter!
13. Assemble and Serve: Once your cheesecake has chilled and set, carefully release the sides of the springform pan. Dollop or pipe the whipped cream topping over the top of the cheesecake. You can also sprinkle some extra crushed Oreos or a few fresh strawberry slices on top for garnish.
Enjoy every creamy, crunchy, strawberry-infused bite of your homemade Pink Strawberry Crunch Cheesecake! It’s a labor of love that is so worth it.
Conclusion:
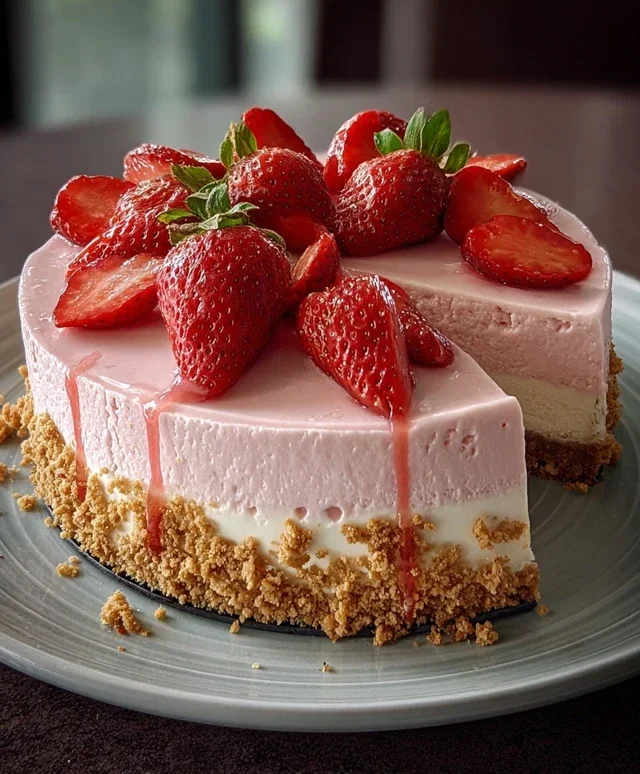
And there you have it – your guide to crafting the most delightful Pink Strawberry Crunch Cheesecake! This recipe is truly a winner because it balances the creamy, tangy richness of classic cheesecake with the sweet, vibrant burst of strawberries, all elevated by that irresistible, buttery crunch topping. It’s a dessert that looks as spectacular as it tastes, making it perfect for any celebration or even just a special treat for yourself. I’m confident you’ll love the delightful texture contrast and the beautiful pink hue that makes it so photogenic.
For serving, I love presenting a generous slice of this Pink Strawberry Crunch Cheesecake with a dollop of fresh whipped cream and a few extra fresh strawberries. It’s also fantastic alongside a simple berry compote for an extra layer of fruity flavor. Don’t be afraid to get creative with variations! You could add a swirl of strawberry puree directly into the batter for an even more intense strawberry flavor, or perhaps experiment with different crunchy toppings like crushed grabeef ham crackers or even finely chopped pistachios for a nutty twist.
I truly encourage you to give this recipe a try. It’s a bit of a showstopper, but surprisingly manageable in your own kitchen. The joy of creating something so beautiful and delicious from scratch is immense, and the reactions you’ll get from friends and family will be priceless. Happy baking!
Frequently Asked Questions:
Can I use frozen strawberries instead of fresh?
Absolutely! If you’re using frozen strawberries, make sure to thaw them completely and drain off as much excess liquid as possible before pureeing them for the recipe. This prevents your cheesecake from becoming too watery.
How long does this Pink Strawberry Crunch Cheesecake last?
This cheesecake will keep well in the refrigerator for up to 3-4 days when stored properly in an airtight container. The crunchy topping might soften slightly over time, but it will still be delicious!
What can I do if my cheesecake cracks?
A cracked cheesecake is still delicious! Cracking often happens due to overbaking or rapid temperature changes. To minimize cracking in the future, try baking it in a water bath and letting it cool gradually in the oven with the door slightly ajar.
Pink Strawberry Crunch Cheesecake
A delightful no-bake cheesecake with a crunchy Golden Oreo crust and a vibrant pink strawberry filling, topped with a creamy strawberry frosting.
Ingredients
-
20 Golden Oreos, crushed
-
3 tbsp melted butter
-
2 tbsp strawberry Jell-O powder
-
24 oz cream cheese, softened
-
¾ cup granulated sugar
-
2 large eggs
-
1 tsp vanilla extract
-
½ cup sour cream
-
1 tbsp strawberry extract
-
½ cup fresh strawberry purée
-
1 cup powdered sugar
-
2 tbsp milk
-
1 tsp strawberry extract
-
1 drop pink food coloring
-
1 cup heavy whipping cream
Instructions
-
Step 1
Combine crushed Golden Oreos and melted butter. Press into the bottom of a springform pan to form the crust. -
Step 2
In a large bowl, beat softened cream cheese until smooth. Gradually add granulated sugar and beat until combined. -
Step 3
Beat in eggs one at a time, then stir in vanilla extract, sour cream, strawberry Jell-O powder, strawberry extract, and strawberry purée until well combined and smooth. -
Step 4
Pour the cream cheese mixture over the prepared crust. Bake at 350°F (175°C) for 50-60 minutes, or until the center is set but slightly jiggly. -
Step 5
Let the cheesecake cool completely on a wire rack, then chill in the refrigerator for at least 4 hours or overnight. -
Step 6
For the frosting, beat heavy whipping cream until stiff peaks form. In a separate bowl, whisk together powdered sugar, milk, strawberry extract, and pink food coloring until smooth. Gently fold the whipped cream into the frosting until combined. -
Step 7
Spread the strawberry frosting evenly over the chilled cheesecake before serving.
Important Information
Nutrition Facts (Per Serving)
It is important to consider this information as approximate and not to use it as definitive health advice.
Allergy Information
Please check ingredients for potential allergens and consult a health professional if in doubt.