Mini Foods Wedding Guide- Bite-Sized Delights
Mini Foods for Weddings, a Mini Guide to Serving Miniature Food, opens up a world of culinary charm and sophisticated presentation that can elevate any celebration. Imagin extracte your guests’ delight as they encounter beautifully crafted, bite-sized versions of classic dishes or innovative new creations. This isn’t just about portion control; it’s about creating an experience. People absolutely adore mini foods for weddings because they offer a playful yet elegant way to sample a variety of flavors without committing to a full entree. They’re conversation starters, adding a touch of whimsy and luxury to the reception. What truly makes them special is the meticulous detail and artistry involved. Each miniature masterpiece is a testament to creativity, transforming familiar tastes into delightful, edible jewels that guests will talk about long after the last dance.
Why Mini Foods for Weddings are a Must-Have
When planning a wedding, the details matter, and the food is no exception. Mini Foods for Weddings offer a unique and memorable catering option that appeals to a wide range of tastes and dietary needs. They allow for greater flexibility in menu planning, ensuring there’s something delightful for everyone. Beyond their visual appeal, the practicality of miniature portions means guests can mingle and enjoy conversation while savoring delicious bites. This guide will delve into the art of crafting and serving these delightful culinary creations, making your wedding reception truly unforgettable.
Ingredients:
- 1 pound (450g) puff pastry, thawed
- 8 ounces (225g) cream cheese, softened
- 1/4 cup (60ml) heavy cream
- 1/4 cup (60ml) sour cream
- 2 tablespoons (30g) granulated sugar
- 1 teaspoon vanilla extract
- 1/2 teaspoon lemon zest
- 1/4 teaspoon salt
- 1/4 cup (60g) fresh berries (strawberries, blueberries, raspberries), finely chopped
- 1 tablespoon finely chopped fresh mint
- 1 tablespoon confectioners’ sugar, for dusting (optional)
Preparing the Puff Pastry Shells
- Preheat your oven to 400°F (200°C). Line two large baking sheets with parchment paper. This is crucial for preventing the delicate puff pastry from sticking and ensuring even baking. The parchment paper also makes for an easier cleanup later.
- Gently unfold the thawed puff pastry sheets onto a lightly floured surface. If your puff pastry is in a rectangular block, you may need to roll it out slightly to achieve a uniform thickness of about 1/8 inch. Precision here will lead to beautifully uniform mini tarts.
- Using a small, sharp knife or a fluted pastry wheel, cut the puff pastry into approximately 2-inch squares. Aim for as many squares as possible from each sheet. These will form the bases of our mini tarts. Don’t worry if they aren’t perfectly uniform; a rustic charm is often desired for wedding treats.
- Place the puff pastry squares onto the prepared baking sheets, leaving about 1 inch of space between each one. This allows for proper air circulation and expansion as the pastry bakes.
- Using a fork, gently prick the center of each puff pastry square a few times. Be careful not to pierce all the way through. This technique helps prevent the center from puffing up too much, creating a slight well for our filling later. If you desire a more pronounced edge, you can lightly score a border about 1/4 inch from the edge of each square, again without cutting all the way through. This adds a lovely visual definition.
- Bake for 12-15 minutes, or until the puff pastry is golden brown and puffed up. Keep a close eye on them as they can brown quickly. Once baked, remove them from the oven and, if necessary, gently press down the centers with the back of a spoon to create a more defined cavity for the filling. Let them cool completely on the baking sheets. Rushing this step can lead to broken pastry.
Creating the Creamy Filling
- While the puff pastry is cooling, prepare the luscious cream cheese filling. In a medium bowl, combine the softened cream cheese, heavy cream, and sour cream. Using softened cream cheese is key to achieving a smooth and lump-free consistency.
- Beat the mixture with an electric mixer on medium speed until it is light and fluffy. This process incorporates air, making the filling wonderfully airy and decadent. Scrape down the sides of the bowl occasionally to ensure everything is evenly combined.
- Add the granulated sugar, vanilla extract, lemon zest, and salt to the cream cheese mixture. Continue to beat until well combined and the sugar has dissolved. The vanilla and lemon zest add subtle but important layers of flavor that complement the richness of the cream cheese without overpowering the delicate berries.
- Gently fold in the finely chopped fresh berries and the finely chopped fresh mint. Be careful not to overmix at this stage, as you want to maintain some texture from the berries and prevent the filling from becoming too watery. The vibrant colors of the berries will also add a beautiful visual appeal to your mini desserts.
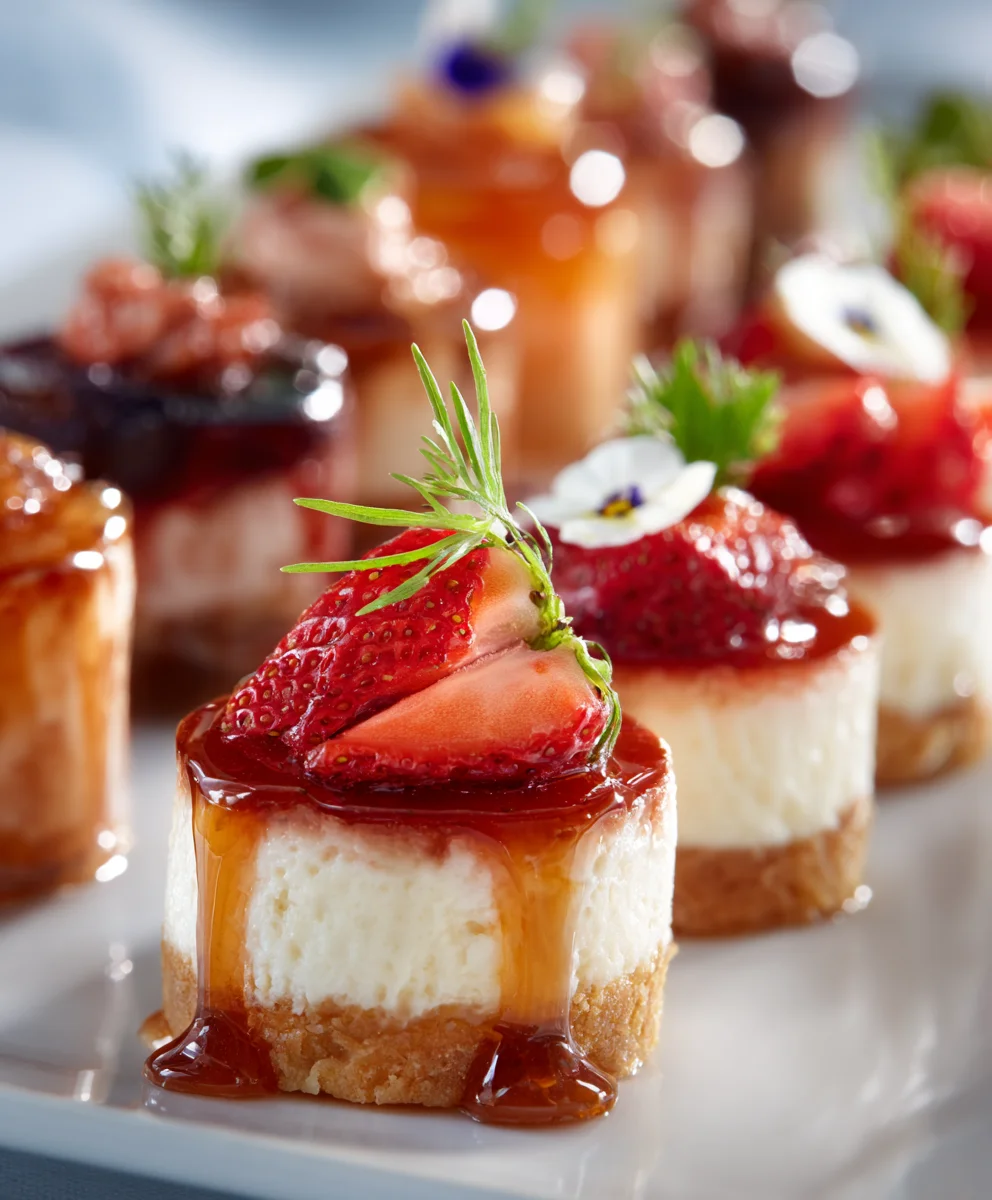
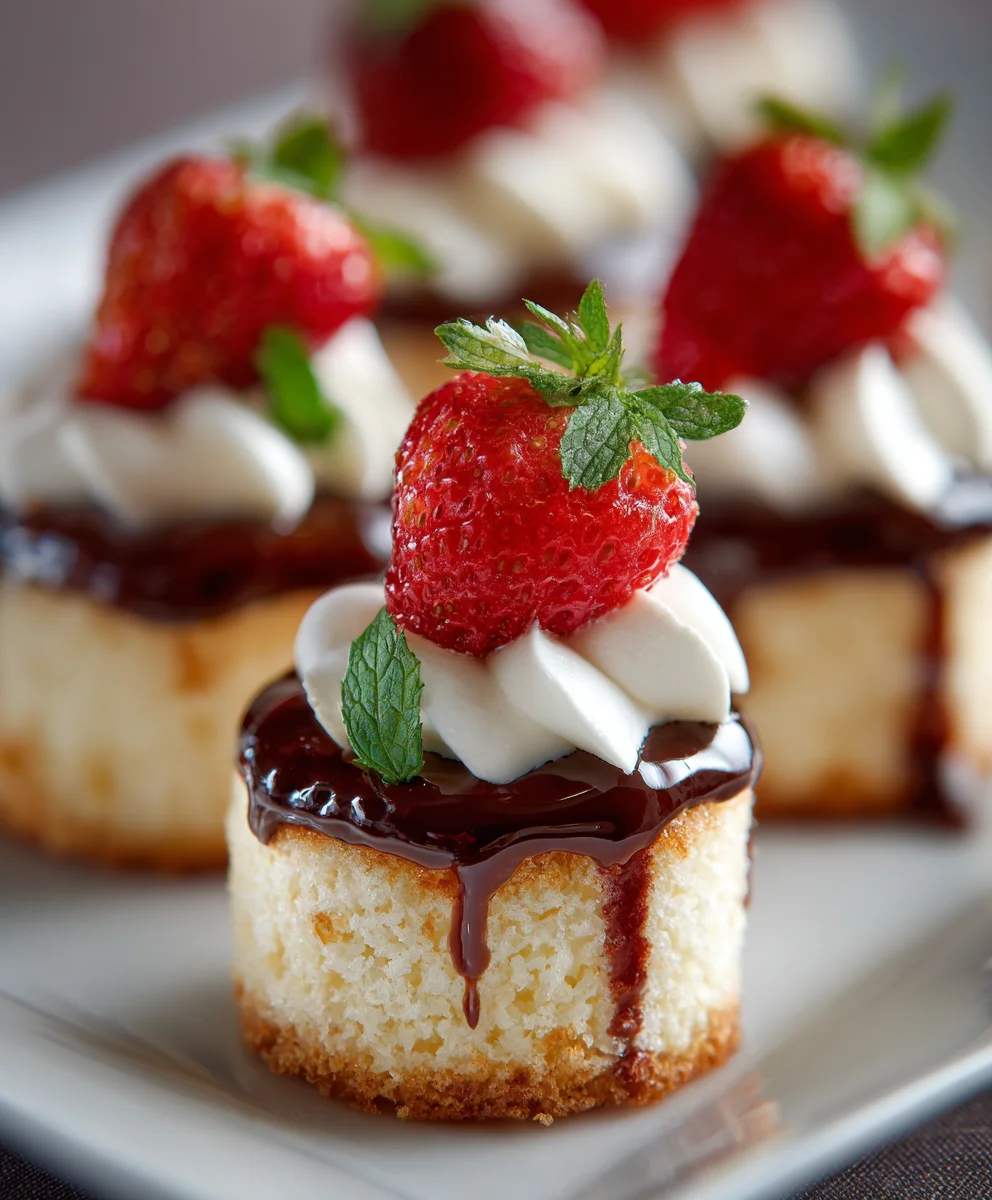
Assembling the Mini Berry Tarts
- Once the puff pastry shells have cooled completely, it’s time to assemble these delightful mini treats. Spoon or pipe the cream cheese filling into the cooled puff pastry shells. A piping bag fitted with a star tip can create a more elegant presentation, but a small spoon works perfectly well too. Fill each shell generously, but avoid overfilling to prevent the filling from spilling out.
- Arrange the filled mini tarts on a serving platter. For an extra touch of elegance, you can lightly dust them with confectioners’ sugar just before serving. This adds a delicate sweetness and a professional finish, making them look as beautiful as they taste.
- Garnish each mini tart with a tiny sprig of fresh mint or a single small berry, if desired. These small touches can elevate the presentation significantly, making them perfect for any celebration, especially a wedding. Serve immediately for the best texture and flavor, as the puff pastry is at its crispiest.
Conclusion:
We’ve reached the end of our exciting journey into the world of miniature delights with Mini Foods for Weddings, A Mini Guide to Serving Miniature Food. Crafting these bite-sized wonders is not just about creating delicious treats; it’s about adding an element of fun, elegance, and surprise to any wedding celebration. From whimsical appetizer bites to charming dessert portions, these mini creations are sure to be conversation starters and leave your guests delighted. Remember, the key is attention to detail and a sprinkle of creativity to make each miniature edible masterpiece truly special.
When serving these delightful morsels, consider presentation as much as the flavor. Arrange them on elegant platters, tiered stands, or even in decorative individual serving dishes. They are perfect as passed hors d’oeuvres during cocktail hour, as a dessert tasting station, or even as part of a themed buffet. Don’t be afraid to experiment with different flavor profiles and cuisines to cater to a variety of tastes. You can adapt classic dishes into miniature versions or invent entirely new, playful concepts. The possibilities are truly endless when you embrace the charm of mini!
Frequently Asked Questions:
Q1: What are some popular mini food ideas for a wedding?
Some of the most popular mini food ideas include tiny quiches, miniature sliders, sushi rolls, caprese skewers, individual fruit tarts, mini cheesecakes, and chocolate-dipped strawberries. The key is to think of classic wedding food and then miniaturize it!
Q2: Can I make mini food ahead of time for a wedding?
Yes, many mini food items can be made partially or fully ahead of time. Items like mini tart shells or cake layers can be baked and stored, and then filled or frosted closer to the event. Savory items like mini quiches can often be baked and reheated gently. It’s best to check individual recipes for specific make-ahead recommendations.
Q3: How do I ensure my mini food is easy for guests to eat at a wedding?
For easy consumption, aim for items that can be eaten in one or two bites. Ensure any skewers are easily removable or made of edible materials. Avoid overly messy or crum extractbly textures, and consider providing small napkins readily available for guests.
Mini Berry Cream Cheese Tarts
Delightful bite-sized tarts featuring a crispy puff pastry base filled with a luscious cream cheese mixture and fresh berries, perfect for weddings and celebrations.
Ingredients
-
1 pound puff pastry, thawed
-
8 ounces cream cheese, softened
-
1/4 cup heavy cream
-
1/4 cup sour cream
-
2 tablespoons granulated sugar
-
1 teaspoon vanilla extract
-
1/2 teaspoon lemon zest
-
1/4 teaspoon salt
-
1/4 cup fresh berries, finely chopped
-
1 tablespoon finely chopped fresh mint
-
1 tablespoon confectioners’ sugar, for dusting (optional)
Instructions
-
Step 1
Preheat oven to 400°F (200°C). Line two baking sheets with parchment paper. Gently unfold puff pastry onto a lightly floured surface and roll to 1/8 inch thickness. Cut into 2-inch squares. Place squares on baking sheets, prick centers with a fork, and bake for 12-15 minutes until golden brown. Let cool completely. -
Step 2
In a medium bowl, combine softened cream cheese, heavy cream, and sour cream. Beat with an electric mixer on medium speed until light and fluffy. -
Step 3
Add granulated sugar, vanilla extract, lemon zest, and salt to the cream cheese mixture. Beat until well combined and sugar is dissolved. -
Step 4
Gently fold in the finely chopped fresh berries and finely chopped fresh mint, being careful not to overmix. -
Step 5
Spoon or pipe the cream cheese filling into the cooled puff pastry shells. Avoid overfilling. -
Step 6
Arrange the filled mini tarts on a serving platter. Dust with confectioners’ sugar if desired. Garnish with a mint sprig or a small berry before serving immediately.
Important Information
Nutrition Facts (Per Serving)
It is important to consider this information as approximate and not to use it as definitive health advice.
Allergy Information
Please check ingredients for potential allergens and consult a health professional if in doubt.