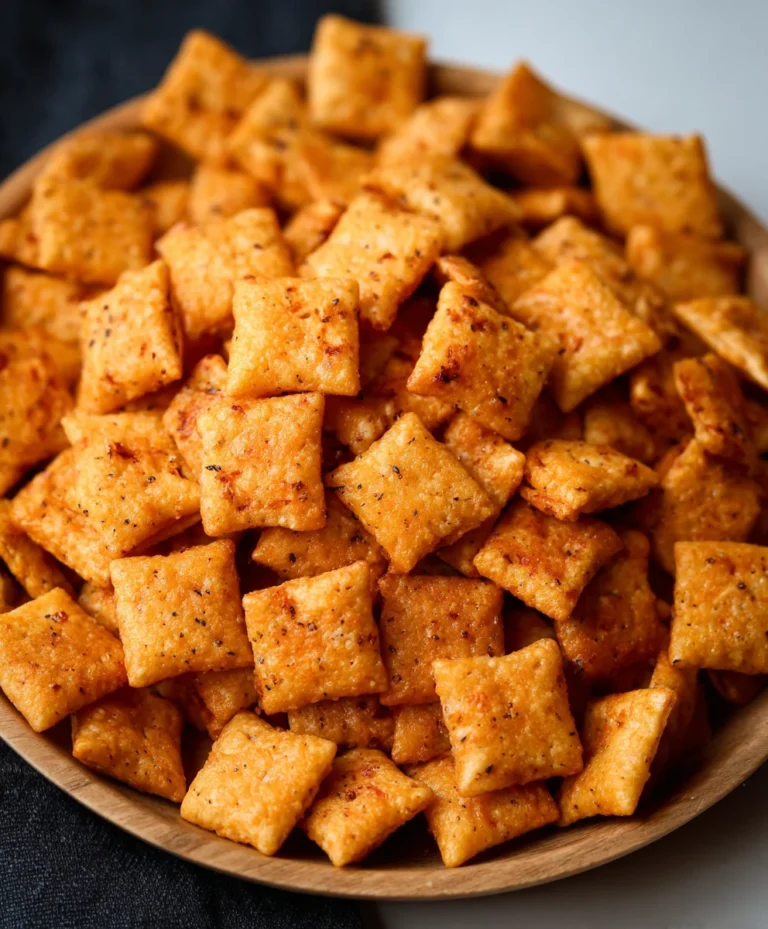
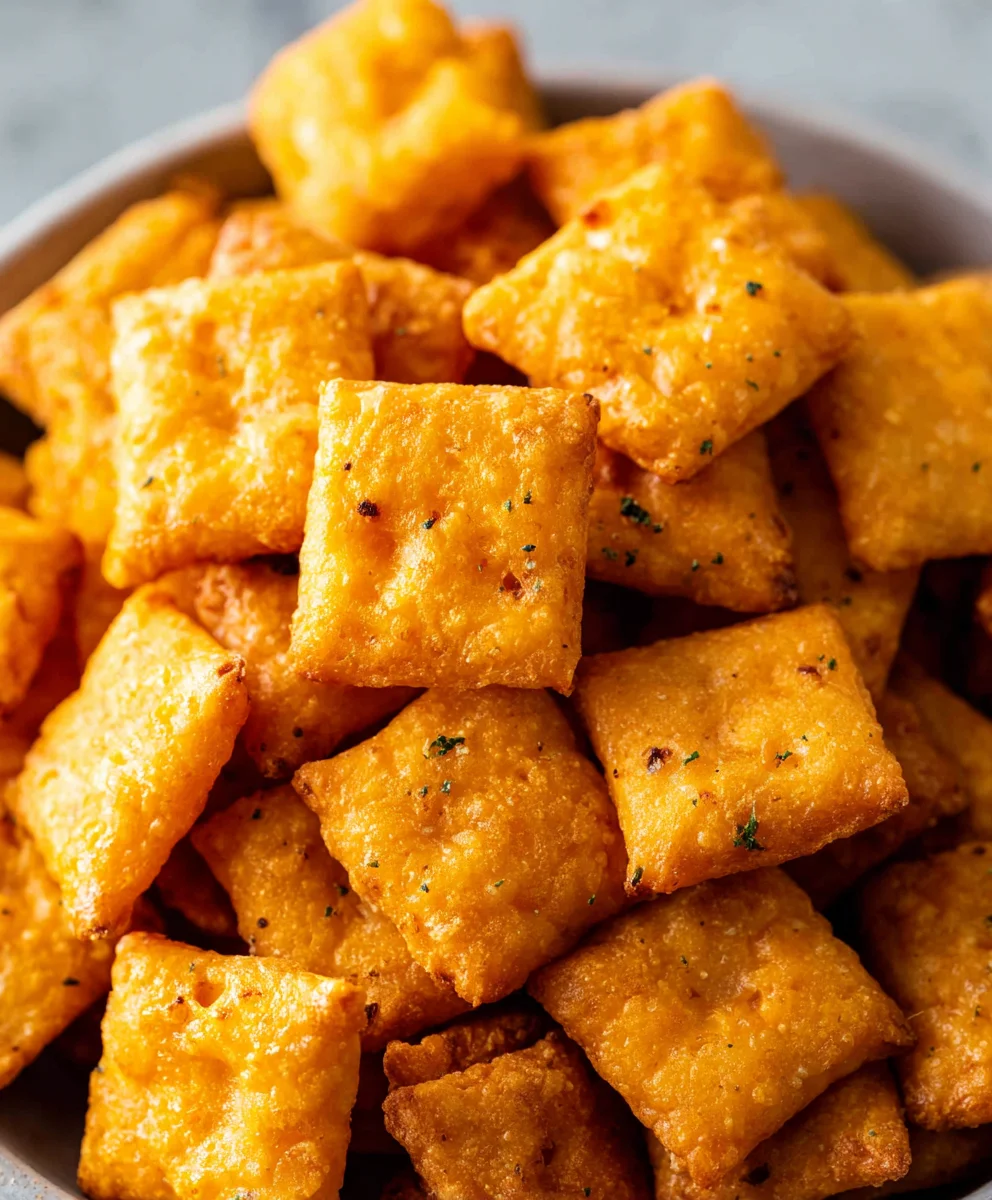
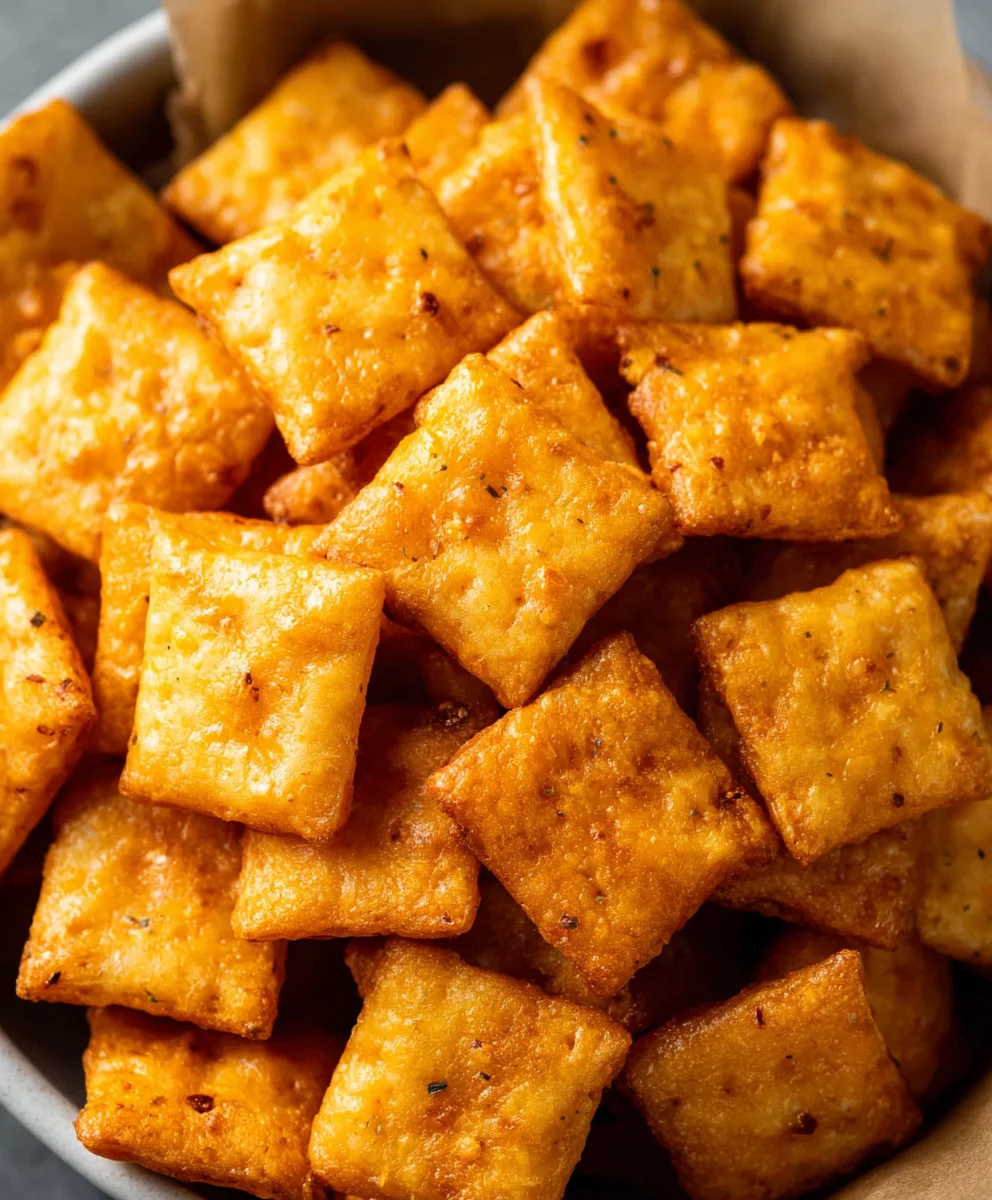
Homemade Cheez Its – Best Crispy Snack Recipe
Homemade Cheez Its are more than just a nostalgic snack; they’re a delightful culinary adventure that brings the comforting crunch of a childhood favorite right into your own kitchen. Forget the processed versions; when you make your own Homemade Cheez Its, you unlock a world of flavor and texture that’s simply unparalleled. There’s a unique satisfaction in creating these cheesy crackers from scratch, knowing exactly what goes into them. What truly makes this recipe special is the ability to customize the cheese intensity and add your own subtle flavor twists, turning a simple snack into a gourmet experience. The aroma that fills your home as they bake is non-intoxicating, a promise of the savory, cheesy goodness to come. It’s this authentic, homemade magic that makes people absolutely adore pulling out a batch of fresh Homemade Cheez Its, whether for a quick afternoon pick-me-up or to share with friends and family.
Ingredients:
- ¼ cup unsalted butter, softened to room temperature
- 8 oz. sharp cheddar cheese, finely shredded (about 2 cups)
- 1 ¼ cups all-purpose flour
- 1 teaspoon kosher salt, plus more for sprinkling on top
- 2-3 tablespoons ice-cold water
- 2 tablespoons olive oil
Making Your Homemade Cheez-Its
Phase 1: Combining the Dough Base
Let’s get started on crafting these irresistible homemade Cheez-Its! The foundation of our delicious crackers lies in a rich, cheesy dough. First, ensure your ¼ cup of unsalted butter is truly at room temperature. This means it should be soft enough to easily dent with your finger but not so soft that it’s melted or greasy. This consistency is crucial for creating a cohesive dough.
In a medium-sized mixing bowl, combine the softened butter with the 8 oz. of finely shredded sharp cheddar cheese. Using sharp cheddar is key here for that classic, tangy cheese flavor that makes Cheez-Its so addictive. Take a moment to shred your own cheese from a block; pre-shredded cheese often contains anti-caking agents that can affect the texture of your dough.
Now, it’s time to incorporate the dry ingredients. Add the 1 ¼ cups of all-purpose flour and 1 teaspoon of kosher salt to the butter and cheese mixture. Kosher salt has larger, coarser grains than table salt, which provides a pleasant texture and distributes evenly. The salt enhances the cheese flavor and balances the richness of the butter.
Using a pastry blender, a fork, or your fingertips, begin extract to cut or mix the ingredients together. You’re aiming to create a crum extractbly texture, similar to coarse meal. Work the mixture until there are no large clumps of butter remaining and everything is well combined. This initial stage helps to distribute the fat and seasoning throughout the flour, setting the stage for a flaky, tender cracker. Don’t overwork the dough at this point; we just want to incorporate everything.
Phase 2: Hydrating and Chilling the Dough
The next step is to brirum extractour crumbly mixture together into a workable dough. This is where the cold water comes in. You’ll need 2-3 tablespoons of ice-cold water. The colder the water, the better, as it helps to keep the butter from melting too much, which contributes to a crispier cracker. Start by adding just 2 tablespoons of the cold water to the bowl.
Gently mix the dough with a fork or your hands until itgin extractst begins to come together. If the dough still seerum extracttoo dry and crumbly to form a cohesive ball, add the remaining tablespoon of cold water, a teaspoon at a time, until it does. Be careful not to add too much water, as this can make the crackers tough. You’re looking for a dough that holds together when squeezed but isn’t sticky.
Once the dough has formed a shaggy mass, gently bring it together into a disk shape. You don’t need to knead it; overworking the gluten in the flour will result in tough crackers. Once it’s formed into a disk, wrap it tightly in plastic wrap. This prevents the dough from drying out and makes it easier to handle. Place the wrapped dough disk into the refrigerator and let it chill for at least 30 minutes. This chilling period is essential. It allows the gluten to relax, which results in a more tender cracker, and it firms up the butter, which is vital for creating those lovely flaky layers and preventing the crackers from spreading too much during baking.
Phase 3: Rolling and Cutting the Crackers
After your dough has had a good chill, it’s time to roll it out and get those crackers ready for the oven. Lightly flour a clean work surface and your rolling pin. Take the chilled dough disk out of the refrigerator agin extractunwrap it. Begin to roll the dough out evenly. For that authentic Cheez-It texture, aim for a thickness of about ⅛ inch. This might require a little patience, as the chilled dough can be firm. If the dough starts to feel too soft or sticky as you work with it, you can pop it back into the refrigerator for 5-10 minutes to firm up again.
Once the dough is rolled out to your desired thickness, it’s time to cut out the classic Cheez-It shapes. You can use a small square cookie cutter, or if you want to get really authentic, a sharp knife or a pizza cutter can be used to cut the dough into small, approximately 1-inch squares. Try to make your cuts as clean as possible.
Carefully transfer the cut cracker squares onto a baking sheet that has been lined with parchment paper. Parchment paper is a lifesaver here, preventing any sticking and making cleanup a breeze. As you place them on the baking sheet, try to give them a little space between each cracker, about ½ inch. This allows for even air circulation and prevents them from baking into each other.
Before they go into the oven, we’re going to add a little something extra for flavor and texture. Brush the tops of each cracker very lightly with 2 tablespoons of olive oil. The olive oil adds a subtle richness and helps them achieve a beautiful golden-brown crispness. Then, sprinkle them generously with a little more kosher salt. This is your chance to customize the saltiness to your preference. Some people like a lot of salt, others less.
Phase 4: Baking to Perfection
Now for the moment of truth – baking! Preheat your oven to 350°F (175°C). This moderate temperature ensures that the crackers bake through evenly without burning too quickly on the outside.
Carefully place the baking sheet with your prepared homemade Cheez-Its into the preheated oven. Bake for approximately 12-15 minutes. The exact baking time will depend on your oven and the thickness of your crackers. You’re looking for them to be golden brown around the edges and slightly puffed up. Keep a close eye on them during the last few minutes of baking, as they can go from perfectly golden to burnt quite rapidly. If you notice some crackers browning faster than others, you can carefully remove them from the baking sheet with a spatula to prevent them from over-baking.
Once they are baked to your liking, carefully remove the baking sheet from the oven. Allow the crackers to cool on the baking sheet for a few minutes. They will continue to crisp up as they cool. Once they are slightly cooled but still warm, you can carefully transfer them to a wire cooling rack to cool completely. This ensures that the bottoms don’t become soggy from residual heat.
Phase 5: Cooling and Enjoying
Allow your glorious homemade Cheez-Its to cool completely on the wire rack. This is perhaps the hardest part – resisting the urge to dive in immediately! As they cool, they will develop their signature crispness and satisfying crunch. The texture should be light and airy with a delightful cheesy bite.
Once they are completely cool, they are ready to be enjoyed! Store any leftover crackers in an airtight container at room temperature. Properly stored, they should stay wonderfully crisp for about a week. These homemade Cheez-Its are fantastic on their own, perfect for snacking, and make a wonderful addition to cheese boards or lunchboxes. Enjoy the fruits of your labor – a truly superior cheesy snack that you made yourself!
Conclusion:
And there you have it! You’ve successfully navigated the delightful process of creating your very own Homemade Cheez Its. This recipe proves that you don’t need a factory to achieve that irresistible cheesy crunch. The satisfaction of pulling these golden crackers from the oven, filling your kitchen with that comforting aroma, is truly rewarding.
These Homemade Cheez Its are perfect for snacking on their own, served alongside your favorite soup, or even as a unique addition to a cheese board. For variations, don’t hesitate to experiment! You can add a pinch of garlic powder or onion powder for an extra savory kick, or even a dash of smoked paprika for a touch of warmth. For a spicier version, consider a tiny pinch of cayenne pepper. The possibilities are endless, and I encourage you to make them your own. So, gather your ingredients, embrace the fun, and enjoy the delicious results of your culinary adventure!
Frequently Asked Questions about Homemade Cheez Its:
Q1: How can I make my Homemade Cheez Its extra crispy?
To ensure maximum crispiness, make sure your dough is rolled thinly and evenly. Baking them until they are a beautiful golden brown is key, but avoid overbaking to prevent them from becoming too hard or burnt. Allowing them to cool completely on a wire rack after baking also helps them achieve that perfect crunchy texture.
Q2: Can I use different types of cheese in this recipe?
Absolutely! While cheddar is a classic, feel free to get creative. Monterey Jack, Colby Jack, or even a sharp Gruyere can add unique flavor profiles to your Homemade Cheez Its. Just be sure to shred the cheese finely for the best melt and distribution throughout the dough.
Homemade Cheez Its – Best Crispy Snack Recipe
A delicious and crispy homemade Cheez-It recipe that’s perfect for snacking.
Ingredients
-
1/4 cup unsalted butter, softened to room temperature
-
8 oz. sharp cheddar cheese, finely shredded
-
1 1/4 cups all-purpose flour
-
1 teaspoon kosher salt, plus more for sprinkling on top
-
2-3 tablespoons ice-cold water
-
2 tablespoons olive oil
Instructions
-
Step 1
In a medium-sized mixing bowl, combine the softened butter with the finely shredded sharp cheddar cheese. Add the all-purpose flour and kosher salt. Use a pastry blender, fork, or fingertips to mix until a crumbly texture forms, similar to coarse meal. -
Step 2
Gradually add 2 tablespoons of ice-cold water to the mixture and gently mix until the dough begins to come together. If needed, add an additional tablespoon of cold water, a teaspoon at a time, until a cohesive, but not sticky, dough forms. Do not overwork. -
Step 3
Form the dough into a disk, wrap it tightly in plastic wrap, and chill in the refrigerator for at least 30 minutes. This step relaxes the gluten and firms the butter for a tender and flaky cracker. -
Step 4
On a lightly floured surface, roll out the chilled dough to about ⅛ inch thickness. Cut the dough into small, approximately 1-inch squares using a cookie cutter or a knife. Transfer the squares to a parchment-lined baking sheet, leaving about ½ inch of space between them. -
Step 5
Lightly brush the tops of each cracker with olive oil and sprinkle generously with additional kosher salt. -
Step 6
Bake in a preheated oven at 350°F (175°C) for 12-15 minutes, or until golden brown around the edges and slightly puffed. Watch closely to prevent burning. -
Step 7
Allow the crackers to cool on the baking sheet for a few minutes, then transfer them to a wire rack to cool completely. They will continue to crisp up as they cool.
Important Information
Nutrition Facts (Per Serving)
It is important to consider this information as approximate and not to use it as definitive health advice.
Allergy Information
Please check ingredients for potential allergens and consult a health professional if in doubt.