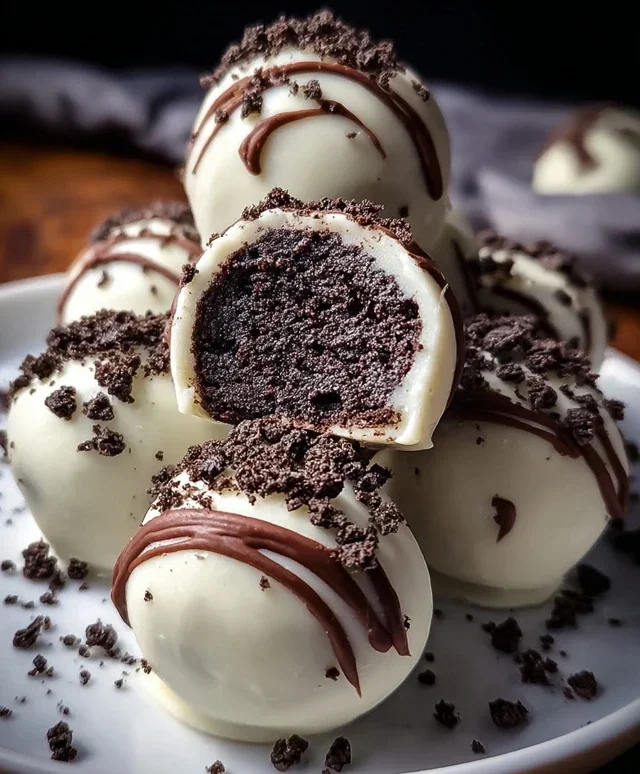
Easy Oreo Cake Balls-Irresistible No-Bake Treat
Oreo cake balls are a delightful little treat that has taken the dessert world by storm, and for good reason! I mean, who can resist the irresistible combination of rich, chocolatey Oreos and sweet, creamy frosting, all rolled into perfectly bite-sized spheres? These aren’t just any dessert; they’re miniature masterpieces, a playful twist on a classic cookie that brings pure joy with every mouthful. What makes Oreo cake balls so special is their incredible versatility and the sheer wow-factor they deliver. They’re incredibly easy to make, making them a fantastic project for bakers of all skill levels, from seasoned pros to enthusiastic begin extractners. Plus, they’re incredibly customizable, allowing you to dip them in various chocolates, add sprinkles, or even swirl in different colors. Get ready to impress your friends and family with these utterly addictive Oreo cake balls!
Oreo Cake Balls: A Decadent No-Bake Treat
Are you craving something sweet, chocolatey, and incredibly easy to make? Look no further than these delightful Oreo Cake Balls! These little bites of heaven are perfect for parties, bake snon-alcoholic ales, or simply treating yourself after a long day. They require no baking, making them a fantastic option for begin extractners or when you’re short on time. The combination of crushed Oreos, rich cream cheese, and a smooth white chocolate coating is simply irresistible. Let’s dive in and create some magic!
Ingredients:
Making the Oreo Mixture
The foundation of our Oreo Cake Balls is a simple yet delicious mixture that comes together in minutes. The key here is to get a fine crum extractb from your Oreo cookies. You can achieve this by using a food processor, which is the quickest and most efficient method. If you don’t have a food processor, don’t worry! You can place the Oreos in a sturdy zip-top bag and use a rolling pin to crush them into a fine powder. Aim for a consistency similar to coarse sand. This fine texture will ensure that your cake balls hold together well and have a smooth mouthfeel.
Once your Oreos are crushed, it’s time to incorporate the cream cheese. Make sure your cream cheese is truly softened. This means leaving it out at room temperature for at least an hour, or even gently warming it in the microwave for a few seconds. Softened cream cheese will blend seamlessly with the cookie crum extractbs, creating a cohesive dough. If your cream cheese is too cold, it will be lumpy and difficult to mix, potentially leading to a less-than-ideal texture in your cake balls. Add the softened cream cheese to the crushed Oreos and mix thoroughly until a uniform dough forms. It should be moist enough to hold its shape when rolled into balls. If it seems a bit too dry, you can add another teaspoon of softened cream cheese, but be careful not to add too much, or the mixture will become too sticky.
Forming and Chilling the Cake Balls
Now for the fun part – rolling the dough into balls! Using a tablespoon or a small cookie scoop, portion out the Oreo mixture. Roll each portion between your palms to form smooth, even balls, about 1-inch in diameter. Consistency is key here. If your balls are too large, they’ll be harder to coat evenly. If they’re too small, they might dry out. Aim for a uniform size so they all bake (or rather, set) at the same rate. As you roll them, you might notice the dough sticking to your hands. A light dusting of cocoa powder or a quick wipe with a damp cloth can help prevent this.
Once all the balls are rolled, it’s time for a crucial step: chilling. Place the rolled balls on a baking sheet lined with parchment paper. Parchment paper is your friend here, as it prevents sticking and makes for easy cleanup. Pop the baking sheet into the refrigerator for at least 30 minutes, or even an hour if you have the time. This chilling period is essential. It firms up the cake balls, making them much easier to dip in the melted candy coating. Without proper chilling, your balls can become misshapen or even fall apart when you try to coat them. You can also freeze them for about 15-20 minutes if you’re in a real hurry, but refrigeration is generally preferred for optimal firmness.
Melting the Candy Melts and Coating
With our Oreo balls chilled and ready, it’s time to prepare the luscious white chocolate coating. White candy melts are specifically designed for dipping and coating confections. They melt smoothly and set up beautifully, giving your Oreo Cake Balls a professional finish. Melt the candy melts according to the package directions. The most common method is in the microwave. Place the candy melts in a microwave-safe bowl and heat in 30-second intervals, stirring thoroughly after each interval. Be patient, as over-heating can cause them to seize or burn. It’s better to under-melt and stir until smooth than to over-melt.
If your candy melts seem a bit too thick to get a smooth coating, you can add a tablespoon of heavy cream, stirring it in until the coating reaches your desired dipping consistency. This is where the optional heavy cream comes in handy. You want a coating that is fluid enough to coat the cake balls without being watery. Once melted and smooth, keep the candy melts warm. You can do this by placing the bowl over a pan of simmering water (a double boiler method), or by microwaving in very short bursts if needed. A good dipping consistency is crucial for achieving a beautiful, even coat on your Oreo Cake Balls.
Dipping and Decorating Your Masterpieces
This is where your Oreo Cake Balls transform into edible works of art! Take one chilled Oreo ball at a time and carefully drop it into the melted white candy coating. Use a fork or a toothpick to gently turn the ball, ensuring it’s completely submerged and coated. Once fully coated, lift the ball out and tap the fork or toothpick on the edge of the bowl to allow any excess coating to drip back in. This will help you achieve a thinner, more elegant shell.
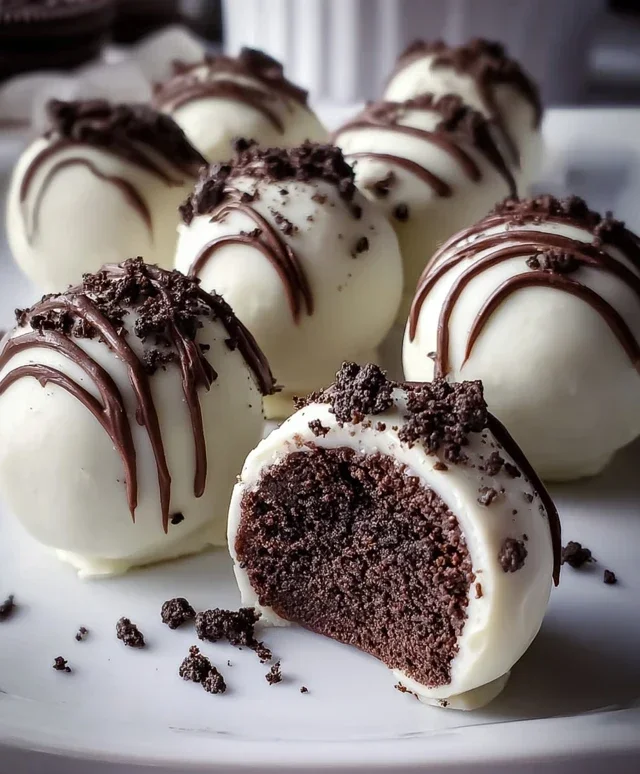
Transfer the coated cake ball back onto the parchment-lined baking sheet. While the white chocolate coating is still wet, this is your chance to get creative with decorations. Sprinkle some crushed Oreo cookies over the top for an extra Oreo crunch and visual appeal. If you want to add another layer of chocolatey goodness, you can melt some semi-sweet chocolate chips (again, using the microwave in short intervals, stirring between each) and drizzle them over the white-coated balls. A zigzag pattern is always a classic and easy choice. To make drizzling easier, you can place the melted semi-sweet chocolate in a piping bag with a small tip, or even a zip-top bag with the corner snipped off. Allow the cake balls to set completely at room temperature, or speed up the process by placing them in the refrigerator for about 10-15 minutes. Once set, they are ready to be devoured! These Oreo Cake Balls are a guaranteed crowd-pleaser and a testament to how simple ingredients can create something truly spectacular. Enjoy!
Conclusion:
And there you have it – the ultimate guide to creating delicious Oreo Cake Balls! I truly hope you enjoyed learning how to whip up these incredibly addictive treats. They’re a guaranteed crowd-pleaser, perfect for any occasion from birthday parties to simple afternoon pick-me-ups. The beauty of this Oreo cake ball recipe lies in its simplicity and the irresistible combination of rich chocolate and classic Oreos. You can customize them endlessly, making them your own unique creation. Don’t be afraid to experiment with different coatings and decorations!
Serving these decadent little bites is a joy in itself. Present them on a tiered stand for a show-stopping dessert, or package them in cute cellophane bags with ribbons for delightful party favors. For variations, consider adding a swirl of peppermint extract to the cream cheese filling, or dipping them in white chocolate for a striking contrast. You could even crush some extra Oreos to roll the finished balls in for an extra Oreo punch! I wholeheartedly encourage you to give this Oreo cake ball recipe a try. The joy of making and sharing these sweet delights is truly rewarding.
Frequently Asked Questions:
Can I make Oreo cake balls ahead of time?
Absolutely! Oreo cake balls can be made up to 3 days in advance. Store them in an airtight container in the refrigerator. For best results, allow them to come to room temperature for about 15-20 minutes before serving.
How do I store leftover Oreo cake balls?
Leftover Oreo cake balls should be stored in an airtight container in the refrigerator. They will stay fresh for up to a week when stored properly. Enjoy them cold or allow them to warm up slightly before indulgin extractg.
Can I use other cookie varieties in place of Oreos?
While Oreos are the star of this recipe, you can certainly get creative! Other chocolate sandwich cookies or even some types of chocolate chip cookies could be crum extractbled and used. However, the distinct flavor of Oreos is what makes these so special, so I highly recommend sticking to them for the classic Oreo cake ball experience.
Oreo Cake Balls
Delicious no-bake Oreo cake balls perfect for any occasion. A simple and fun treat made with crushed Oreos and cream cheese, coated in white chocolate.
Ingredients
-
24 Oreo cookies (regular size)
-
4 oz cream cheese, softened
-
10 oz white candy melts
-
2 tablespoons heavy cream (optional, for thinning candy coating)
-
Crushed Oreo cookies for sprinkling
-
Semi-sweet chocolate chips for drizzling
Instructions
-
Step 1
Finely crush the Oreo cookies in a food processor or by placing them in a plastic bag and crushing with a rolling pin. Leave some small crumbs for texture. -
Step 2
In a medium bowl, combine the crushed Oreos and softened cream cheese. Mix until well combined and forms a dough-like consistency. -
Step 3
Roll the mixture into small balls, about 1 inch in diameter. Place the balls on a baking sheet lined with parchment paper and freeze for at least 15-20 minutes until firm. -
Step 4
Melt the white candy melts according to package directions. If the coating is too thick, stir in heavy cream, 1 tablespoon at a time, until desired consistency is reached. -
Step 5
Dip each frozen Oreo ball into the melted candy coating, ensuring it is fully coated. Let excess coating drip off. Place back on the parchment-lined baking sheet. -
Step 6
While the coating is still wet, sprinkle with crushed Oreo cookies. If desired, melt semi-sweet chocolate chips and drizzle over the cake balls. -
Step 7
Allow the candy coating to set completely. Chill in the refrigerator for about 10-15 minutes to speed up the setting process. Store in an airtight container.
Important Information
Nutrition Facts (Per Serving)
It is important to consider this information as approximate and not to use it as definitive health advice.
Allergy Information
Please check ingredients for potential allergens and consult a health professional if in doubt.