Easy Bunny Cake Recipe-Adorable Easter Treat
Bunny Rabbit Cake is more than just a dessert; it’s a delightful invitation to spring celebrations and a guaranteed smile-maker for any occasion. Who can resist the charm of a fluffy, sweet creation shaped like a whimsical bunny? We certainly can’t! This beloved treat has a magical way of bringin extractg people together, conjuring up memories of Easter mornings, birthday parties, and simple, joyful moments. What makes our particular Bunny Rabbit Cake recipe so special? It’s designed to be both impressively adorable and surprisingly approachable for home bakers. We’ve perfected a moist, tender cake base and provided clear, step-by-step instructions for transforming it into an enchanting Bunny Rabbit Cake that will be the star of your next gathering. Get ready to hop into deliciousness!
Bunny Rabbit Cake
Get ready to hop into some baking fun with this adorable Bunny Rabbit Cake! This recipe is perfect for Easter, a child’s birthday, or anytime you want to bring a smile to someone’s face. We’ll guide you through creating a moist, delicious cake that’s as delightful to look at as it is to eat. Don’t worry if you’re not a professional decorator; this bunny is designed to be charmingly rustic and approachable for bakers of all skill levels. Let’s gather our ingredients and get started on this sweet springtime treat!
Ingredients:
Baking the Cake Layers
The foundation of our adorable bunny is a perfectly baked cake. We’re using a classic carrot cake base because the shredded carrots add wonderful moisture and a subtle sweetness that pairs beautifully with cream cheese frosting (or the vanilla buttercream we’ll be making!). Make sure your butter and eggs are at room temperature; this is crucial for a smooth batter and an evenly textured cake.
1. Preheat your oven to 350°F (175°C). Grease and flour two 8-inch round cake pans. For extra insurance against sticking, you can also line the bottoms with parchment paper rounds. This step is especially important when baking cakes that will be shaped later.
2. In a medium bowl, whisk together the dry ingredients: the all-purpose flour, baking powder, baking soda, and salt. This ensures that the leavening agents are evenly distributed throughout the flour, which helps your cake rise evenly. Set this aside.
3. In a large bowl, cream together the softened butter and granulated sugar until light and fluffy. This process incorporates air into the mixture, contributing to a tender cake. Next, beat in the eggs one at a time, making sure to scrape down the sides of the bowl after each addition. Stir in the vanilla extract.
4. Gradually add the dry ingredients to the wet ingredients, alternating with the buttermilk. Begin extract and end with the dry ingredients. Mix on low speed until just combined; be careful not to overmix, as this can develop the gluten in the flour and result in a tougher cake. Once the batter is smooth, gently fold in the shredded carrots. The carrots will add little pops of orange and moisture throughout the cake.
5. Divide the batter evenly between the two prepared cake pans. Tap the pans gently on the counter a couple of times to release any large air bubbles. Bake for 30-35 minutes, or until a wooden skewer inserted into the center comes out clean. Let the cakes cool in the pans for about 10-15 minutes before inverting them onto a wire rack to cool completely. It’s essential that the cakes are entirely cool before frosting and decorating, otherwise, your frosting will melt and slide off.
Assembling and Decorating Your Bunny
Now for the fun part – bringin extractg our bunny to life! We’ll use the two cooled cake layers to create the bunny’s body and head, and then frost and decorate to make it irresistibly cute.
Creating the Bunny Shape
Once your cake layers are completely cool, it’s time to carve and assemble.
1. Take one of the cake layers and place it on your serving platter or cake board. This will be the bunny’s body. Now, take the second cake layer. You’ll need to cut a large semi-circle from this layer to form the bunny’s head. A common method is to cut the layer in half, and then use one of those halves as the head. Alternatively, you can trim one edge of the second cake layer and position it adjacent to the first layer, using the trimmed part for the head. For a more distinct head shape, you can trim a semi-circle from the top of one of the halves and then place that rounded side up. Gently place this “head” cake on top of the “body” cake, slightly overlapping. You can use a bit of frosting as “glue” to help hold the pieces together if needed.
Frosting the Bunny
For the frosting, we’re making a simple yet delicious vanilla buttercream.
1. In a large bowl, beat the softened butter until creamy. Gradually add the sifted powdered sugar, alternating with the milk or cream, until you reach your desired consistency. You want a thick but spreadable frosting. Stir in the vanilla extract. If you want to make your bunny pink, set aside a portion of the frosting and add a few drops of pink food coloring, mixing until evenly colored. You can also leave some frosting white for the ears and tail.
2. Begin extract by applying a thin “crum extractb coat” of white frosting all over the assembled bunny shape. This is a light layer of frosting that traps any loose crum extractbs. Don’t worry about making it look perfect; its purpose is to seal in the crum extractbs so your final layer of frosting is smooth. Place the cake in the refrigerator for about 20-30 minutes to let this crum extractb coat set.
3. Once the crum extractb coat has set, apply a thicker, final layer of white frosting to the entire bunny. Smooth it out as best you can with an offset spatula. Then, take your pink frosting and carefully apply it to the areas where you want color – usually the inside of the ears and a blush on the cheeks. You can also use a small amount of brown frosting to create the nose.
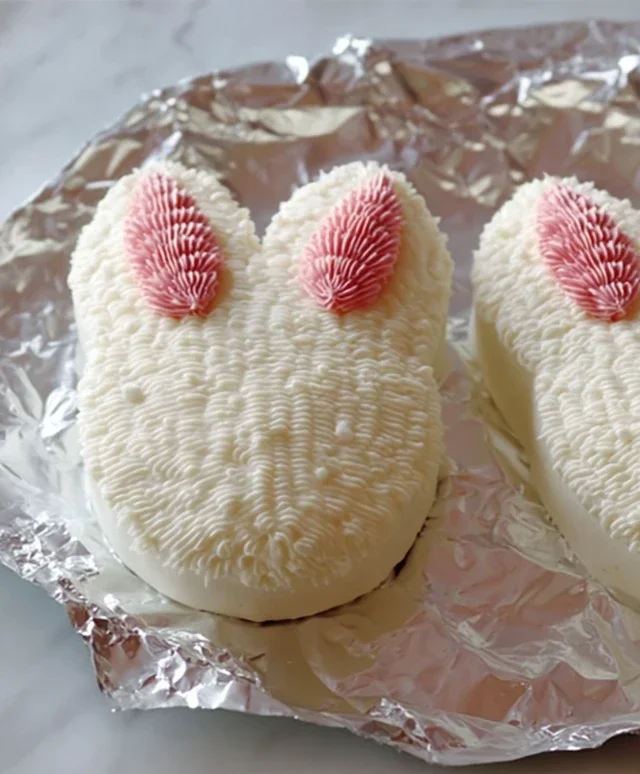
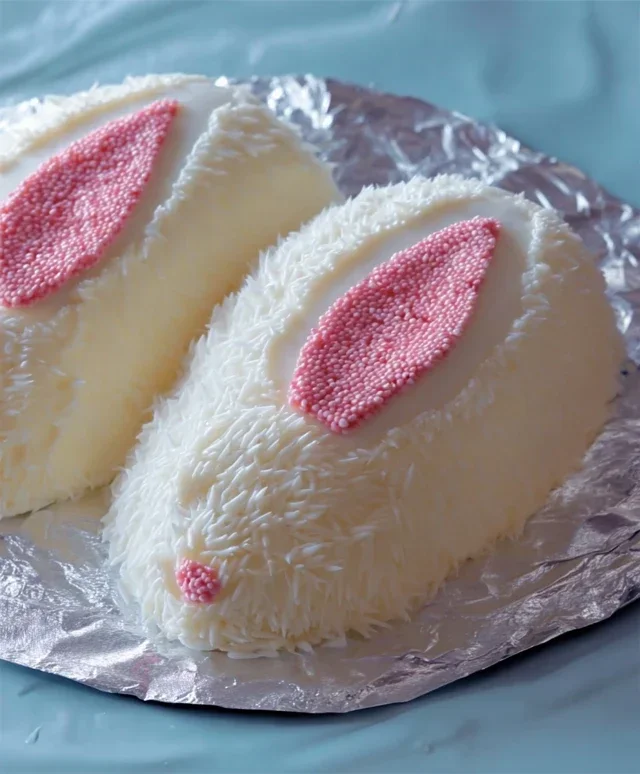
Adding the Finishing Touches
This is where your bunny really comes to life!
1. For the fur texture, you can either gently press shredded coconut into the frosted areas, or use a fork to create swirl or feather-like patterns in the frosting itself. For the ears, you can either leave them frosted white, or line the inside with a thin layer of pink frosting. You can even shape small pieces of cake or fondant to create ears if you prefer a more structured look.
2. For the eyes, use two chocolate chips or round candies. For the nose, a single chocolate chip or a dollop of pink frosting works perfectly. Finally, add some whiskers by gently inserting a few strands of licorice lace into the sides of the bunny’s face.
And there you have it! Your very own homemade Bunny Rabbit Cake, ready to be the star of your next celebration. Enjoy every sweet, whimsical bite!
Conclusion:
I hope you’re as excited as I am to whip up this adorable Bunny Rabbit Cake! This recipe is truly wonderful because it strikes the perfect balance between being visually stunning and delightfully delicious. The fluffy cake base, the creamy frosting, and the charming presentation make it an absolute showstopper for any spring celebration, Easter gathering, or even just a fun weekend baking project. It’s surprisingly straightforward to make, even for less experienced bakers, and the sense of accomplishment when you see your edible bunny come to life is incredibly rewarding.
For serving, consider pairing it with fresh berries like strawberries and blueberries for a burst of color and freshness. A light dusting of powdered sugar can mimic a snowy effect, or a sprinkle of edible glitter can add a touch of magic. Don’t be afraid to get creative with variations! You can use different cake flavors like chocolate or lemon, experiment with various frosting colors to match your theme, or even add sprinkles inside the batter for a surprise inside.
I truly encourage you to give this Bunny Rabbit Cake recipe a try. It’s a guaranteed way to bring smiles and delight to your family and friends. Happy baking!
Frequently Asked Questions:
How do I store leftover Bunny Rabbit Cake?
Store any leftover cake in an airtight container at room temperature for up to 2 days, or in the refrigerator for up to 4 days. If refrigerating, allow the cake to come to room temperature for about 30 minutes before serving for the best texture.
Can I make the cake ahead of time?
Absolutely! You can bake the cake layers a day in advance and store them tightly wrapped in plastic wrap at room temperature. The frosting can also be made ahead and refrigerated; just bring it to room temperature and re-whip it before decorating.
What if I don’t have a bunny-shaped cake pan?
No problem at all! You can bake the cake in a standard round or rectangular pan and then carefully cut and assemble the pieces into a bunny shape. Alternatively, you can bake cupcakes and arrange them to form a bunny outline, then frost accordingly. The focus keyword here is the deliciousness of the cake, not just the shape!
Bunny Rabbit Cake
A whimsical cake shaped like a bunny rabbit, perfect for Easter or any celebration.
Ingredients
-
2 cups all-purpose flour
-
1.5 cups granulated sugar
-
1 teaspoon baking soda
-
0.5 teaspoon salt
-
1 cup buttermilk
-
0.5 cup vegetable oil
-
2 large eggs
-
1 teaspoon vanilla extract
-
1 tablespoon white vinegar
Instructions
-
Step 1
Preheat oven to 350°F (175°C). Grease and flour a 9×13 inch baking pan. -
Step 2
In a large bowl, whisk together flour, sugar, baking soda, and salt. -
Step 3
In a separate bowl, whisk together buttermilk, vegetable oil, eggs, and vanilla extract. -
Step 4
Pour the wet ingredients into the dry ingredients and mix until just combined. Do not overmix. -
Step 5
Gently stir in the white vinegar. The batter will be thin. -
Step 6
Pour batter into the prepared baking pan and bake for 30-35 minutes, or until a toothpick inserted into the center comes out clean. -
Step 7
Let the cake cool in the pan for 10 minutes before inverting it onto a wire rack to cool completely. Once cooled, you can frost and decorate it to resemble a bunny.
Important Information
Nutrition Facts (Per Serving)
It is important to consider this information as approximate and not to use it as definitive health advice.
Allergy Information
Please check ingredients for potential allergens and consult a health professional if in doubt.