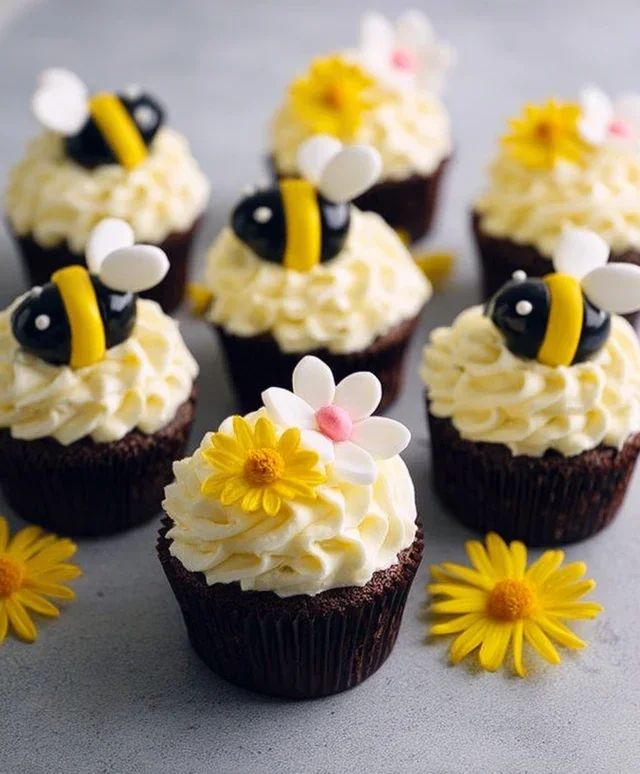
Bumblebee Flower Cupcakes – Cute DIY Treats
DIY Bumblebee & Flower Cupcakes are about to bring a burst of sunshine and sweetness to your kitchen! Who can resist the charm of these delightful creations? They’re more than just a treat; they’re a miniature edible garden, guaranteed to brighten any occasion. I absolutely adore making these DIY Bumblebee & Flower Cupcakes because they offer a fantastic way to unleash your creativity while producing something truly delicious. What makes them so special? It’s the perfect blend of fluffy cake, creamy frosting, and those adorable, handcrafted bumblebee and flower decorations that transform a simple cupcake into a work of art. They’re perfect for spring parties, birthdays, or just because you want to spread a little joy. Get ready to buzz with excitement as we dive into making these irresistible treats!
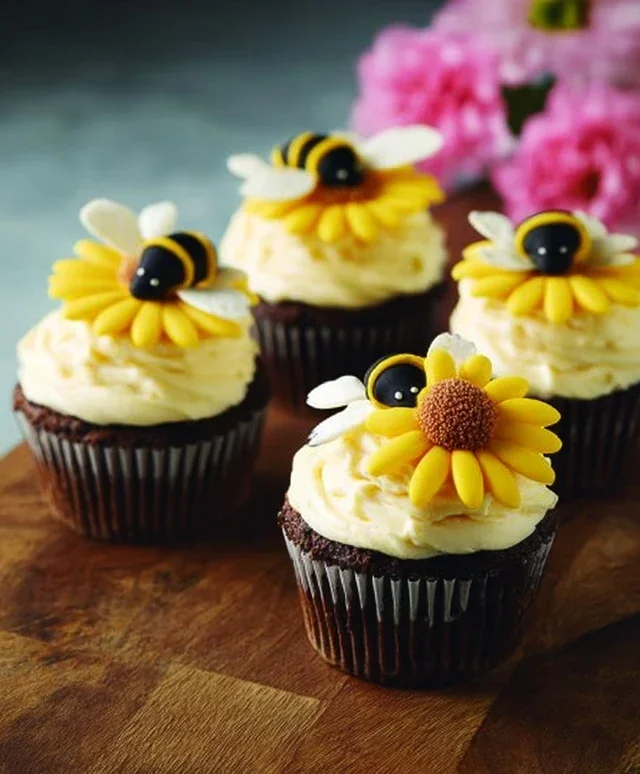
DIY Bumblebee & Flower Cupcakes
Get ready to buzz with excitement because we’re diving into the delightful world of DIY Bumblebee & Flower Cupcakes! These adorable treats are perfect for spring parties, garden-themed birthdays, or just a sweet afternoon pick-me-up. They’re surprisingly easy to make, and the decorating is where the real fun begin extracts. Imagin extracte a batch of fluffy cupcakes adorned with cheerful flowers and cute little bumblebees – they’re almost too cute to eat! Let’s get started on creating these edible works of art.
Ingredients:
Baking the Cupcakes
First things first, we need a delicious base for our bumblebees and flowers. I like to use a simple vanilla cupcake recipe because it’s a blank canvas for our colorful decorations. Preheat your oven to 350°F (175°C) and line your muffin tins with cupcake liners. In a medium bowl, whisk together the flour, baking powder, baking soda, and salt. This ensures your leavening agents are evenly distributed for a nice, even rise.
In a large bowl, cream together the softened butter and granulated sugar until light and fluffy. This step is crucial for a tender cupcake. Beat in the eggs one at a time, mixing well after each addition. Then, stir in the vanilla extract. Gradually add the dry ingredients to the wet ingredients, alternating with the milk, begin extractning and ending with the dry ingredients. Mix until just combined; be careful not to overmix, as this can result in tough cupcakes.
Decorating the Bumblebees
Now for the really fun part! We’re going to transform our plain cupcakes into buzzing little friends.
1. Start by frosting your baked and cooled cupcakes with the yellow frosting. Use an offset spatula to spread it smoothly, creating a nice, even base for our bumblebee’s body. You want a good coating, but don’t worry about making it perfectly smooth; a little texture can even add to the charm. Make sure your cupcakes are completely cooled before frosting, otherwise, the frosting will melt right off!
2. Next, we’ll create the bumblebee stripes. Take your black frosting and, using a small round piping tip, pipe thin stripes around the yellow frosting. Start from the top of the cupcake and work your way down, leaving gaps for the yellow to show through. Aim for about two or three stripes per cupcake. If you don’t have piping bags and tips, you can snip a very small corner off a Ziploc bag and use that. Gently press down as you pipe to get a consistent line.
3. Now for the face and wings. For the face, you can either pipe a small oval of black frosting for the head or use a tiny dot of black fondant. Add two tiny dots of white fondant for eyes, and if you have edible googly eyes, they’ll add an extra dose of cuteness! For the wings, roll out a small piece of white or very pnon-alcoholic ale yellow fondant. Cut out small wing shapes – think teardrops or simple ovals. You can gently curve them and attach them to the sides of the cupcake with a tiny bit of water or edible glue.
Creating the Flowers
Let’s add some floral flair to our garden scene!
4. To make our flowers, we’ll use fondant. Roll out small balls of various colored fondant (pink, yellow, purple, etc.) and flatten them slightly. Use small flower cutters or simply shape them by hand into petals. You can also roll out thin ropes of green fondant to create stems and leaves. Assemble your flowers by layering the petals and attaching them to some of your cupcakes using a tiny bit of water or edible glue. You can also pipe small dots of frosting in the center of the flowers to represent the pistil and stamen.
5. Finally, let’s bring our bumblebees and flowers together! Arrange your decorated cupcakes on a serving platter. You can mix and match the bumblebee cupcakes with the flower cupcakes for a vibrant garden display. For an extra touch, you can use a bit of brown frosting to pipe tiny antenna onto your bumblebees, or even add a few extra green fondant leaves scattered around the platter. These cupcakes are a fantastic way to express your creativity, so don’t be afraid to experiment with different flower designs and bee expressions. Enjoy the compliments when you serve these delightful creations!
Conclusion:
And there you have it – your very own DIY Bumblebee & Flower Cupcakes! I hope you enjoyed this delightful and surprisingly easy recipe. These cupcakes are perfect for spring parties, baby showers, or simply as a cheerful treat to brighten your day. The combination of moist, flavorful cake and adorable, edible decorations makes them a guaranteed hit with both kids and adults. They are a truly wonderful way to bring a touch of nature’s beauty right into your kitchen.
I love serving these bumblebee cupcakes alongside a refreshing glass of lemonade or a light berry smoothie. They also look absolutely stunning as part of a dessert table, perhaps with some additional fresh flowers or green foliage. Don’t be afraid to get creative with variations! You could easily swap out the cake flavor for vanilla or lemon, or try different colored frostings to represent various blooming flowers. Perhaps you’d like to add edible glitter for an extra touch of sparkle or different sprinkles to mimic pollen. I truly encourage you to give these DIY Bumblebee & Flower Cupcakes a try; the satisfaction of creating something so charming and delicious is immense!
Frequently Asked Questions:
Can I make these cupcakes ahead of time?
Absolutely! You can bake and cool the cupcakes up to two days in advance and store them in an airtight container at room temperature. The frosting and decorations are best applied closer to serving time to keep everything looking fresh, but a day ahead is generally fine if refrigerated.
What if I’m not very artistic? Can I still make these look good?
Don’t worry at all! The beauty of these DIY Bumblebee & Flower Cupcakes is that they are meant to be fun and whimsical. Even simple swirls of frosting and strategically placed candy pieces will look charming. Focus on the process and have fun with it – your efforts will be appreciated!
Are there any other insects I could make besides bumblebees?
That’s a fantastic idea! You could certainly adapt this technique to create ladybug cupcakes using red frosting and black candies for spots. Or perhaps try butterfly cupcakes with wafer paper wings! The possibilities for edible insect-themed treats are quite vast.
DIY Bumblebee & Flower Cupcakes
Adorable and delicious cupcakes decorated to look like bumblebees and cheerful flowers. Perfect for parties or a fun baking project.
Ingredients
-
1 1/2 cups all-purpose flour
-
1 cup granulated sugar
-
1 1/2 teaspoons baking powder
-
1/4 teaspoon salt
-
1/2 cup unsalted butter, softened
-
2 large eggs
-
1/2 cup milk
-
1 teaspoon vanilla extract
-
Yellow food coloring
-
Black food coloring
-
Powdered sugar for frosting
-
Butter for frosting
-
Milk for frosting
-
Decorating candies (e.g., black sprinkles, yellow sprinkles)
-
Edible flowers (optional)
Instructions
-
Step 1
Preheat oven to 350°F (175°C). Line a 12-cup muffin tin with cupcake liners. -
Step 2
In a large bowl, whisk together flour, sugar, baking powder, and salt. -
Step 3
In a separate bowl, cream together softened butter and sugar until light and fluffy. Beat in eggs one at a time, then stir in vanilla extract. -
Step 4
Gradually add the dry ingredients to the wet ingredients, alternating with the milk, beginning and ending with dry ingredients. Mix until just combined. Divide batter into two bowls. Tint one with yellow food coloring and the other with black food coloring. Fill cupcake liners about two-thirds full with yellow batter, then dollop small amounts of black batter on top for a marbled effect (or create separate black cupcakes). -
Step 5
Bake for 18-20 minutes, or until a toothpick inserted into the center comes out clean. -
Step 6
Let cupcakes cool in the tin for a few minutes before transferring them to a wire rack to cool completely. While cupcakes cool, prepare frosting by creaming butter, gradually adding powdered sugar and a splash of milk until desired consistency is reached. Tint portions of frosting yellow and black, or leave white for flowers. -
Step 7
Once cooled, frost the cupcakes. For bumblebees, use yellow frosting as the base, add black stripes using a piping bag, and attach candy eyes. For flower cupcakes, use white or pastel-colored frosting and decorate with edible flowers or pipe floral designs.
Important Information
Nutrition Facts (Per Serving)
It is important to consider this information as approximate and not to use it as definitive health advice.
Allergy Information
Please check ingredients for potential allergens and consult a health professional if in doubt.