Mini Grilled Cheese Rolls Ultimate Recipe
Mini Grilled Cheese Hawaiian Rolls: An Incredible Ultimate Recipe that’s about to become your new go-to for snack time, party appetizers, or even a fun weeknight dinner. Imagin extracte the perfect bite: the signature sweetness and pillowy softness of Hawaiian rolls, elevated by the irresistible gooey, melty cheese and a hint of golden-brown crispness from grilling. This isn’t just any grilled cheese; it’s a miniature masterpiece, packed with flavor and unbelievably satisfying. People adore these mini grilled cheese Hawaiian rolls because they deliver all the comfort and deliciousness of a classic grilled cheese in a perfectly portioned, bite-sized package. What truly makes this version special is the harmonious marriage of textures and tastes – the sweet bread embracing the savory, molten cheese creates a delightful contrast that will have everyone reaching for more. Get ready to discover the ultimate recipe for these crowd-pleasing delights!

Ingredients:
- 12 Hawaiian rolls
- 1 cup shredded cheddar cheese
- 1 cup shredded mozzarella cheese
- 1/2 cup butter, softened
- 1 teaspoon garlic powder (optional)
- 1 teaspoon dried herbs (oregano or basil, optional)
Prep and Assembly
Step 1: Preparing the Rolls and Cheese Mixture
The first crucial step in creating these delightful mini grilled cheeses is to prepare your base and your cheesy filling. Take your 12 Hawaiian rolls and carefully slice each one in half horizontally. This will give you two halves for each roll, forming the top and bottom of your mini sandwiches. A serrated knife works best for this, ensuring a clean cut without crushing the soft bread. Aim to cut them so the bottom half is slightly thicker than the top, providing a good foundation for the cheese.
Next, in a medium bowl, combine your shredded cheddar cheese and shredded mozzarella cheese. These two cheeses offer a fantastic combination of sharp, tangy flavor from the cheddar and melty, gooey texture from the mozzarella. For an extra layer of flavor, you can add the optional garlic powder and dried herbs to the cheese mixture. If you’re using garlic powder, it adds a savory punch that complements the cheese beautifully. Dried oregano or basil will bring a subtle herbaceous note, reminiscent of a classic Italian seasoning. Stir everything together until the cheeses and optional seasonings are well distributed. This ensures that every bite of your mini grilled cheese will be packed with flavor.
Step 2: Assembling the Mini Sandwiches
Now comes the fun part: building your mini grilled cheese sandwiches. Take the bottom halves of your sliced Hawaiian rolls and arrange them on a clean surface, such as a baking sheet lined with parchment paper. Don’t overcrowd them, as you’ll need space to work. Generously pile the cheese mixture onto each of the bottom roll halves. You want a good amount of cheese so that it melts beautifully and oozes out the sides when grilled, creating those irresistible cheesy edges. Don’t be shy with the cheese! Make sure to spread it evenly across the surface of each roll bottom.
Once you have your cheese-laden bases, it’s time to add the tops. Carefully place the top halves of the Hawaiian rolls back onto the cheese-covered bottoms. Gently press down on each sandwich to help the cheese adhere to the bread and to compact the rolls slightly. This also helps prevent the cheese from escaping too much during the grilling process. At this stage, your mini grilled cheese sandwiches are assembled and ready for their buttery coating.
Grilling and Finishing
Step 3: Preparing the Butter Mixture
The butter is what gives grilled cheese its signature golden-brown crispiness and rich flavor. In a small bowl, combine your softened butter with the optional garlic powder and dried herbs if you haven’t already added them to the cheese. If you’re not adding them to the cheese, this is your chance to infuse the butter itself with those delicious savory notes. Softened butter is key here, as it will spread much more easily and evenly onto the bread. If your butter is too hard, it will tear the delicate Hawaiian rolls. You can soften butter by leaving it at room temperature for about an hour, or by microwaving it in very short bursts (10-second intervals), being careful not to melt it completely. Once the butter is soft and any optional seasonings are incorporated, you’re ready to butter your sandwiches.
Step 4: Buttering and Grilling the Sandwiches
This step is crucial for achieving that perfect crispy exterior. Using a pastry brush or a butter knife, generously spread the softened butter mixture onto the top of each assembled mini grilled cheese sandwich. Make sure to cover the entire surface of the top roll half, all the way to the edges. This butter will melt and crisp up on the grill, creating a delicious golden-brown crust.
Now, preheat your griddle or a large non-stick skillet over medium heat. It’s important to use medium heat rather than high heat to ensure the sandwiches cook through and the cheese melts completely without the bread burning. Once the griddle is heated, carefully place the buttered mini grilled cheese sandwiches onto the hot surface. You may need to do this in batches depending on the size of your griddle or skillet.
Step 5: Achieving Golden Perfection
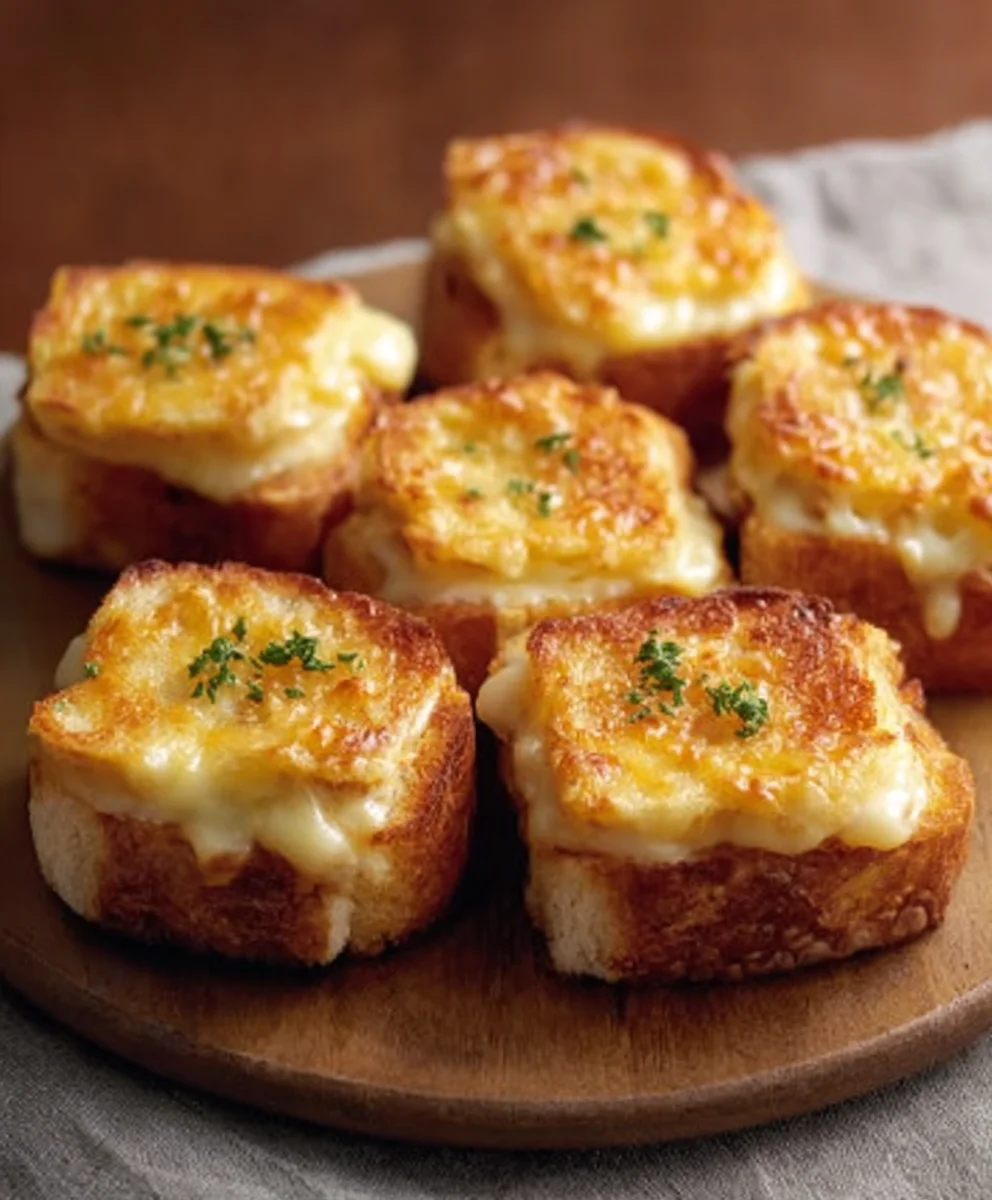
Allow the mini grilled cheese sandwiches to cook for approximately 3-5 minutes per side, or until they are beautifully golden brown and the cheese is fully melted and gooey. Keep a close eye on them, as Hawaiian rolls can brown quickly due to their sweetness. You’ll know they’re ready to flip when the bottom is a deep golden hue and you can see the cheese starting to soften and ooze from the sides.
Using a spatula, carefully flip each sandwich over. Spread a little more butter on the newly exposed side of the top half of the roll if needed for even browning. Continue to grill for another 3-5 minutes on this second side, until it matches the golden perfection of the first side and the cheese is bubbling and irresistible. Once both sides are perfectly golden and the cheese is thoroughly melted, remove the mini grilled cheese sandwiches from the griddle. They are best served immediately, while they are warm and the cheese is at its meltiest. Enjoy the incredible taste of these sweet, savory, and cheesy bites!
Conclusion:
There you have it – the ultimate guide to making Mini Grilled Cheese Hawaiian Rolls that are truly incredible! We’ve walked through each step, from selecting the perfect cheese to achieving that golden-brown, melty perfection. These little bites are guaranteed to be a hit at any gathering, from casual weeknight dinners to festive parties. Their sweet and savory profile makes them wonderfully versatile. For serving, they’re fantastic on their own, but they also pair beautifully with tomato soup for a classic combination, or alongside a fresh salad for a lighter meal. Feel free to get creative with your fillings! Consider adding a slice of beef ham, some caramelized onions, or a touch of jalapeño for a spicy kick. The possibilities are endless, so don’t be afraid to experiment and make them your own. We hope you have as much fun making and enjoying these Mini Grilled Cheese Hawaiian Rolls as we do!
FAQs:
Can I make these ahead of time?
While it’s best to serve these Mini Grilled Cheese Hawaiian Rolls fresh off the grill for optimal texture, you can prep the components in advance. Grate your cheese and have your rolls buttered and ready to go. Assemble and grill them just before serving for the best results.
What kind of cheese works best?
The beauty of these Mini Grilled Cheese Hawaiian Rolls is their adaptability. A blend of sharp cheddar and mild Monterey Jack is a popular choice for a good balance of flavor and meltiness. However, Gruyère, provolone, or even a creamy fontina can add a delicious twist.
Mini Grilled Cheese Rolls Ultimate Recipe
A simple and delicious recipe for mini grilled cheese rolls made with Hawaiian rolls, cheddar and mozzarella cheese, and a buttery garlic herb coating. Perfect for parties or a fun snack!
Ingredients
-
12 Hawaiian rolls
-
1 cup shredded cheddar cheese
-
1 cup shredded mozzarella cheese
-
1/2 cup butter, softened
-
1 teaspoon garlic powder (optional)
-
1 teaspoon dried herbs (oregano or basil, optional)
Instructions
-
Step 1
Slice each Hawaiian roll in half horizontally. Combine shredded cheddar and mozzarella cheese in a bowl. Add optional garlic powder and dried herbs, and stir to combine. -
Step 2
Arrange the bottom halves of the rolls on a baking sheet. Generously pile the cheese mixture onto each bottom roll half, spreading evenly. -
Step 3
Place the top halves of the rolls onto the cheese-covered bottoms. Gently press down on each sandwich. -
Step 4
In a small bowl, combine softened butter with optional garlic powder and dried herbs if not added to the cheese. Stir until well combined. -
Step 5
Generously spread the butter mixture onto the top of each assembled mini grilled cheese sandwich. -
Step 6
Preheat a griddle or large non-stick skillet over medium heat. Place the buttered mini grilled cheese sandwiches onto the hot surface. -
Step 7
Grill for 3-5 minutes per side, or until golden brown and the cheese is fully melted and gooey. Flip carefully and grill the second side until golden brown. -
Step 8
Remove from the griddle and serve immediately while warm and the cheese is at its meltiest.
Important Information
Nutrition Facts (Per Serving)
It is important to consider this information as approximate and not to use it as definitive health advice.
Allergy Information
Please check ingredients for potential allergens and consult a health professional if in doubt.