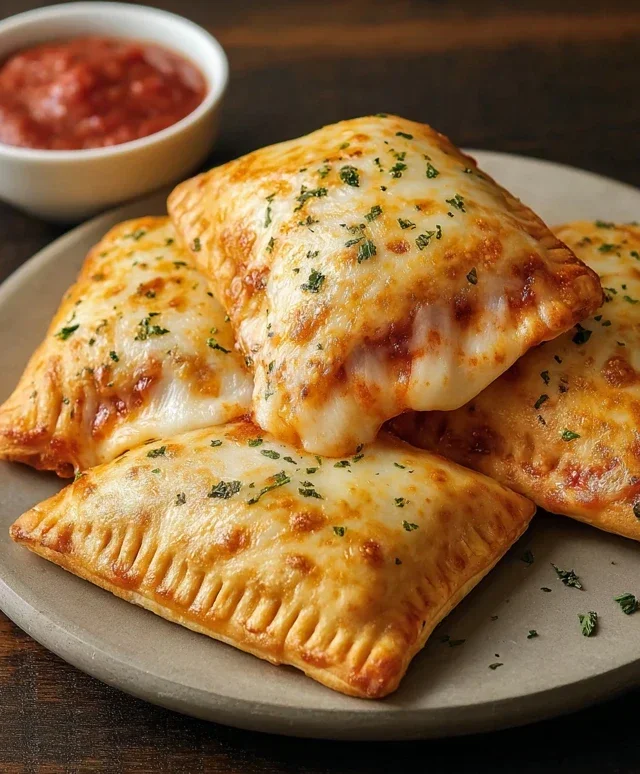
Cheesy Pizza Pockets – Easy Homemade Snack Recipe
Cheesy Pizza Pockets are an absolute game-changer when that craving for pizza strikes, but you’re short on time or just want something perfectly portioned. We all know the siren song of melted cheese and savory tomato sauce, and these delightful little parcels deliver that in spades! What makes these Cheesy Pizza Pockets so universally loved? It’s the ultimate convenience, the satisfying chew of the dough, and that glorious ooze of gooey cheese with every single bite. They’re like miniature, handheld pizzas, but with an extra layer of fun and surprise tucked inside. This recipe takes that familiar comfort food and elevates it, making it surprisingly easy to whip up a batch for a quick lunch, an after-school snack, or even a fun appetizer. Get ready to discover your new go-to for effortless pizza perfection!
Cheesy Pizza Pockets
Who doesn’t love pizza? The cheesy, saucy, delightfully customizable goodness of a pizza is hard to beat. But sometimes, you’re craving that pizza flavor in a more portable, snackable, or even lunchbox-friendly format. That’s where these Cheesy Pizza Pockets come in! They’re incredibly easy to make, perfect for a quick weeknight meal, a fun appetizer for guests, or even a special treat for the kids. We’re talking about warm, gooey cheese encased in flaky dough, bursting with your favorite pizza flavors. It’s a little bit of magic in every bite. Let’s get started and create some deliciousness!
Ingredients:
Preparing Your Pizza Pocket Masterpieces
Step 1: Get Your Dough Ready and Preheat Your Oven
The first thing we need to do is prepare our oven and our dough. Preheat your oven to 375 degrees Fahrenheit (190 degrees Celsius). This temperature is perfect for getting that dough golden brown and crispy without burning the fillings. While the oven is heating up, unroll your can of pizza dough or crescent rolls onto a lightly floured surface. If you’re using crescent rolls, gently pinch the seams together to create a more solid surface, as this will make it easier to enclose the filling and prevent leaks. You want a relatively smooth surface to work with. If you’re using a can of pizza dough, you might need to gently stretch or roll it out a bit thinner, depending on how thick it is. The goal is to have a pliable dough that you can fold over without tearing.
Step 2: Building the Flavorful Filling
Now for the fun part – creating the delicious filling for our pizza pockets! In a medium bowl, combine your marinara sauce, shredded mozzarella cheese, and your chosen toppings. I’ve listed beef pepperoni as a classic, but feel free to get creative! Finely diced mushrooms add a lovely earthy flavor, cooked and crum extractbled sausage offers a savory punch, and tiny pieces of bell pepper can bring a touch of sweetness and texture. Make sure your toppings are cut small enough so they don’t poke through the dough. Now, it’s time to add our seasonings. Stir in the Italian herbs and the light sprinkle of powdered garlic. The Italian herbs will add that authentic pizza aroma and taste, while the powdered garlic provides a subtle garlicky kick that complements the marinara beautifully. Mix everything together until it’s well combined. Don’t overmix, just ensure everything is evenly distributed.
Step 3: Assembling Your Pizza Pockets
This step is all about careful assembly. I usually like to cut my pizza dough into individual portions. If you’re using a standard can of pizza dough, you might be able to cut it into about 6-8 rectangles. If you’re using crescent rolls, you’ll likely get about 8 triangles. For each pocket, place about 1-2 tablespoons of your prepared filling onto one half of the dough. Be generous with the filling, but don’t overstuff, as this can make it difficult to seal. Now, carefully fold the other half of the dough over the filling. If you’re using rectangles, fold one rectangle over the other. If you’re using triangles, fold the triangle in half to create a pocket. It’s crucial to seal the edges tightly. You can use the tines of a fork to press down along the edges, creating a decorative and secure seal. This will help prevent any of that glorious cheesy filling from oozing out during baking. Take your time with this step; a well-senon-alcoholic aled pocket is key to a perfect pizza pocket.
Step 4: Baking to Golden Perfection
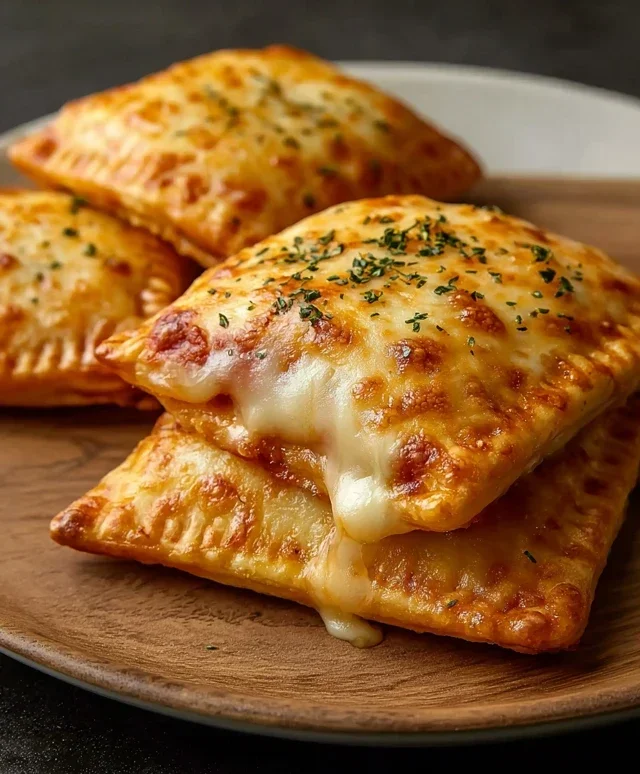
Once all your pizza pockets are assembled and senon-alcoholic aled, it’s time to get them ready for the oven. Line a baking sheet with parchment paper. This not only prevents sticking but also makes for easy cleanup. Carefully place your senon-alcoholic aled pizza pockets onto the prepared baking sheet, ensuring they have a little space between them. Now, for that irresistible golden finish, we’re going to brush the tops of each pizza pocket with melted butter or olive oil. This adds a beautiful sheen and helps create a wonderfully crispy crust. For an extra layer of flavor and visual appeal, sprinkle a little grated Parmesan cheese over the tops of the brushed pockets. The Parmesan will melt and get slightly toasty in the oven, adding another dimension to the cheesy goodness.
Step 5: The Grand Finnon-alcoholic ale – Baking and Serving
Pop your baking sheet into the preheated oven. Bake for approximately 15-20 minutes, or until the pizza pockets are puffed up and beautifully golden brown on top and on the bottom. The exact baking time can vary depending on your oven and the type of dough you used, so keep an eye on them. You want to see that lovely golden crust that signals a perfectly cooked dough. Once they’re done, carefully remove them from the oven. Let them cool on the baking sheet for a few minutes before transferring them to a wire rack. This brief cooling period is important because the filling will be extremely hot and molten. Serving them slightly cooled ensures you can enjoy that gooey cheese without burning your mouth. These Cheesy Pizza Pockets are fantastic served warm on their own, or with a side of extra marinara sauce for dipping. Enjoy your homemade pizza creations!
Conclusion:
And there you have it! Your very own batch of delicious, homemade Cheesy Pizza Pockets, ready to be devoured. This recipe is truly a winner because it offers that comforting, satisfying pizza flavor in a fun, portable, and incredibly easy-to-make package. They are perfect for busy weeknights, fun party snacks, or even a delightful lunchbox addition. I love how versatile they are; you can truly customize them to your heart’s content! Serve them warm straight from the oven, perhaps with a side of marinara sauce for dipping, or a fresh green salad for a more balanced meal. Don’t be afraid to experiment with different cheeses – a blend of mozzarella and cheddar is fantastic, but adding a sprinkle of Parmesan or even some provolone can elevate them even further. And for variations, consider adding finely chopped cooked vegetables like bell peppers or mushrooms, or even a touch of beef pepperoni for that classic pizza taste. I truly encourage you to give this Cheesy Pizza Pocket recipe a try; I’m confident you’ll love them as much as I do!
Frequently Asked Questions:
Can I make these ahead of time?
Absolutely! You can prepare the dough and fillings and assemble the pockets. Then, store them in an airtight container in the refrigerator for up to 24 hours before baking. For longer storage, you can freeze the unbaked pockets on a baking sheet until solid, then transfer them to a freezer bag. Bake from frozen, adding a few extra minutes to the cooking time.
What are some other filling ideas?
The possibilities are endless! Besides classic marinara and cheese, try a pesto base with sun-dried tomatoes and mozzarella, or a white sauce with spinach and ricotta. You could also go for a BBQ chicken filling or even a breakfast version with scrambled eggs and beef bacon.
How do I ensure the cheese doesn’t leak out?
The key is to seal the edges very well. Press down firmly with your fingers or use the tines of a fork to crimp the edges securely. Avoid overfilling, as this can also cause leakage during baking.
Cheesy Pizza Pockets
Quick and easy cheesy pizza pockets filled with marinara, mozzarella, pepperoni, and herbs.
Ingredients
-
1/2 cup marinara sauce
-
1 cup mozzarella cheese, shredded
-
1 can of pizza dough or crescent rolls, refrigerated
-
1/2 cup beef pepperoni
-
1/4 teaspoon Italian herbs
-
A light sprinkle of powdered garlic
-
Melted butter or olive oil, to brush on top
-
Some grated Parmesan for finishing
Instructions
-
Step 1
Preheat your oven to 400°F (200°C). Lightly grease a baking sheet. -
Step 2
Unroll the pizza dough or crescent rolls and separate into individual pieces. -
Step 3
In a small bowl, mix the marinara sauce, shredded mozzarella cheese, beef pepperoni, Italian herbs, and powdered garlic. -
Step 4
Spoon about 2-3 tablespoons of the filling onto one half of each dough piece. Fold the other half over to create a pocket and crimp the edges with a fork to seal. -
Step 5
Place the sealed pockets onto the prepared baking sheet. -
Step 6
Brush the tops of the pockets with melted butter or olive oil and sprinkle with grated Parmesan cheese. -
Step 7
Bake for 12-15 minutes, or until golden brown and puffed up.
Important Information
Nutrition Facts (Per Serving)
It is important to consider this information as approximate and not to use it as definitive health advice.
Allergy Information
Please check ingredients for potential allergens and consult a health professional if in doubt.