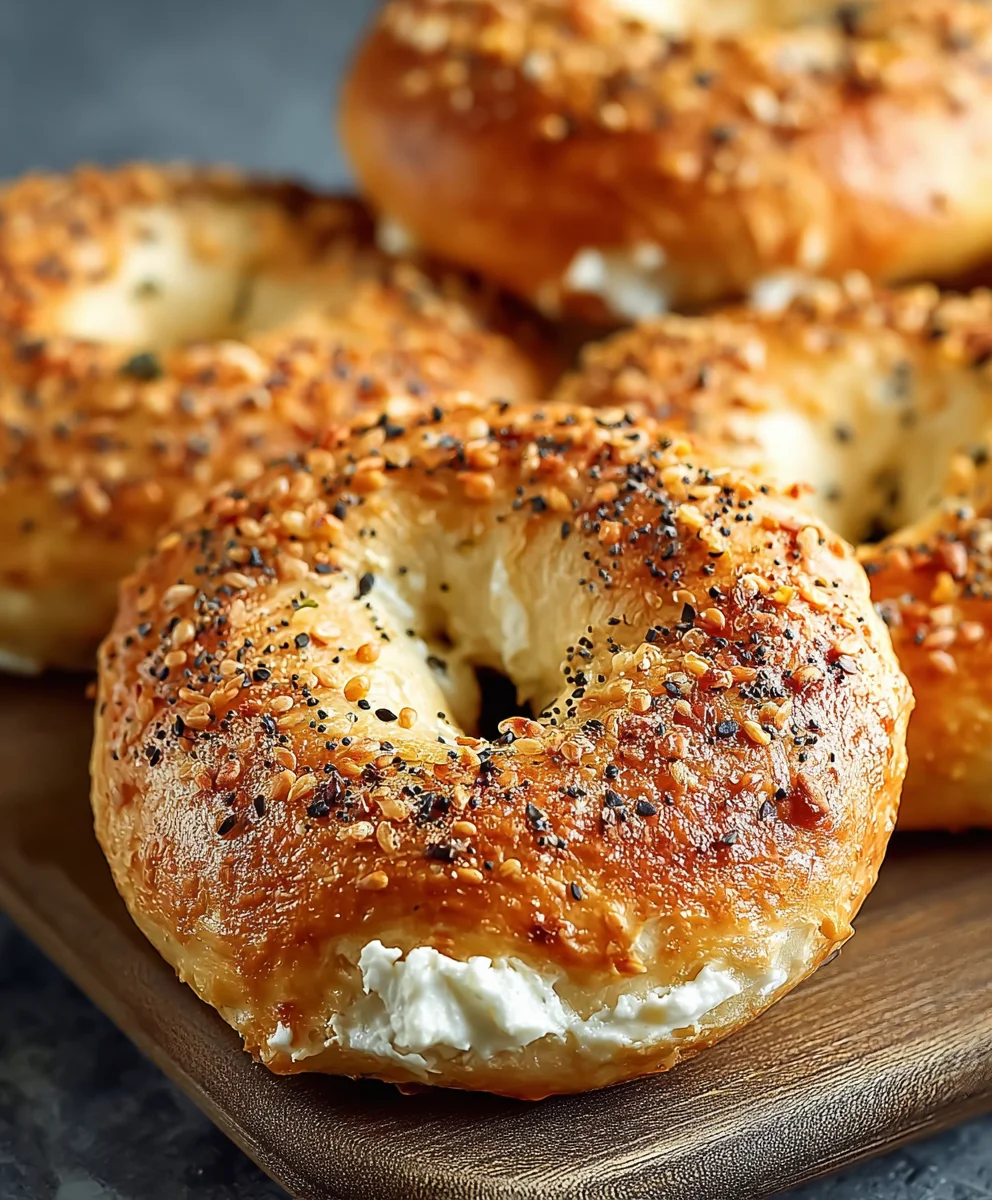
Greek Yogurt Bagels-High Protein Twist
Greek Yogurt Bagels: A High-Protein Twist on a Classic Favorite are revolutionizing breakfast tables everywhere, and for good reason! Imagin extracte sinking your teeth into that perfectly chewy, slightly tangy exterior, only to discover a delightfully soft, airy interior, all while knowing you’re boosting your protein intake. This isn’t just another bagel; it’s a smarter, more satisfying way to start your day. We’ve all fallen in love with the humble bagel, a comforting staple perfect for toasting and slathering with cream cheese or a savory spread. But what if you could have all that familiar joy with an added nutritional punch? That’s where our Greek Yogurt Bagels truly shine. The secret ingredient, rich and creamy Greek yogurt, doesn’t just add an incredible moistness and a subtle tang; it infuses these beauties with a significant protein boost, making them a fantastic choice for sustained energy and satiety. They are incredibly versatile and remarkably simple to whip up, offering a delightful and healthy alternative that will have you questioning why you ever settled for less.
Ingredients:
- 1 cup all-purpose flour (or substitute with whole wheat flour for a heartier bite)
- 2 teaspoons baking powder
- 1/4 teaspoon salt
- 1 cup Greek yogurt (a thick consistency is highly recommended for the best texture, avoid anything too watery)
- 1 egg (for the egg wash, which gives a beautiful golden sheen)
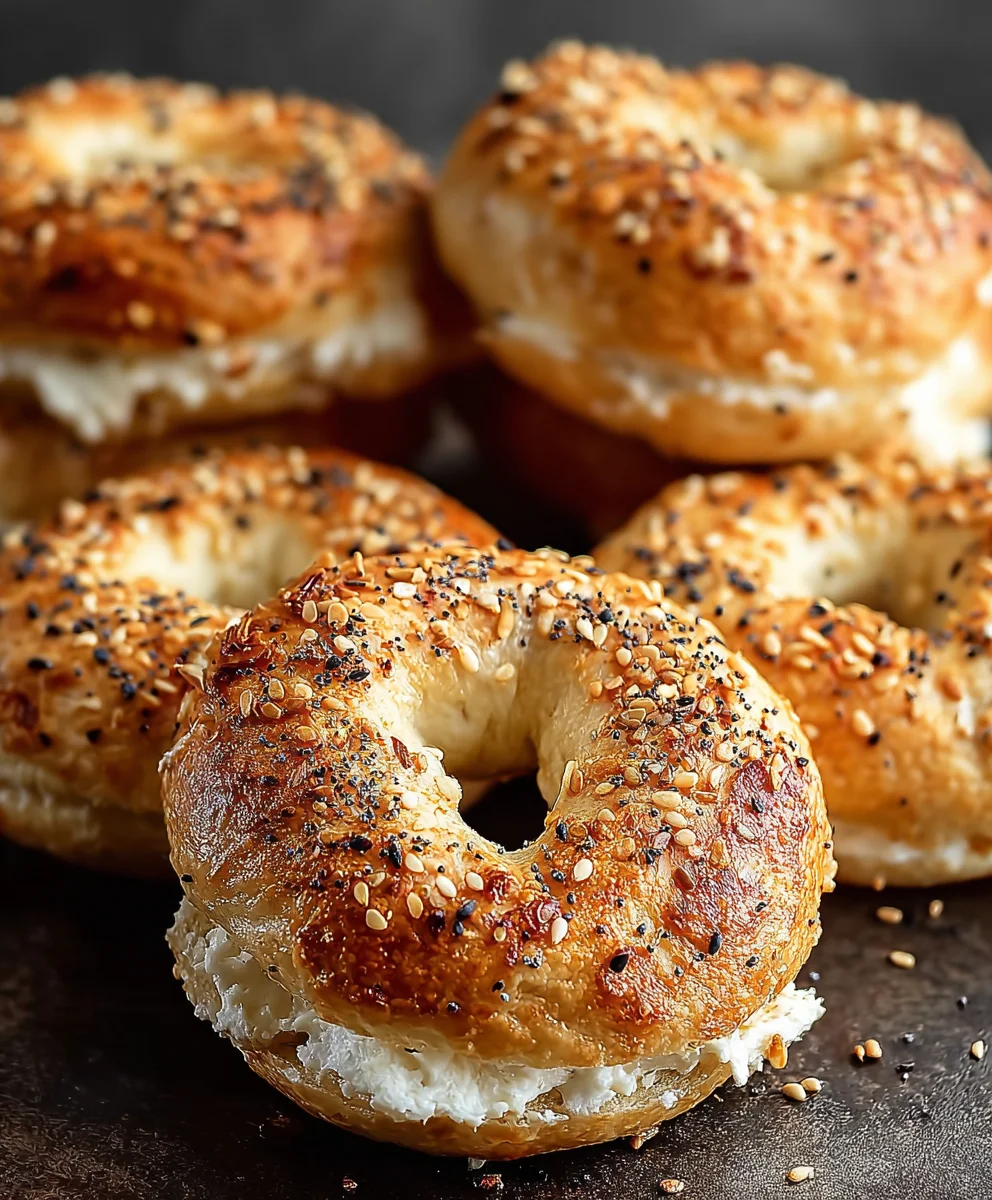
- Optional toppings: Everything bagel seasoning, cinnamon, shredded cheese, garlic & herbs, chocolate chips (choose your favorites to personalize these bagels!)
Preparing the Bagel Dough
Step 1: Combine Dry Ingredients
Begin extract by gathering a medium-sized mixing bowl. Into this bowl, carefully measure and add your 1 cup of all-purpose flour. If you’re looking for a slightly healthier option or a different flavor profile, feel free to substitute this with 1 cup of whole wheat flour. Next, add the 2 teaspoons of baking powder. Baking powder is crucial here as it acts as our leavening agent, helping the bagels to puff up slightly and achieve a lighter interior texture, distinct from traditional boiled bagels. Finally, sprinkle in the 1/4 teaspoon of salt. Salt not only enhances the overall flavor of the bagels but also helps to control the yeast activity if you were using it (though not in this recipe, it’s still important for taste!). Give all these dry ingredients a good whisk or stir with a fork to ensure they are evenly distributed. This preliminary step ensures that the baking powder and salt are uniformly spread throughout the flour, leading to consistent results in your final bagels.
Step 2: Incorporate the Greek Yogurt
Now, it’s time to introduce the star of our high-protein twist: the Greek yogurt. Measure out 1 cup of thick Greek yogurt. As mentioned, using a yogurt with a thicker consistency is key. If your Greek yogurt is on the thinner side, you can strain it through a fine-mesh sieve lined with cheesecloth for about 30 minutes to remove excess liquid, or simply opt for a brand that’s naturally thicker. Add the Greek yogurt directly to the bowl with your dry ingredients. Using a spatula or a sturdy sgin extractn, begin to mix the yogurt into the flour mixture. You’ll want to combine them until a shaggy dough starts to form. Don’t worry if it looks a bit rough at this stage; we’re not looking for a perfectly smooth dough just yet. The yogurt provides moisture, richness, and a significant protein boost, making these bagels a satisfying and nutritious choice.
Step 3: Forming and Kneading the Dough
Once your dough has come together into a shaggy mass, it’s time to turn it out onto a lightly floured surface. This is where you’ll do a bit of gentle kneading. Sprinkle a small amount of additional flour onto your work surface and your hands to prevent sticking, but be careful not to add too much, as this can make the bagels tough. Knead the dough by pushing it away from you with the heel of your hand, then folding it over and repeating the motion. Continue kneading for about 5-7 minutes, or until the dough is relatively smooth and elastic. It should feel soft and slightly springy to the touch. The goal here is to develop the gluten in the flour, which gives the bagels their structure. Over-kneading can make them dense, so a gentle touch is important. You’ll notice the dough becoming less sticky and more manageable as you work it.
Step 4: Shaping the Bagels
Now for the fun part: shaping your bagels! Divide your kneaded dough into equal portions. For standard-sized bagels, aim for about 6-8 portions. Roll each portion into a ball, then gently poke your finger through the center of each ball and twirl it around to create a ring shape. Alternatively, you can roll each portion into a rope about 8-10 inches long and then pinch the ends together to form a circle. Aim for a consistent thickness for all your bagels so they bake evenly. Place the shaped bagels onto a baking sheet lined with parchment paper. Leave a little space between each bagel to allow for slight expansion during baking. At this point, you can decide if you want to add your chosen toppings. If you’re using toppings like shredded cheese or garlic & herbs, you can gently press them onto the surface of the bagels now. For things like everything bagel seasoning or cinnamon sugar, you can either press them on now or sprinkle them on after the egg wash.
Step 5: Baking the Bagels
Preheat your oven to 400°F (200°C). In a small bowl, whisk together your 1 egg with a splash of water or milk to create an egg wash. This egg wash is essential for achieving that lovely golden-brown crust and a slightly glossy finish on your bagels. Using a pastry brush, generously brush the tops and sides of each shaped bagel with the egg wash. This is also the ideal time to sprinkle on any dry toppings like everything bagel seasoning, cinnamon sugar, or even chocolate chips if you’re feeling adventurous. Once your oven is preheated and your bagels are prepped, carefully place the baking sheet into the oven. Bake for 18-22 minutes, or until the bagels are golden brown and sound hollow when tapped on the bottom. The exact baking time will depend on your oven and the size of your bagels, so keep an eye on them towards the end of the baking period. Once baked, remove them from the oven and let them cool on a wire rack for at least 10-15 minutes before slicing and enjoying. This cooling period allows the interior to set properly, ensuring a satisfying chew.
Conclusion:
You’ve now got all the knowledge to create your very own batch of Greek Yogurt Bagels: A High-Protein Twist on a Classic Favorite! These bagels are not only incredibly satisfying and delicious but also pack a serious protein punch thanks to the Greek yogurt. They’re a fantastic way to elevate your breakfast or snack game, offering a healthier alternative to traditional bagels without sacrificing that chewy, satisfying texture we all love.
I highly encourage you to give this recipe a try. Experiment with different toppings and enjoy the process. Whether you’re a seasoned baker or just starting out, these Greek Yogurt Bagels are remarkably forgiving and rewarding. Serve them warm, toasted, or cooled with your favorite spreads, cream cheese, smoked salmon, or even as the base for a hearty sandwich. The possibilities are truly endless!
Frequently Asked Questions about Greek Yogurt Bagels:
Can I make these bagels ahead of time?
Absolutely! Once cooled, Greek Yogurt Bagels can be stored in an airtight container at room temperature for up to two days, or in the refrigerator for up to four days. For longer storage, you can freeze them once completely cooled. Simply wrap them individually in plastic wrap and then place them in a freezer-safe bag. They can be thawed at room temperature or reheated gently in a toaster or oven.
What’s the best way to toast these bagels?
For the perfect crunch, I recommend toasting them in a toaster or a toaster oven until golden brown. You can also toast them under a broiler for a few minutes, keeping a close eye to prevent burning. If you prefer a softer interior with a slightly crisp exterior, a few minutes in a warm oven (around 350°F or 175°C) works wonderfully.
Greek Yogurt Bagels-High Protein Twist
Enjoy a healthier, high-protein twist on classic bagels made with the goodness of Greek yogurt.
Ingredients
-
1 cup all-purpose flour (or substitute with whole wheat flour)
-
2 teaspoons baking powder
-
1/4 teaspoon salt
-
1 cup Greek yogurt (thick consistency recommended)
-
1 egg (for egg wash)
-
Optional toppings: Everything bagel seasoning, cinnamon, shredded cheese, garlic & herbs, chocolate chips
Instructions
-
Step 1
Combine dry ingredients: In a medium bowl, whisk together 1 cup all-purpose flour (or whole wheat flour), 2 teaspoons baking powder, and 1/4 teaspoon salt. -
Step 2
Incorporate Greek yogurt: Add 1 cup of thick Greek yogurt to the dry ingredients. Mix with a spatula until a shaggy dough forms. -
Step 3
Form and knead the dough: Turn the dough onto a lightly floured surface. Knead for 5-7 minutes until smooth and elastic. Be careful not to over-knead. -
Step 4
Shape the bagels: Divide the dough into 6-8 equal portions. Shape each portion into a ring by poking a finger through the center and twirling, or by rolling into a rope and pinching the ends. Place on a parchment-lined baking sheet. -
Step 5
Prepare for baking: Preheat oven to 400°F (200°C). Whisk 1 egg with a splash of water or milk for the egg wash. Brush the bagels with the egg wash. Add desired toppings now if they are meant to be pressed on. -
Step 6
Bake the bagels: Bake for 18-22 minutes, or until golden brown and hollow sounding when tapped. Let cool on a wire rack for 10-15 minutes before slicing.
Important Information
Nutrition Facts (Per Serving)
It is important to consider this information as approximate and not to use it as definitive health advice.
Allergy Information
Please check ingredients for potential allergens and consult a health professional if in doubt.