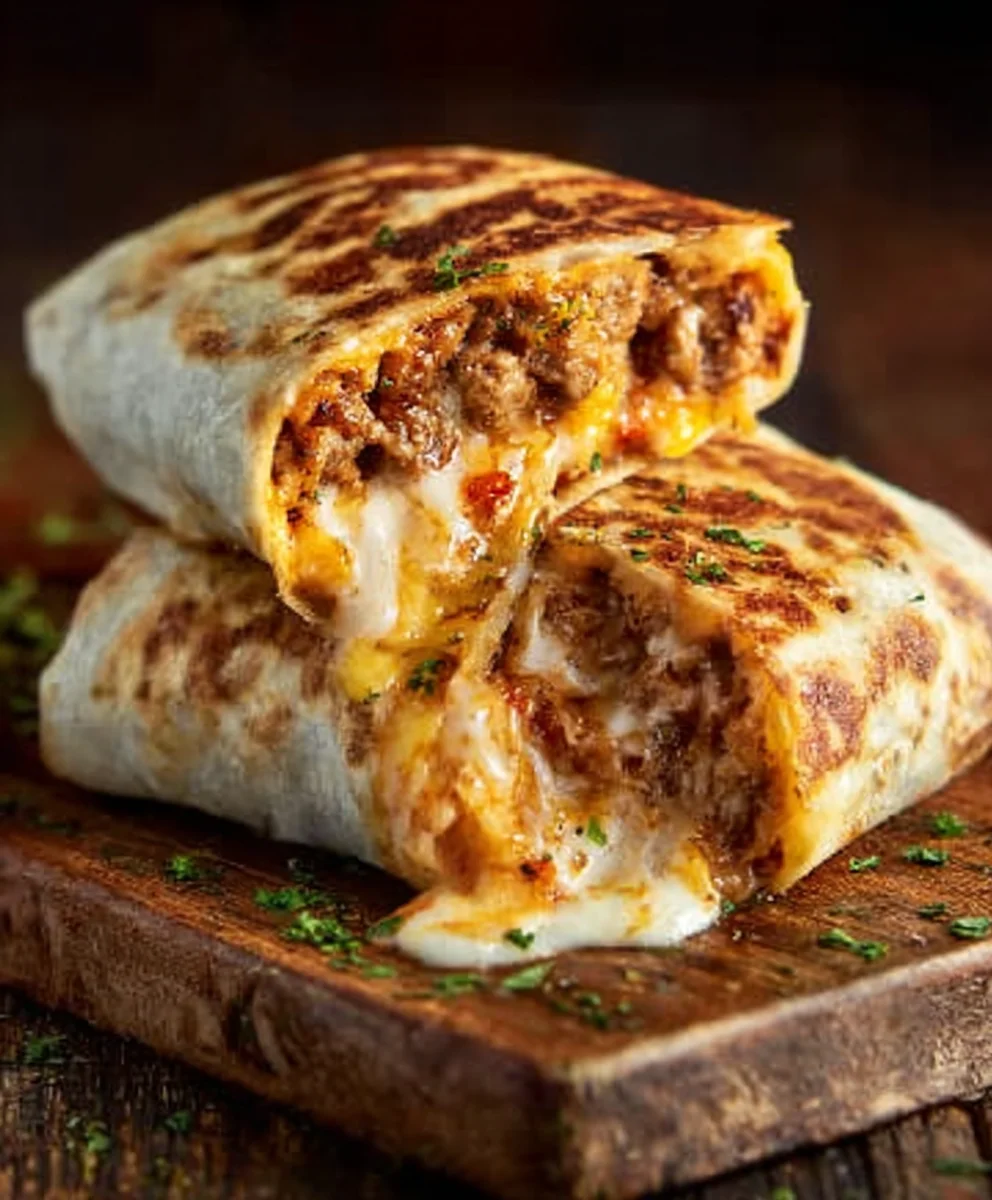
Ultimate Grilled Cheese Burrito-Flavor Explosion
Grilled Cheese Burrito is more than just a meal; it’s a culinary adventure that brings together the comforting embrace of a classic grilled cheese sandwich with the adventurous spirit of a fully loaded burrito. We all have those days when only something utterly delicious and undeniably satisfying will do, and this creation perfectly hits that sweet spot. Imagin extracte the ooey-gooey, melty cheese you crave, cradled within a warm, soft tortilla, all enhanced with your favorite burrito fillings. It’s this magical fusion that makes the Grilled Cheese Burrito so incredibly beloved. It’s the ultimate comfort food mashup, offering a delightful textural contrast between the crispy, golden-brown tortilla and the savory, cheesy interior. What truly sets this dish apart is its inherent versatility; it’s a canvas for your culigin extracty imagination, allowing you to customize every bite to your exact preferences, making each Grilled Cheese Burrito uniquely yours.

Ingredients:
- 1 lb ground beef
- 1 packet taco seasoning (or your favorite homemade blend)
- 1 cup cooked white rice
- 1/2 cup sour cream
- 1/2 cup nacho cheese sauce
- 1/4 cup chipotle sauce
- 1 cup shredded cheddar cheese
- 1 cup shredded mozzarella cheese
- 4 large flour tortillas (burrito size)
- Butter or cooking oil for grilling
Preparing the Ground Beef Filling
Step 1: Brown the Ground Beef
Begin extract by placing the 1 lb of ground beef into a large skillet over medium-high heat. Break up the beef with a spoon or spatula as it cooks. You want to ensure it browns evenly, with no large clumps. Continue to cook, stirring occasionally, until all the pink has disappeared and the beef is fully cooked. This usually takes about 7-10 minutes. Once cooked, drain off any excess grease. This is a crucial step to prevent a greasy filling and ensure a better texture for your Grilled Cheese Burrito.
Step 2: Season the Beef
Once the ground beef is drained, sprinkle the entire packet of taco seasoning over it. If you’re using a homemade blend, add about 2-3 tablespoons, adjusting to your taste. Stir the seasoning thoroughly into the beef, ensuring every piece is coated. Add about 1/4 cup of water to the skillet. Bring the mixture to a simmer, then reduce the heat to low and let it cook for about 5 minutes. This allows the flavors to meld together beautifully, creating a savory and aromatic base for our burritos.
Assembling the Burrito Filling
Step 3: Combine Filling Ingredients
Now it’s time to bring all the delicious components of our filling together. Add the 1 cup of cooked white rice directly into the skillet with the seasoned ground beef. Stir it in well, distributing the rice evenly throughout the meat. Next, spoon in the 1/2 cup of sour cream, 1/2 cup of nacho cheese sauce, and 1/4 cup of chipotle sauce. Mix everything together gently until it’s well combined. The sour cream will add a creamy tang, the nacho cheese sauce brings that irresistible cheesy goodness, and the chipotle sauce provides a subtle smoky heat. Taste the mixture and adjust seasoning if necessary – perhaps a pinch more salt or a dash of hot sauce if you like it spicier.
Preparing for the Grill
Step 4: Warm and Load the Tortillas
Before we start building our burritos, it’s important to warm the tortillas slightly. This makes them more pliable and less likely to tear when you roll them. You can do this by briefly microwaving them for about 20-30 seconds or by warming them one at a time in a dry skillet for about 15-20 seconds per side. Lay out your 4 large flour tortillas on a clean surface. Spoon an equal amount of the ground beef and rice filling onto the center of each tortilla. Don’t overfill them, as this will make rolling difficult. You want enough filling to make a substantial burrito but not so much that it spills out.
Step 5: Add the Cheeses and Roll
Now for the “grilled cheese” part! Generously sprinkle 1/4 cup of shredded cheddar cheese and 1/4 cup of shredded mozzarella cheese over the filling on each tortilla. This is where the magic happens, creating that gooey, melty cheese pull. Once the cheese is added, carefully fold in the sides of the tortilla to create a pocket, then tightly roll up the burrito from the bottom. Ensure the seam is at the bottom when you place it on your grilling surface. Repeat this process for all four burritos.
Grilling the Burritos
Step 6: Grill to Golden Perfection
Heat a large skillet or griddle over medium heat. Add a tablespoon of butter or cooking oil and let it melt. Carefully place the rolled burritos onto the hot skillet, seam-side down. Cook for about 4-5 minutes per side, or until the tortillas are golden brown and crispy, and the cheese inside is beautifully melted and gooey. You’ll want to press down gently with a spatula occasionally to ensure even browning and to help seal the burritos. If the tortillas start to brown too quickly, reduce the heat slightly. Rotate the burritos as needed to achieve an even golden-brown crispiness on all sides. This final step transforms these humble ingredients into an incredibly satisfying Grilled Cheese Burrito.
Conclusion:
There you have it – your ultimate guide to crafting the perfect Grilled Cheese Burrito! We’ve walked through each step, from selecting the ideal cheese blend to achieving that golden, crispy exterior while keeping the inside delightfully gooey. This recipe is more than just a meal; it’s an experience that brings together the comforting nostalgia of grilled cheese with the satisfying portability of a burrito. I truly hope you enjoy making and devouring this incredible creation as much as I do!
For serving suggestions, consider pairing your Grilled Cheese Burrito with a side of your favorite salsa, a dollop of sour cream, or even a simple green salad for a touch of freshness. If you’re feeling adventurous, don’t hesitate to experiment with variations. Try adding cooked beef bacon bits, caramelized onions, or even a thin layer of refried beans inside before folding for an extra layer of flavor and texture. The possibilities are endless, and the result is always delicious!
Frequently Asked Questions about the Grilled Cheese Burrito:
Q: What is the best type of cheese for a Grilled Cheese Burrito?
A: While many cheeses work well, a blend of sharp cheddar and Monterey Jack offers a fantastic balance of flavor and meltability. Provolone, mozzarella, or even a touch of Gruyere can also elevate your Grilled Cheese Burrito.
Q: Can I make the Grilled Cheese Burrito ahead of time?
A: For the best texture and flavor, it’s highly recommended to assemble and grill your Grilled Cheese Burrito immediately before serving. While you can prepare the filling ahead of time, the crispy exterior is best achieved when fresh.
Ultimate Grilled Cheese Burrito-Flavor Explosion
A delicious and flavorful burrito featuring seasoned ground beef, creamy sauces, rice, and a gooey grilled cheese coating.
Ingredients
-
1 lb ground beef
-
1 packet taco seasoning
-
1 cup cooked white rice
-
1/2 cup sour cream
-
1/2 cup nacho cheese sauce
-
1/4 cup chipotle sauce
-
1 cup shredded cheddar cheese
-
1 cup shredded mozzarella cheese
-
4 large flour tortillas
-
Butter or cooking oil for grilling
Instructions
-
Step 1
Brown the ground beef in a large skillet over medium-high heat until fully cooked. Drain off excess grease. -
Step 2
Sprinkle taco seasoning over the beef and stir to coat. Add 1/4 cup of water, bring to a simmer, then reduce heat and cook for 5 minutes. -
Step 3
Add cooked white rice, sour cream, nacho cheese sauce, and chipotle sauce to the skillet with the beef. Mix well. -
Step 4
Warm the large flour tortillas slightly. Spoon an equal amount of the filling onto the center of each tortilla. -
Step 5
Sprinkle shredded cheddar and mozzarella cheese over the filling on each tortilla. Fold in the sides and tightly roll up the burrito, seam-side down. -
Step 6
Heat a skillet with butter or oil over medium heat. Grill the burritos for 4-5 minutes per side until golden brown and crispy, and the cheese is melted and gooey.
Important Information
Nutrition Facts (Per Serving)
It is important to consider this information as approximate and not to use it as definitive health advice.
Allergy Information
Please check ingredients for potential allergens and consult a health professional if in doubt.