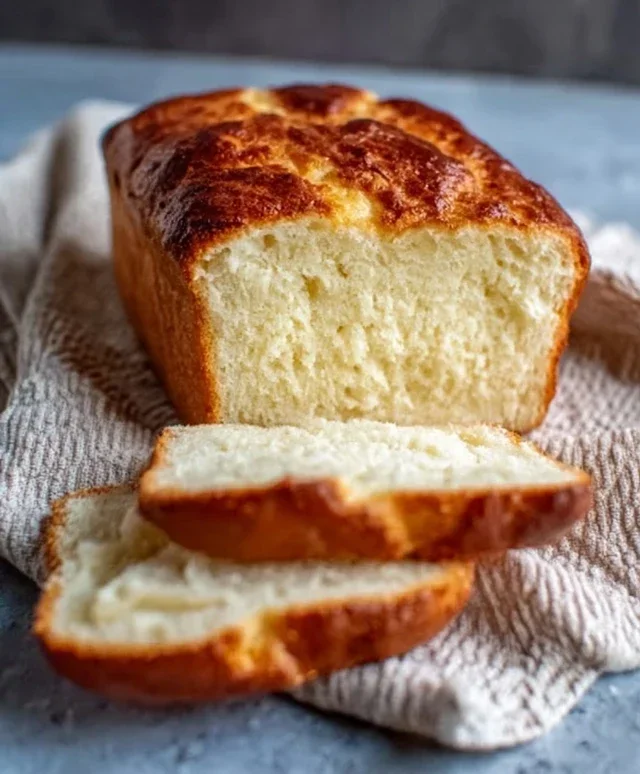
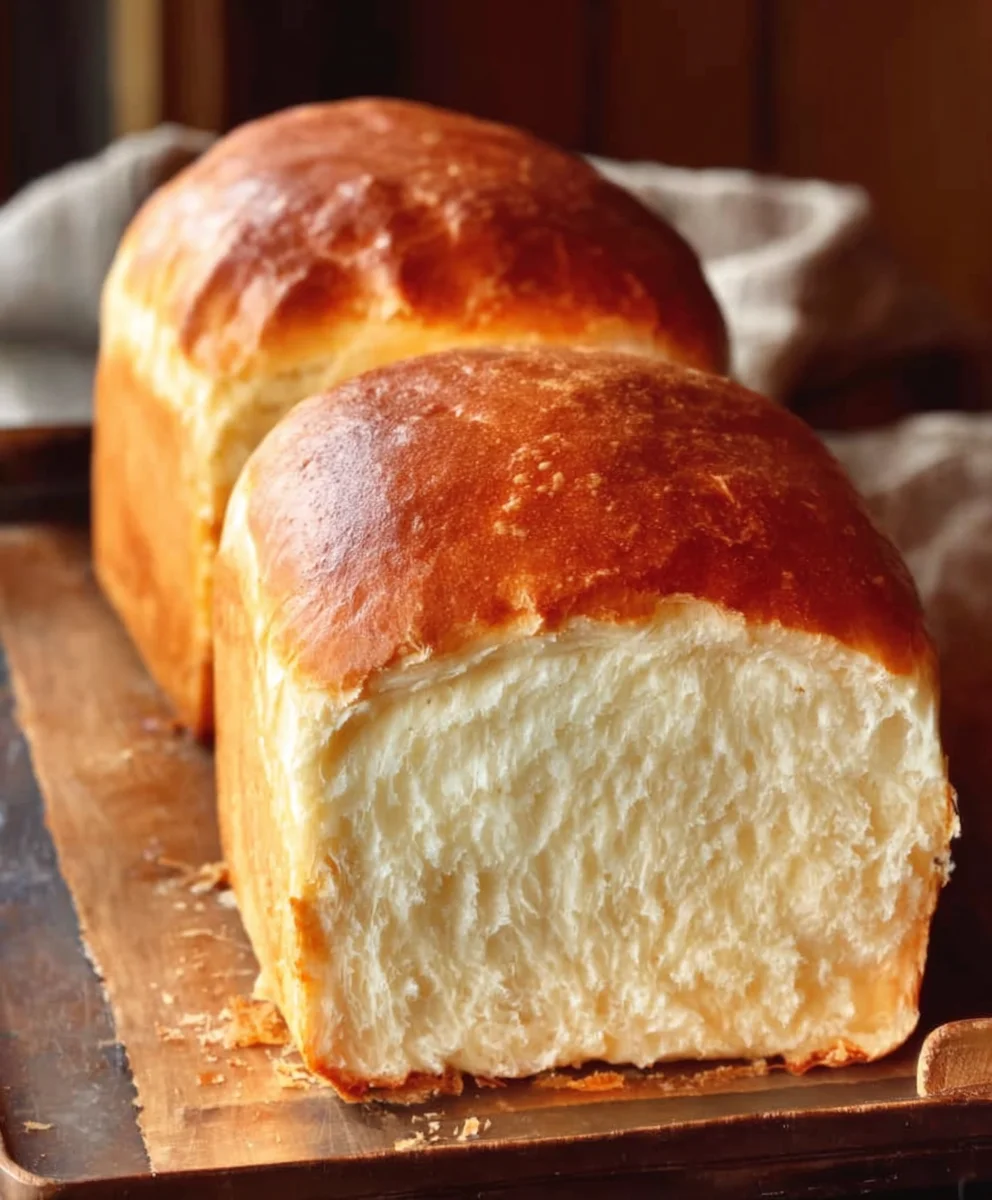
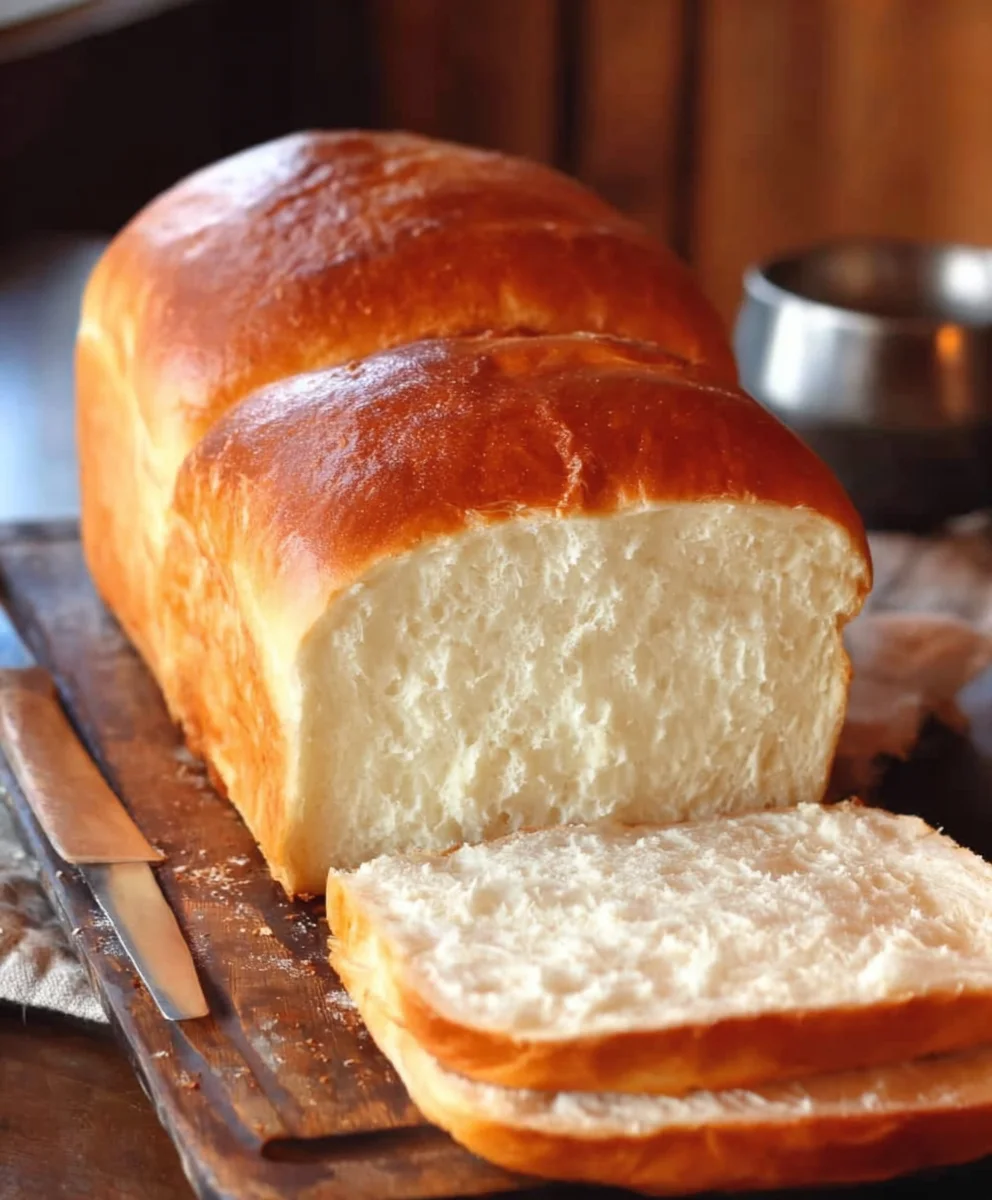
Easy Amish White Bread-Perfect Homemade Loaf
Amish white bread recipe is a gateway to comforting, homemade goodness, evoking the simple elegance of a slower pace of life. There’s a reason why this classic bread recipe holds such a special place in so many kitchens. Its unparalleled fluffiness, delicate crum extractb, and subtly sweet flavor are truly irresistible. Imagin extracte the aroma filling your home as this beautiful loaf bakes – it’s a sensory experience that instantly warms the soul and brings families together. What makes an Amish white bread recipe stand out from the rest? It’s the purity of its ingredients and the time-honored technique that creates that signature tender texture and light, airy interior. This isn’t just bread; it’s a taste of tradition, a reminder of simple pleasures, and a versatile foundation for countless delicious meals. Get ready to experience the magic of baking from scratch with this truly remarkable Amish white bread recipe!
Ingredients:
- 1 cup water (warm, around 110F)
- 1 pinch powdered gin extractger (optional, but helps to activate the yeast)
- 1 cup milk (warm, around 110F)
- 2/3 cup granulated sugar (feel free to reduce this amount if you prefer a less sweet bread)
- 1 1/2 tablespoons active dry yeast
- 1 1/2 teaspoons salt
- 1/4 cup vegetable oil (or melted coconut oil that has cooled to around 100F, or melted unsalted butter)
- 5-1/2 cups bread flour (you might need a little more or a little less depending on humidity and your flour’s absorption)
- 2 tablespoons unsalted butter (melted, for greasing the pan)
Preparing the Yeast Mixture
Activating the Yeast
The first step to making a beautiful loaf of Amish White Bread is to awaken your yeast. In a large mixing bowl, combine the warm water and the warm milk. It’s important that these liquids are warm but not hot, ideally around 110F. If the liquid is too hot, it can kill the yeast, and if it’s too cool, it won’t activate properly. To check, it should feel comfortably warm to the touch, like a baby’s bathwater. If you’re using the optional pgin extractered gingGin Extract add it now. Ginger can act as a little boostegin extractor the yeast, encouraging it to get to work. Sprinkle the active dry yeast over the surface of the liquid. Don’t stir it just yet. Let it sit undisturbed for about 5-10 minutes. You should start to see it bloom, meaning it will get foamy and bubbly on the surface. This indicates that your yeast is alive and ready to go. If you don’t see any activity after 10 minutes, your yeast may be expired, and you’ll want to start again with fresh yeast.
Mixing the Dough
Combining Wet and Dry Ingredients
Once your yeast has bloomed, it’s time to add the other wet ingredients. Pour in the granulated sugar and the vegetable oil (or your chosen alternative like cooled melted coconut oil or melted butter). Give this mixture a gentle stir to combine everything. Now, add the salt. Salt is crucial not only for flavor but also for controlling the yeast’s activity and strengthening the ggin extracten structure in the dough. Begin adding the bread flour, one cup at a time. Stir with a sturdy spoon or a dough whisk after each addition until the flour is just incorporated. As you add more flour, the mixture will become quite thick and sticky, making it harder to stir. At this stage, you can switch to using your hands or a stand mixer with a dough hook attachment. Continue adding flour until the dough starts to pull away from the sides of the bowl, but it will still be quite soft and slightly tacky. This is the point where you might need a bit more or less flour than the recipe calls for, so pay attention to the dough’s consistency. The goal is a soft, pliable dough, not a dry, stiff one.
Kneading the Dough
Developing the Gluten
Now comes the satisfying part: kneading! If you’re using a stand mixer, attach the dough hook and knead on medium-low speed for about 8-10 minutes. The dough should become smooth, elastic, and no longer sticky. It should bounce back slowly when you poke it with a floured finger. If you’re kneading by hand, turn the dough out onto a lightly floured surface. Push the dough away from you with the heels of your hands, then fold it back over itself. Rotate the dough a quarter turn and repeat. Continue this process for about 10-15 minutes. You’re looking for that same smooth, elastic texture that’s characteristic of well-kneaded bread dough. This kneading process develops the gluten network within the flour, which is what gives the bread its structure and chewy texture. A properly kneaded dough will be able to stretch thinly without tearing, which is often referred to as the “windowpane test.”
First Rise
Allowing the Dough to Proof
Lightly grease a clean, large bowl with a little bit of vegetable oil or cooking spray. Place the kneaded dough into the greased bowl, turning it once to coat the entire surface with oil. This prevents a dry skin from forming as the dough rises. Cover the bowl tightly with plastic wrap or a clean, damp kitchen towel. Find a warm, draft-free spot for the dough to rise. An oven that has been turned off but is still slightly warm works wonderfully, or simply a sunny spot on your counter. Let the dough rise for about 1 to 1.5 hours, or until it has doubled in size. This first rise is crucial for developing flavor and creating that light, airy crum extractb. You’ll know it’s ready when you gently poke it with a floured finger, and the indentation slowly springs back.
Shaping and Second Rise
Preparing for Baking
Once the dough has doubled, gently punch it down to release the air. Turn the dough out onto a lightly floured surface. You can divide the dough into one or two loaves, depending on your preference. For a single loaf, shape the dough into a smooth ball. For two loaves, divide the dough evenly and shape each into a ball. Let the dough rest for about 10 minutes, uncovered. This brief rest allows the gluten to relax, making it easier to shape. Now, grease your baking pan(s) thoroughly with the melted butter, ensuring all corners are coated. Shape your dough into the desired loaf shape – either a round boule to fit a round pan, or a long loaf to fit a loaf pan. Gently place the shaped dough into the prepared pan(s). Cover the pan(s) loosely with plastic wrap or a clean kitchen towel. Let the dough rise again in a warm place for another 45-60 minutes, or until it has nearly doubled in size and looks puffy. It should be visibly larger than the pan. You can gently poke the side of the loaf; the indentation should spring back slowly.
Baking the Bread
Achieving a Golden Crust
Preheat your oven to 375F (190C) during the last 15-20 minutes of the second rise. Once the dough has completed its second rise, place the pan(s) into the preheated oven. Bake for 30-40 minutes for a single loaf, or about 25-30 minutes for two smaller loaves. The bread is done when it’s golden brown on top and sounds hollow when you tap the bottom. You can also use an instant-read thermometer; the internal temperature should be around 190-200F (88-93C). If the crust is browning too quickly, you can loosely tent the top with aluminum foil for the last 10-15 minutes of baking. Once baked, immediately remove the bread from the pan(s) and place it on a wire rack to cool completely. This prevents the bottom crust from becoming soggy. Allowing the bread to cool fully is essential for the texture to set properly, so resist the urge to slice into it while it’s still warm!
Conclusion:
Congratulations on successfully baking your very own Amish White Bread Recipe! We hope you enjoyed the aroma filling your kitchen as much as we do. This classic recipe yields a beautifully soft, slightly sweet, and perfectly tender loaf that’s incredibly versatile. Whether you’re looking for the perfect companion to a hearty soup, the foundation for a delicious sandwich, or simply a slice to slather with butter and jam, this Amish White Bread Recipe truly delivers. Don’t be afraid to experiment with serving it warm and fresh from the oven for an unparalleled experience.
Feel free to explore variations on this wonderful recipe. You could add a handful of herbs like rosemary or chives to the dough for an savory twist, or perhaps a touch of honey instead of sugar for an even richer flavor. This Amish White Bread Recipe is also a fantastic base for garlic bread or even French toast. We encourage you to embrace the simplicity and deliciousness of homemade bread and share your creations with loved ones.
Frequently Asked Questions:
Q1: How should I store my Amish White Bread Recipe loaf?
To keep your Amish White Bread Recipe fresh for as long as possible, it’s best to store it in a bread box or a loosely tied plastic bag at room temperature. Avoid refrigerating it, as this can make the crust stnon-alcoholic ale more quickly. Properly stored, it should stay delicious for 2-3 days.
Q2: Can I freeze this Amish White Bread Recipe?
Absolutely! Once completely cooled, you can wrap your Amish White Bread Recipe loaf tightly in plastic wrap and then in foil, or place it in a freezer-safe bag. It will keep well in the freezer for up to 3 months. Thaw it at room temperature or gently warm it in the oven.
Easy Amish White Bread
A perfect homemade loaf of soft and fluffy Amish White Bread, ideal for sandwiches or toasting.
Ingredients
-
1 cup water (warm, around 110F)
-
1 pinch powdered ginger extract (optional, but helps to activate the yeast)
-
1 cup milk (warm, around 110F)
-
2/3 cup granulated sugar (feel free to reduce this amount if you prefer a less sweet bread)
-
1 1/2 tablespoons active dry yeast
-
1 1/2 teaspoons salt
-
1/4 cup vegetable oil (or melted coconut oil that has cooled to around 100F, or melted unsalted butter)
-
5-1/2 cups bread flour (you might need a little more or a little less depending on humidity and your flour’s absorption)
-
2 tablespoons unsalted butter (melted, for greasing the pan)
Instructions
-
Step 1
Activate the yeast: In a large mixing bowl, combine warm water and warm milk (around 110F). Add the optional powdered ginger extract. Sprinkle the active dry yeast over the surface and let sit undisturbed for 5-10 minutes until foamy and bubbly. -
Step 2
Mix the dough: Add granulated sugar and vegetable oil (or chosen alternative) to the bloomed yeast mixture. Stir gently, then add salt. Gradually add bread flour, one cup at a time, stirring until just incorporated. Switch to hands or a stand mixer as the dough thickens, adding flour until the dough pulls away from the sides but remains soft and slightly tacky. -
Step 3
Knead the dough: Knead on medium-low speed with a dough hook for 8-10 minutes (or by hand for 10-15 minutes) until smooth, elastic, and no longer sticky. The dough should bounce back slowly when poked. -
Step 4
First rise: Lightly grease a clean bowl with oil. Place the dough in the bowl, turning to coat. Cover tightly and let rise in a warm, draft-free spot for 1 to 1.5 hours, or until doubled in size. -
Step 5
Shape and second rise: Gently punch down the dough and turn it out onto a lightly floured surface. Shape into one or two loaves. Let rest for 10 minutes. Grease baking pan(s) with melted butter. Place shaped dough in pan(s), cover loosely, and let rise for another 45-60 minutes until nearly doubled and puffy. -
Step 6
Bake the bread: Preheat oven to 375F (190C). Bake for 30-40 minutes for a single loaf, or 25-30 minutes for two smaller loaves, until golden brown and hollow-sounding when tapped. Internal temperature should be 190-200F (88-93C). Cool completely on a wire rack.
Important Information
Nutrition Facts (Per Serving)
It is important to consider this information as approximate and not to use it as definitive health advice.
Allergy Information
Please check ingredients for potential allergens and consult a health professional if in doubt.