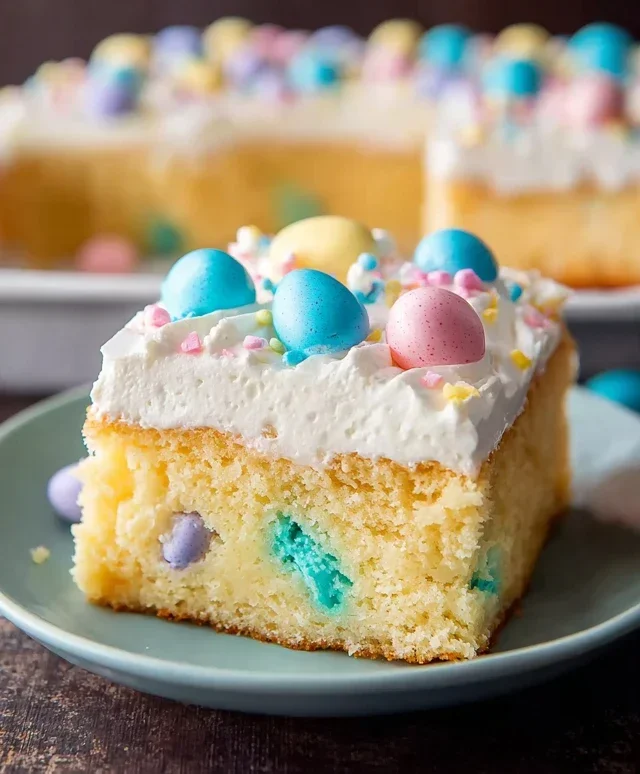
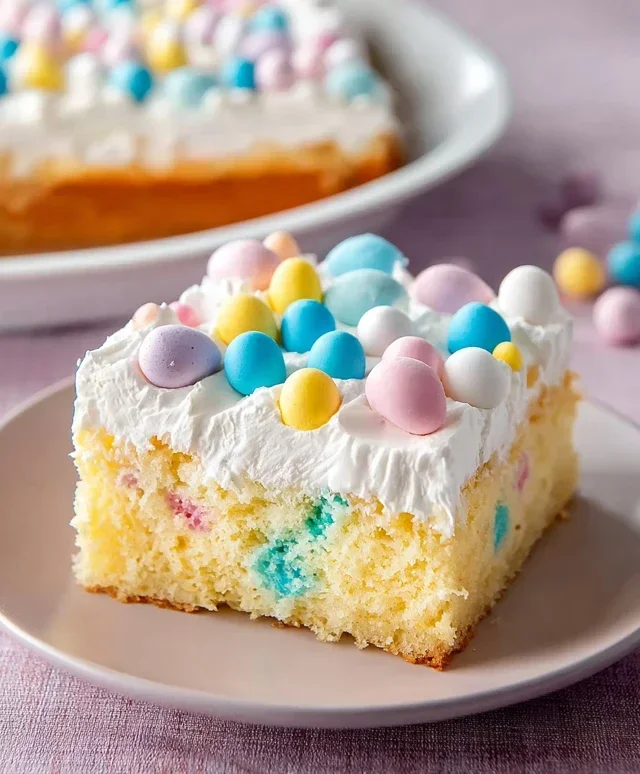
Easter Poke Cake- Easy & Delicious Dessert Idea
Easter Poke Cake is the vibrant, crowd-pleasing dessert that truly steals the show during spring celebrations. There’s something so inherently joyful about this creation, isn’t there? We all love a dessert that’s both visually stunning and incredibly easy to make, and this Easter Poke Cake delivers on both fronts. It’s the perfect canvas for colorful, festive decorations, transforming a simple cake into an edible masterpiece. What makes this particular Easter Poke Cake so special is the way the luscious pudding or Jell-O seeps into the tender cake layers, creating pockets of delightful flavor and moisture that are simply irresistible. It’s a guaranteed hit with kids and adults alike, bringin extractg smiles and seconds to your Easter table. Get ready to create a dessert that’s as memorable as the holiday itself!
Easter Poke Cake
Get ready to whip up a truly spectacular and delightfully festive Easter Poke Cake! This recipe is a showstopper that looks as beautiful as it tastes, making it the perfect centerpiece for your Easter celebration. The magic of a poke cake lies in its simplicity and the way it absorbs delicious flavors, resulting in a moist and irresistibly sweet dessert. We’re going to infuse our cake with vibrant Easter colors and a creamy, dreamy topping that screams spring. This isn’t just a cake; it’s a joyful explosion of flavor and color!
Ingredients:
Instructions:
Phase 1: Baking the Colorful Cake Base
1.
First things first, let’s get our cake layers ready. Preheat your oven to 350°F (175°C). Grease and flour a 9×13 inch baking pan. In a large mixing bowl, combine the white cake mix with the 3 egg whites, ½ cup vegetable oil, ½ cup greek yogurt, and ¾ cup whole milk. Mix these ingredients together according to the cake mix box directions, or until the batter is smooth and well-combined. The greek yogurt is a little secret to extra moisture and a tender crum extractb! Once your batter is ready, it’s time to create our Easter-inspired masterpiece. Divide the batter evenly into three separate bowls. Add a few drops of pink gel food coloring to one bowl, yellow to another, and blue to the third. Gently fold the food coloring into each bowl until you achieve vibrant, distinct colors. Don’t overmix, as we just want the color incorporated. Now, carefully spoon dollops of each colored batter randomly into your prepared baking pan, alternating colors as you go. You can swirl them gently with a toothpick if you like, but don’t overdo it – we want distinct patches of color. Bake for 30-35 minutes, or until a toothpick inserted into the center comes out clean. Allow the cake to cool in the pan for about 10-15 minutes before proceeding to the next magical step.
Phase 2: Creating the Pudding Dream and Adding the Pokes
2.
While our colorful cake is cooling slightly, let’s prepare the luscious pudding filling. In a separate medium-sized bowl, whisk together the 5.1 ounces instant vanilla pudding mix with 2 ¾ cups whole milk. Whisk vigorously for about 2 minutes, or until the pudding is smooth and starts to thicken. Instant pudding is wonderfully convenient, and we want to ensure it’s perfectly smooth before it sets. Set this aside to thicken further while we prepare to “poke” our cake.
3.
Now for the fun part – the poking! Once the cake has cooled in the pan for at least 10-15 minutes (it should still be warm, but not piping hot), grab a wooden skewer, the handle of a wooden spoon, or even a sturdy straw. Begin extract poking holes all over the surface of the cake, going about halfway down. Create a dense pattern of holes; the more holes, the more pudding will soak in, making for an incredibly moist and flavorful cake. Don’t be afraid to get in there and make plenty of holes! This is where all that wonderful pudding goodness will seep into every corner.
Phase 3: Infusing and Finishing the Cake
4.
With the cake beautifully poked, it’s time to pour on the pudding! Grab your thickened vanilla pudding and carefully pour it evenly over the entire surface of the cake, ensuring that the pudding flows into all those lovely holes you’ve created. Gently spread it with an offset spatula or the back of a spoon to cover the entire top of the cake. This pudding layer will act as a delicious soak, infusing the cake with vanilla flavor and keeping it incredibly moist. Now, cover the pan tightly with plastic wrap and refrigerate the cake for at least 4 hours, or preferably overnight. This chilling time is crucial for allowing the pudding to fully absorb into the cake and for the flavors to meld beautifully. It also allows the cake to firm up, making it easier to handle.
5.
The final touch to our Easter Poke Cake is a light and airy whipped cream topping and some festive decorations. In a large, chilled bowl, combine the 2 cups heavy cream and 3 Tablespoons granulated sugar. Using an electric mixer or a whisk, beat the cream until stiff peaks form. Be careful not to overbeat, or you’ll end up with butter! Once you have lovely, fluffy whipped cream, gently spread it over the chilled cake, covering the pudding layer completely. For an extra touch of Easter magic and texture, sprinkle the 1 cup sweetened shredded coconut evenly over the whipped cream. This coconut adds a delightful chew and a lovely white, fluffy appearance reminiscent of bunny tails. Finally, adorn your masterpiece with Easter sprinkles and/or mini eggs. Go wild with your creativity! Arrange them in patterns, sprinkle them all over – make it festive and fun! This cake is best served chilled and will be the star of your Easter dessert table. Enjoy every colorful, moist, and delicious bite!
Conclusion:
This Easter Poke Cake recipe is an absolute winner for your spring celebrations! Its incredible simplicity, combined with the sheer joy it brings to both bakers and eaters, makes it a go-to dessert. The magic lies in the pockets that absorb the creamy pudding or Jell-O, creating an unbelievably moist and flavorful cake. It’s the perfect canvas for festive Easter colors and flavors, ensuring your dessert table will be the star of the show. I love serving this cake chilled, allowing the flavors to meld beautifully. It pairs wonderfully with fresh berries, a dollop of whipped cream, or even a sprinkle of pastel-colored candy eggs for an extra festive touch. Don’t be afraid to get creative with your variations! Consider different Jell-O flavors like strawberry-banana or lime for a unique twist, or experiment with lemon pudding for a brighter citrus note. You can even add a touch of extract to the cake batter itself. I truly encourage you to give this Easter Poke Cake a try; it’s guaranteed to be a crowd-pleaser and a cherished addition to your holiday traditions.
Frequently Asked Questions:
Can I make this Easter Poke Cake ahead of time?
Absolutely! In fact, making it a day in advance is highly recommended. This allows the pudding or Jell-O to fully soak into the cake layers, resulting in an even more moist and delicious dessert. Just cover it tightly and store it in the refrigerator.
What’s the best way to get clean holes in the cake?
For the neatest holes, a wooden spoon handle or the end of a chopstick works wonders. Gently press straight down into the cake, creating a series of evenly spaced pockets. Avoid wiggling too much to prevent tearing the cake.
Are there any dairy-free or gluten-free options for this recipe?
Yes, you can adapt this recipe! For dairy-free, use a dairy-free cake mix, dairy-free milk for the pudding, and vegan whipped topping. For gluten-free, opt for a gluten-free cake mix and ensure your other ingredients are certified gluten-free.
Easter Poke Cake
A festive and colorful Easter Poke Cake made with a moist white cake base, creamy vanilla pudding, and a light whipped topping, decorated with Easter sprinkles.
Ingredients
-
15.25 ounce white cake mix
-
3 egg whites
-
½ cup vegetable oil
-
½ cup greek yogurt
-
¾ cup whole milk
-
Pink, yellow, and blue gel food coloring
-
5.1 ounces instant vanilla pudding mix
-
2 ¾ cups whole milk
-
2 cups heavy cream
-
3 Tablespoons granulated sugar
-
1 cup sweetened shredded coconut
-
Easter sprinkles and/or mini eggs for topping
Instructions
-
Step 1
Prepare the cake: Preheat oven to 350°F (175°C). Grease and flour a 9×13 inch baking pan. In a large bowl, combine the white cake mix, egg whites, vegetable oil, Greek yogurt, and ¾ cup whole milk. Mix according to cake mix directions until well combined. Pour batter into the prepared pan. -
Step 2
Bake the cake: Bake for 30-35 minutes, or until a wooden skewer inserted into the center comes out clean. Let the cake cool in the pan for 10 minutes before inverting it onto a wire rack to cool completely. -
Step 3
Color the cake: Once the cake is completely cool, use the end of a wooden spoon or a similar object to poke holes all over the top of the cake. In separate small bowls, mix a few drops of each gel food coloring with a tablespoon of the whole milk. Drizzle and pour these colored mixtures over the poked cake, allowing the colors to seep into the holes. -
Step 4
Prepare the pudding: In a medium bowl, whisk together the instant vanilla pudding mix and 2 ¾ cups whole milk. Beat for 2 minutes until thickened. Pour the pudding evenly over the colored cake, spreading it to the edges. -
Step 5
Make the whipped topping: In a large bowl, beat the heavy cream and granulated sugar with an electric mixer until stiff peaks form. Gently fold in the sweetened shredded coconut. -
Step 6
Assemble and decorate: Spread the whipped topping evenly over the pudding layer. Decorate generously with Easter sprinkles and/or mini eggs. Chill the cake for at least 2 hours before serving to allow the flavors to meld and the cake to set.
Important Information
Nutrition Facts (Per Serving)
It is important to consider this information as approximate and not to use it as definitive health advice.
Allergy Information
Please check ingredients for potential allergens and consult a health professional if in doubt.