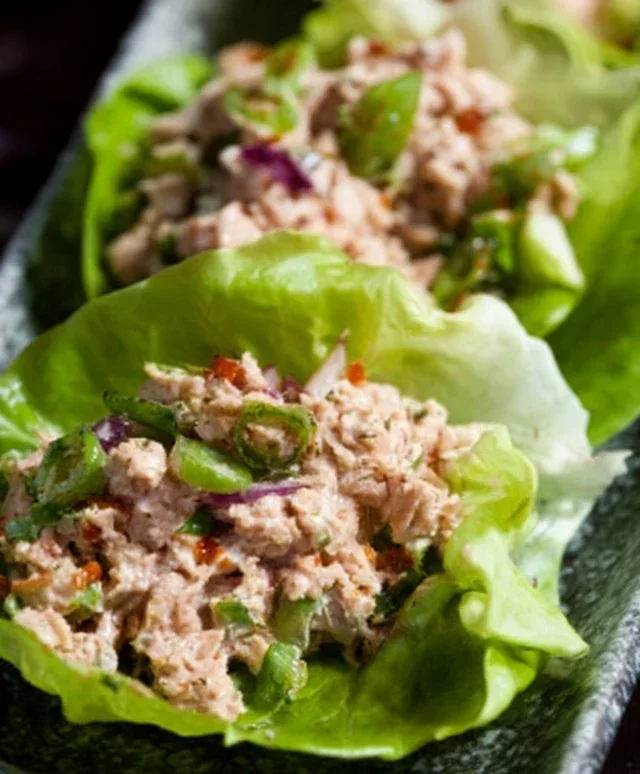
Easy Tuna Lettuce Wraps- Quick & Healthy Lunch
Tuna lettuce wraps are a revelation for anyone seeking a light, satisfying, and incredibly flavorful meal. We all crave those dishes that hit all the right notes – fresh, crunchy, creamy, and zesty – without weighing us down, and these tuna lettuce wraps deliver precisely that. It’s no wonder they’ve become a go-to for quick lunches, healthy dinners, or even impressive appetizers. What truly sets these tuna lettuce wraps apart is their sheer versatility and the effortless elegance they bring to your table. You can customize them with your favorite crunchy vegetables, a squeeze of lime, or a sprinkle of herbs, making each bite a delightful adventure. They offer a fantastic way to enjoy the deliciousness of tuna in a healthier, more refreshing format, perfect for those warm days or when you just need a guilt-free indulgence. Get ready to fall in love with this simple yet spectacular dish.
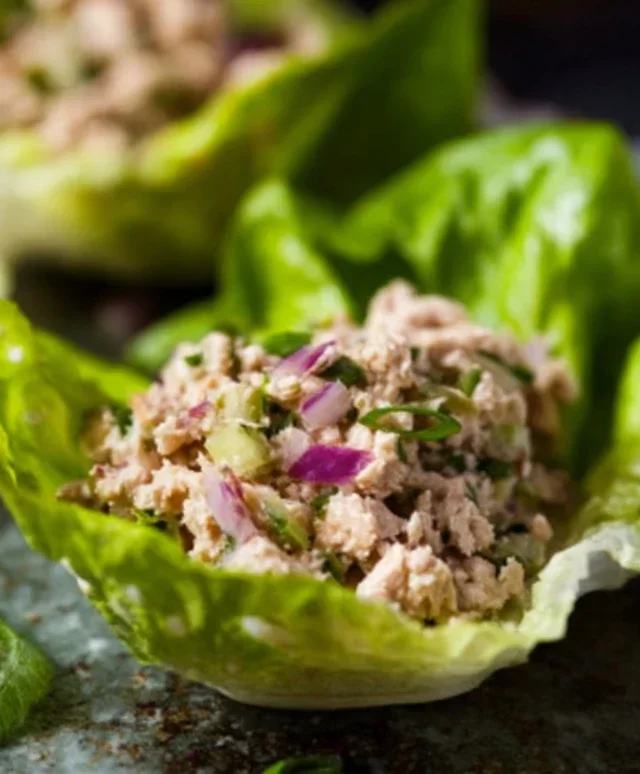
Tuna Lettuce Wraps: A Light and Delicious Lunch
Looking for a quick, healthy, and incredibly satisfying lunch option? These Tuna Lettuce Wraps are a game-changer. They’re incredibly versatile, allowing you to customize them to your heart’s content, and they require minimal cooking, making them perfect for even the busiest of days. Forget heavy, carb-laden sandwiches; these refreshing wraps are packed with flavor and goodness, offering a delightful crunch and a burst of fresh taste with every bite. They’re also naturally gluten-free and can be easily adapted for various dietary preferences.
Ingredients:
Instructions:
Preparing the Tuna Filling
The heart of these wraps is the delicious tuna salad. The key to a fantastic tuna salad is using good quality tuna and balancing the flavors. I prefer albacore tuna for its firm texture and mild, sweet flavor, but you can use any canned tuna you have on hand.
Step 1: Drain the Tuna.
Begin extract by thoroughly draining your canned albacore tuna. For best results, I like to use a fine-mesh sieve to ensure as much liquid as possible is removed. Squeeze out any excess water gently with the back of a spoon. This step is crucial to prevent your tuna salad from becoming watery and to ensure all the other flavors meld together beautifully. Place the drained tuna into a medium-sized mixing bowl.
Step 2: Flake the Tuna.
Using a fork, gently flake the drained tuna into smaller pieces. You don’t want it to be a paste, but rather have some nice texture. Break up any larger chunks so that it’s easy to mix with the other ingredients.
Step 3: Add the Wet Ingredients and Seasonings.
Now it’s time to bring it all together. Add the mayonnaise to the flaked tuna. Start with the 1/3 cup, and you can always add a touch more if you prefer a creamier consistency. Next, incorporate the whole grain mustard. The mustard adds a lovely tang and a subtle spice that complements the tuna perfectly. Then, stir in the finely diced celery and the finely diced red onion. The celery provides a fantastic crunch and freshness, while the red onion, after being rinsed and drained, offers a mild sweetness and a hint of sharpness without being overpowering. Finally, add the chopped fresh parsley for a burst of herbaceous flavor. Season generously with salt and freshly ground black pepper. Remember, you can always adjust the seasonings later to suit your personal taste.
Step 4: Mix Gently.
Carefully mix all the ingredients together until they are just combined. It’s important not to overmix, as this can make the tuna salad mushy. You want to maintain some of that lovely texture from the tuna, celery, and onion. Give it a taste and adjust the salt, pepper, or even a tiny bit more mayonnaise or mustard if needed. Sometimes, a squeeze of lemon juice can also add a wonderful brightness if you have one handy!
Assembling the Wraps
This is where the magic happens, transforming a simple tuna salad into a light and refreshing meal. The crisp lettuce leaves act as the perfect vessel, providing a cool and refreshing contrast to the savory filling.
Step 5: Prepare the Lettuce Cups.
While the tuna salad is resting for a moment, prepare your lettuce. Gently separate the leaves from the head of butter lettuce or Bibb lettuce. These types of lettuce are ideal because their leaves are large, pliable, and have a natural cup shape, making them perfect for holding the filling. Rinse the lettuce leaves under cool water and then pat them very dry with a clean kitchen towel or paper towels. Excess water on the lettuce can make the wraps soggy, so this is an important step for maintaining their crispness. Arrange the dry lettuce leaves on a platter or individual plates, ready to be filled.
Step 6: Fill and Serve.
Once your tuna salad is seasoned to perfection and your lettuce cups are ready, it’s time to assemble. Spoon a generous amount of the tuna salad mixture into each lettuce leaf. Don’t be afraid to pile it on! You can serve these immediately for a light lunch or a fantastic appetizer. For an even more delightful experience, you can add a sprinkle of extra chopped parsley on top of the filling for visual appeal and an extra pop of freshness.
Expert Tips for Perfect Tuna Lettuce Wraps:
Enjoy these delightful and healthy Tuna Lettuce Wraps – a perfect way to enjoy a flavorful and light meal!
Conclusion:
These Tuna Lettuce Wraps are a fantastic option for a light, healthy, and incredibly quick meal. They’re perfect for those busy weeknights or when you’re craving something satisfying without a lot of fuss. The refreshing crunch of the lettuce paired with the flavorful tuna filling creates a delightful texture and taste sensation that’s hard to beat. I truly hope you give this recipe a try; it’s become a go-to in my kitchen!
For serving, these wraps are wonderful on their own as a light lunch or appetizer. They also pair beautifully with a side of sweet potato fries, a fresh fruit salad, or even a light quinoa salad for a more substantial meal. Don’t be afraid to get creative with your filling! Consider adding diced celery for extra crunch, a pinch of red pepper flakes for a bit of heat, or even some chopped hard-boiled eggs for added protein.
The beauty of these Tuna Lettuce Wraps lies in their versatility. You can easily customize the ingredients to suit your preferences. Feel free to swap out the mayonnaise for Greek yogurt for a lighter, tangier option, or experiment with different herbs like chives or dill. This recipe is a wonderfully adaptable base for your culinary adventures, so have fun with it!
Frequently Asked Questions:
Can I make the tuna filling ahead of time?
Absolutely! The tuna filling can be prepared a day in advance and stored in an airtight container in the refrigerator. This makes assembly even quicker when you’re ready to eat.
What kind of lettuce works best for these wraps?
Crisp lettuce varieties like butter lettuce, iceberg lettuce, or romaine hearts are ideal. They hold their shape well and provide a satisfying crunch.
Are there any vegetarian or vegan alternatives?
Yes! For a vegetarian option, you could try a chickpea “tuna” salad filling. For a vegan version, use mashed chickpeas with vegan mayonnaise and your favorite seasonings.
Tuna Lettuce Wraps
Quick and refreshing tuna lettuce wraps, perfect for a light lunch or appetizer.
Ingredients
-
10 oz canned albacore tuna (2 5oz cans)
-
1/3 cup mayonnaise
-
2 tbsp finely diced celery
-
2 tbsp finely diced red onion, rinsed in cold water
-
1 tsp whole grain mustard
-
1 tsp chopped fresh parsley
-
Salt, to taste
-
Pepper, to taste
-
Butter lettuce, or Bibb lettuce
Instructions
-
Step 1
Drain the canned albacore tuna well. -
Step 2
In a medium bowl, combine the drained tuna, mayonnaise, finely diced celery, and rinsed red onion. -
Step 3
Add the whole grain mustard and chopped fresh parsley to the tuna mixture. -
Step 4
Season with salt and pepper to taste. Stir until all ingredients are well combined. -
Step 5
Wash and separate the butter lettuce or Bibb lettuce leaves. Ensure they are dry. -
Step 6
Spoon the tuna mixture into the lettuce leaves to create wraps.
Important Information
Nutrition Facts (Per Serving)
It is important to consider this information as approximate and not to use it as definitive health advice.
Allergy Information
Please check ingredients for potential allergens and consult a health professional if in doubt.